The clutch master looks cool. One thing you may have checked but thought I would run it by you. I had looked into the same location but was concerned about clearing the inner fender with the master. Have you checked that? Also thinking through the arc that the rod is making from start to finish, make sure the end of the stroke is not to much of an angle. We use the Wilwood masters for the kits we sell at American Powertrain and one of the failures we see is the master blowing out do to the angle at beginning and at the end of the stroke. Since you are near the top of the pedal there is probably not that much arc. If it feels smooth and is probably good to go!
Barry
Hackster's F100 #2 CV Swap 6 speed manual and Coyote
Moderator: FORDification
-
IN2FORD
- Preferred User

- Posts: 345
- Joined: Sun Apr 27, 2014 3:54 pm
- Location: Cookeville TN
-
hackster
- Preferred User
- Posts: 317
- Joined: Fri Oct 18, 2013 11:21 am
Re: Hackster's F100 #2 CV Swap 6 speed manual and Coyote
Good Points my friend...IN2FORD wrote:The clutch master looks cool. One thing you may have checked but thought I would run it by you. I had looked into the same location but was concerned about clearing the inner fender with the master. Have you checked that? Also thinking through the arc that the rod is making from start to finish, make sure the end of the stroke is not to much of an angle. We use the Wilwood masters for the kits we sell at American Powertrain and one of the failures we see is the master blowing out do to the angle at beginning and at the end of the stroke. Since you are near the top of the pedal there is probably not that much arc. If it feels smooth and is probably good to go!
Barry
Should clear the inner fender by a good bit, its tight to that brace and luckily I have a truck next to it to check stuff like this. =)
The arc at the top is pretty small but the pedal is on its upsweep at that point. I checked it a couple times and it only lifts a tiny bit from beginning to end.
Master is super cool, small, black and pretty clean. Not too expensive and super easy to mount. I like the threaded rod and the heim joint on the end too, it gives me lots of adjustment for pedal height and stroke.
Thanks for the input.
Sean
-
my79f
- New Member

- Posts: 13
- Joined: Sun Jan 04, 2015 7:59 pm
Re: Hackster's F100 #2 CV Swap 6 speed manual and Coyote
With that master cylinder, are you going to move the pedal closer to the floor? Im sure you are familiar with how far off the floor the pedal is from factory. Have any shots of how you did it?
-
hackster
- Preferred User
- Posts: 317
- Joined: Fri Oct 18, 2013 11:21 am
Re: Hackster's F100 #2 CV Swap 6 speed manual and Coyote
I moved them a lot closer to the floor. I set the pedals up mostly to get the right travel length then set up the bottom of the travel to have the pedal at the floor, the upper height of both pedals are about the same in relation to each other.my79f wrote:With that master cylinder, are you going to move the pedal closer to the floor? Im sure you are familiar with how far off the floor the pedal is from factory. Have any shots of how you did it?
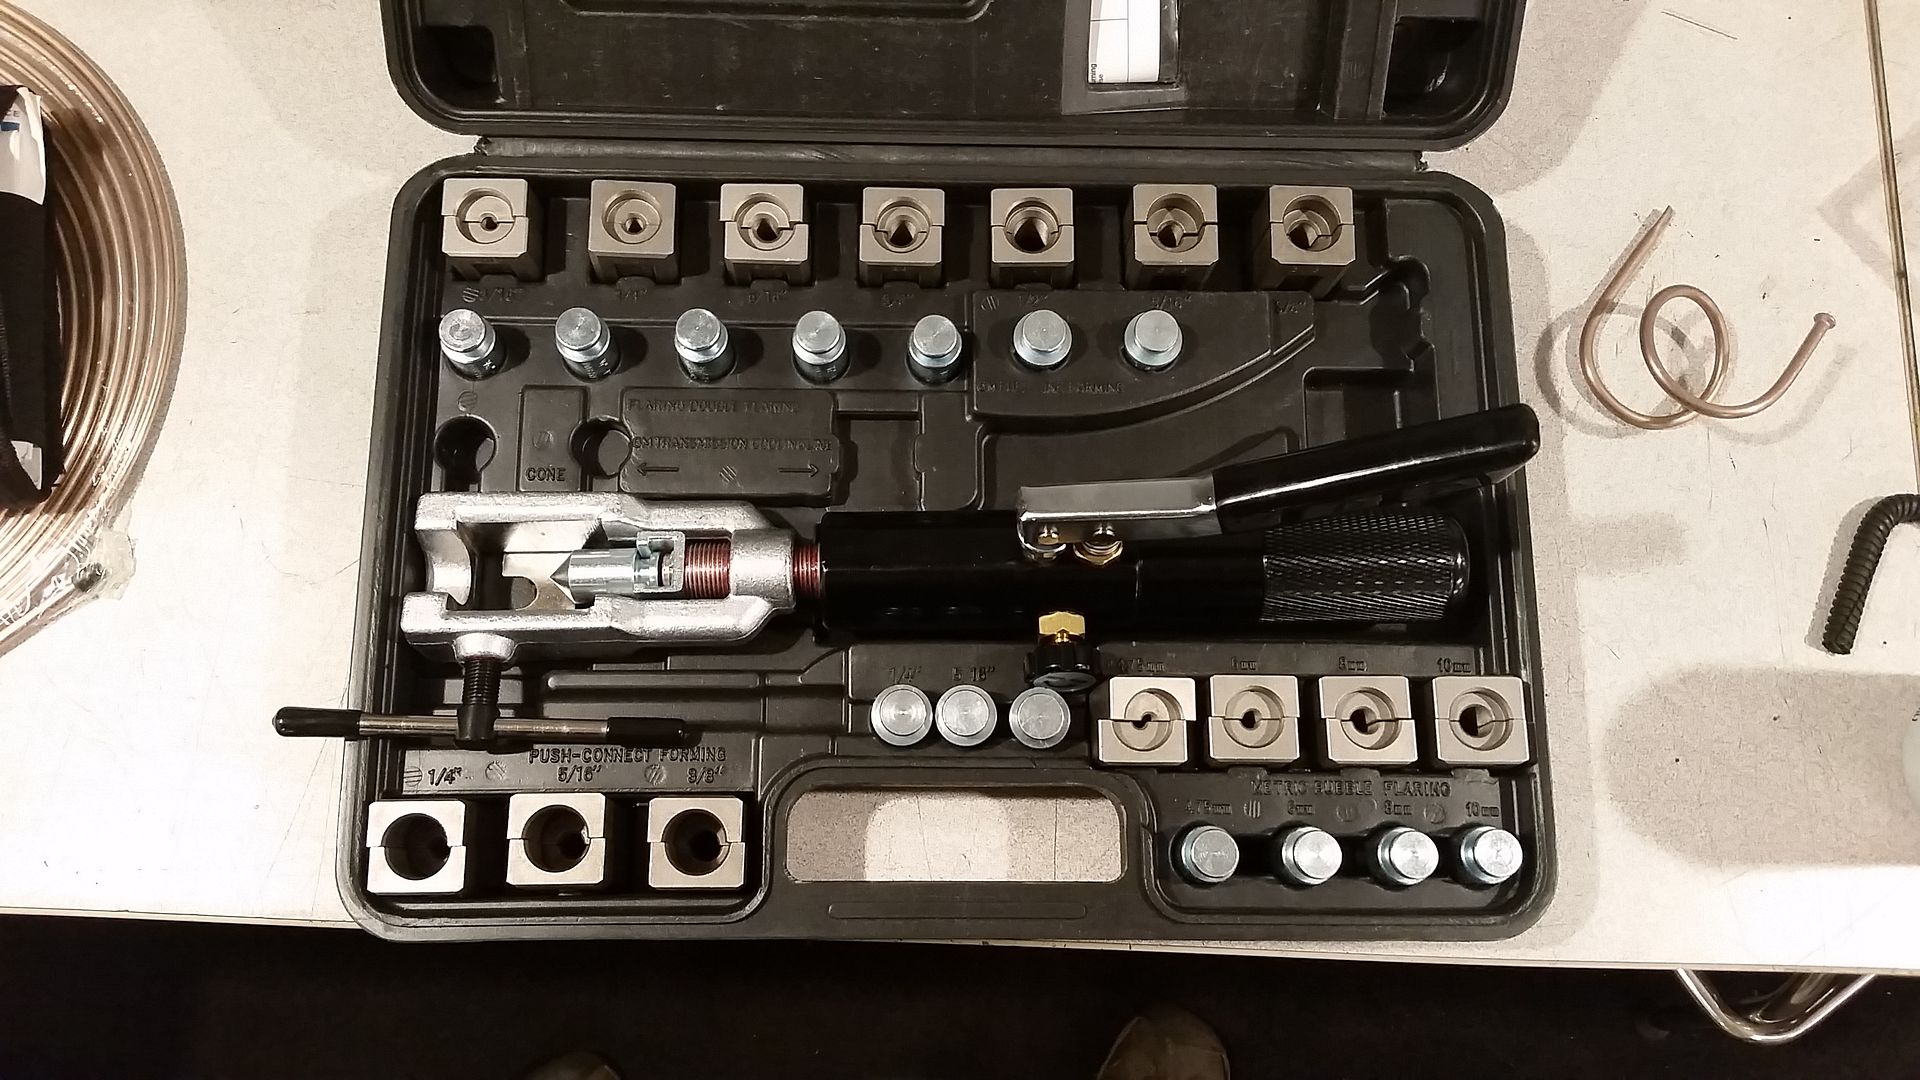
Messed around with some rear brake lines tonight. Not too sure I am 100% happy with them and I got fed up with the piece of **** flare tool I have and ordered the mastercool 71475 setup. Its badass. Should be here Wednesday and Ill keep on with the lines.
Running the NiCopp lines is awesome. Ill never use anything else again.


Sean
-
48prerunner

- Preferred User
- Posts: 495
- Joined: Thu Sep 30, 2010 5:44 pm
Re: Hackster's F100 #2 CV Swap 6 speed manual and Coyote
master cool flare tool is really nice wish I ha bought on years ago. I went with braided steel lines for a cobra mustang for the flex lines . I ran the hard lines inside the boxing plates.
-
IN2FORD
- Preferred User
- Posts: 345
- Joined: Sun Apr 27, 2014 3:54 pm
- Location: Cookeville TN
Re: Hackster's F100 #2 CV Swap 6 speed manual and Coyote
How did you lower the pedal set closer to the floor?
Barry
Barry
-
hackster
- Preferred User
- Posts: 317
- Joined: Fri Oct 18, 2013 11:21 am
Re: Hackster's F100 #2 CV Swap 6 speed manual and Coyote
Sorry I did not make that clear. I lowered the pedals closer to the firewall by reducing their overall travel. They are still theoretically at the same mounting height off of the floor. I never thought about making them closer to the floor though, that is something that is totally doable. Hell, I think I could pretty easily make them height adjustable as well.....IN2FORD wrote:How did you lower the pedal set closer to the floor?
Barry
Did the stainless lines for the mustang bolt up to the stock calipers just fine? Length was long enough to get you to the framerail? Any idea what year of Cobra? Like 03-04?48prerunner wrote:master cool flare tool is really nice wish I ha bought on years ago. I went with braided steel lines for a cobra mustang for the flex lines . I ran the hard lines inside the boxing plates.
I am not happy with the line under the truck, its coming out tonight. The ones at the rear I am pretty happy with. Not too sure how I would get them inside the rails anyways. I should be able to get the long run under the cab from the rear crossmember inside the frame rails behind the boxing plates. Might take a little help drilling and tapping those holes and getting the line in the clamp.
Thanks for the feedback, flare tool should be here today.
Sean
-
48prerunner
- Preferred User
- Posts: 495
- Joined: Thu Sep 30, 2010 5:44 pm
Re: Hackster's F100 #2 CV Swap 6 speed manual and Coyote
I have explorer brakes in the back and crown vic in front. I used weld on brackets to attach lines to the rear and front frame rails. I bought the lines on ebay they were Russel lines. I think I used the front on the rear and the rears on the front. I know the one braided line I bought from Jegs to go from frame to the rear had a deformed flare.
-
IN2FORD
- Preferred User
- Posts: 345
- Joined: Sun Apr 27, 2014 3:54 pm
- Location: Cookeville TN
Re: Hackster's F100 #2 CV Swap 6 speed manual and Coyote
Hey Sean I am working on my fuel door for the bed. I used a 6" hole saw(wow those are cheap either) and cut my hole above the fuel inlet. I picked up a fuel door off of a Saturn because the lid is just pinched on to the frame/hinge. removed the lid and tacked the piece I cut out to the frame. Now I am trying to finish out the hinge mount but I am running into a problem with it being round. It is hitting the back of the hole when you lift it up. Square hole probably would have worked fine. I just wanted to see how you did yours.
Barry
Barry
-
hackster
- Preferred User
- Posts: 317
- Joined: Fri Oct 18, 2013 11:21 am
Re: Hackster's F100 #2 CV Swap 6 speed manual and Coyote
You gotta get the right fuel door... The one from the saturn is probably just a flip open from a square door. The key is getting something with a round door. It will be hinged from farther back on the quarter panel or wherever it mounts and kind of cam over a little bit. This way when you pull on the door it moves out away from the bed floor before it actualy opens.
Does that make sense?
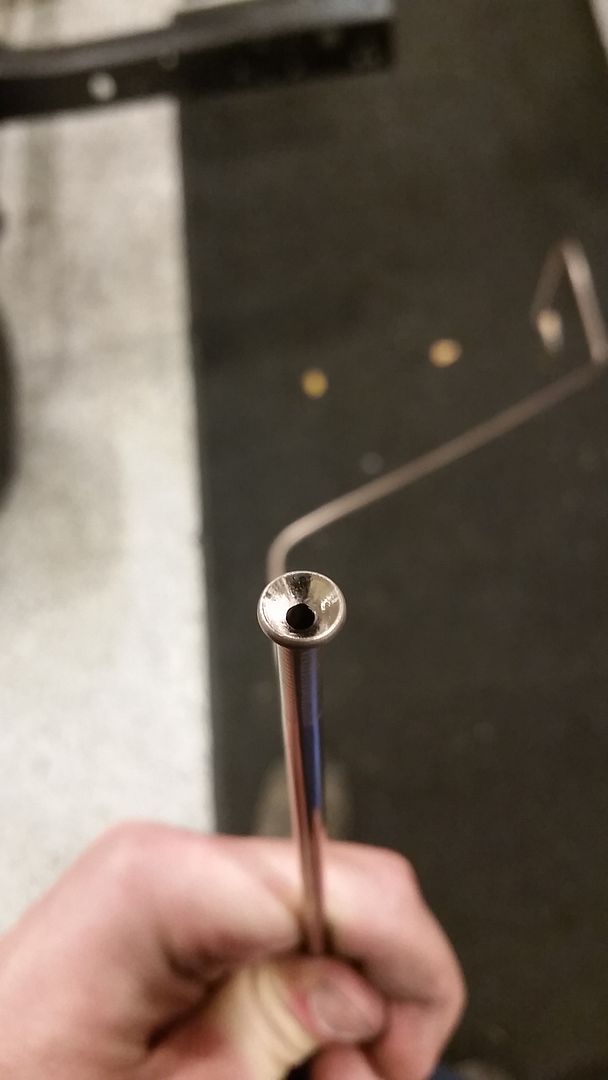
I got the mastercool today. Oh lord jesus that thing is amazing. Perfect flares everytime.
Bending up some of the front lines. This one goes from the master Cylinder over to the passenger side of the crossmember. Ill have a union there.

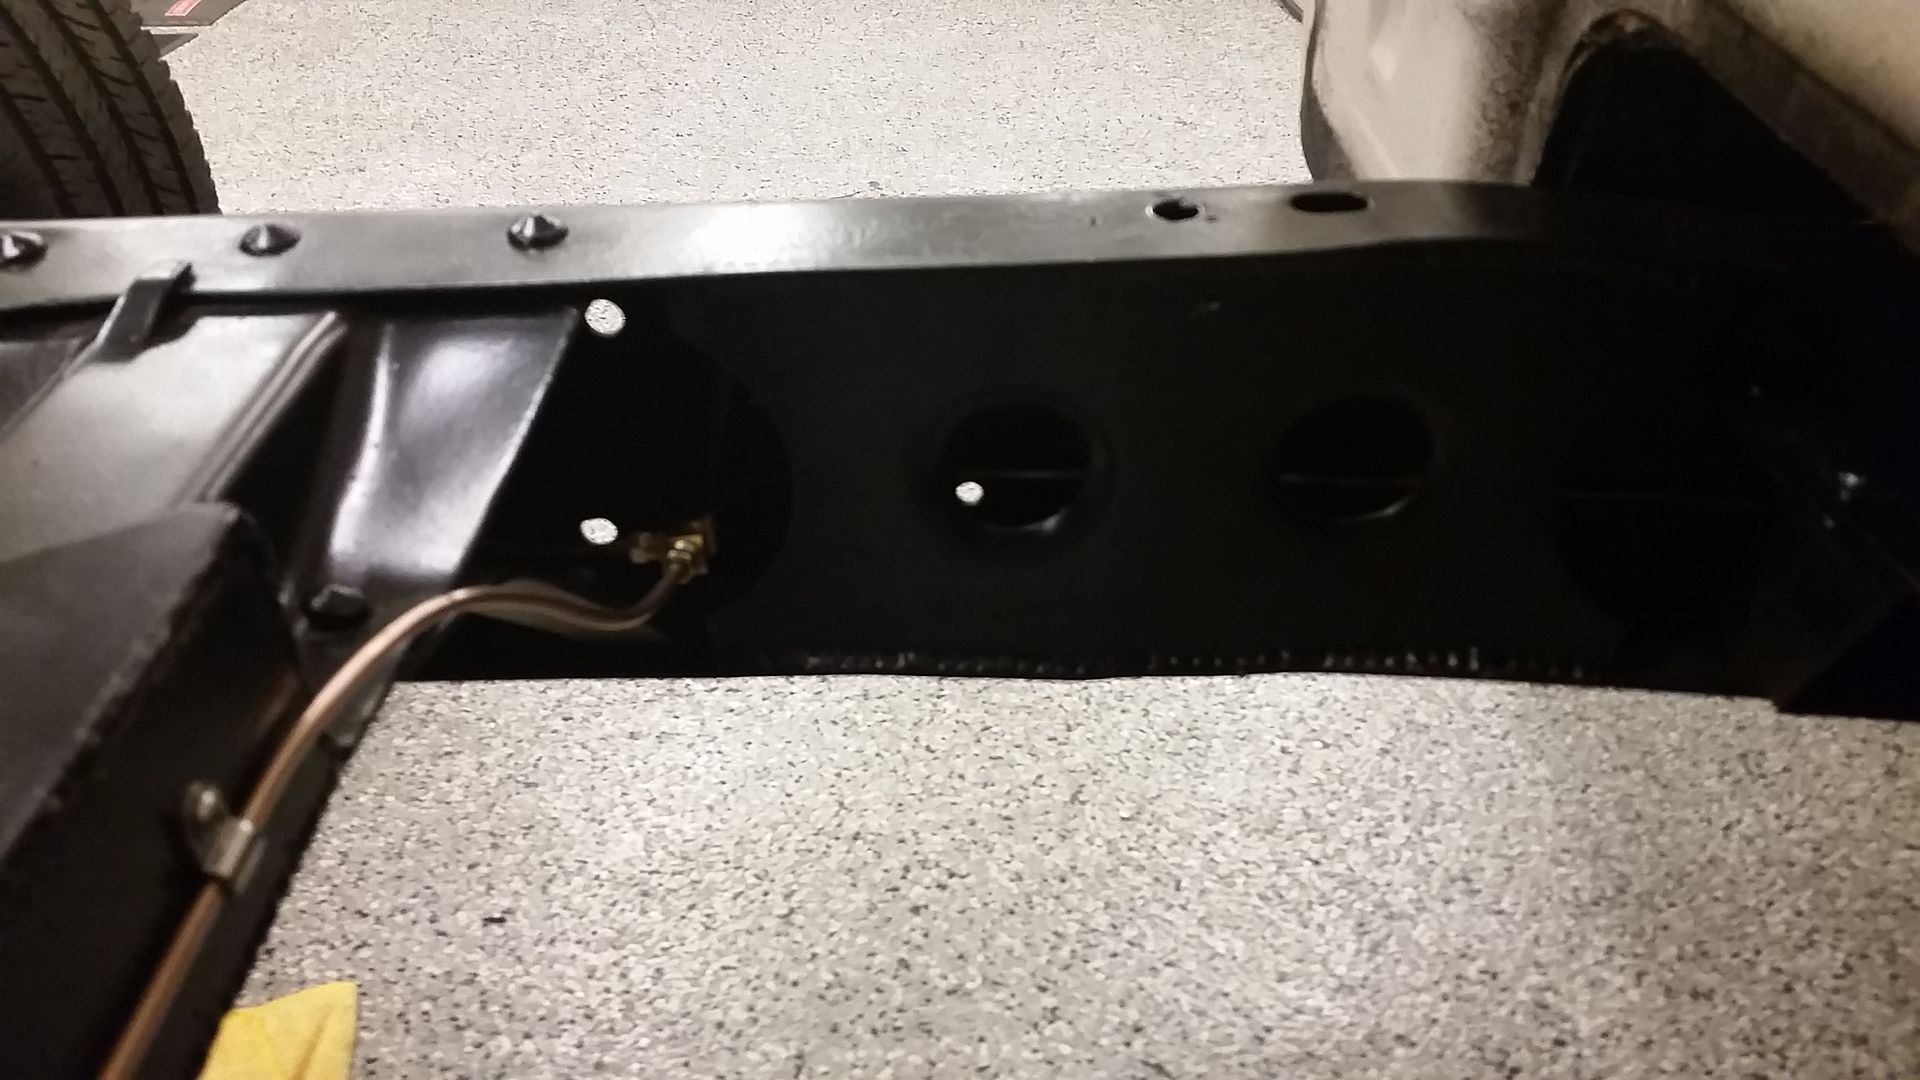
I also tore off the brake line under the cab and ran it in the framerail. Should have done it that way the first go around. Looks so much better.
Brake lines up to the master cylinder. Rear is the farthest one back, Passenger next and driver to the front.
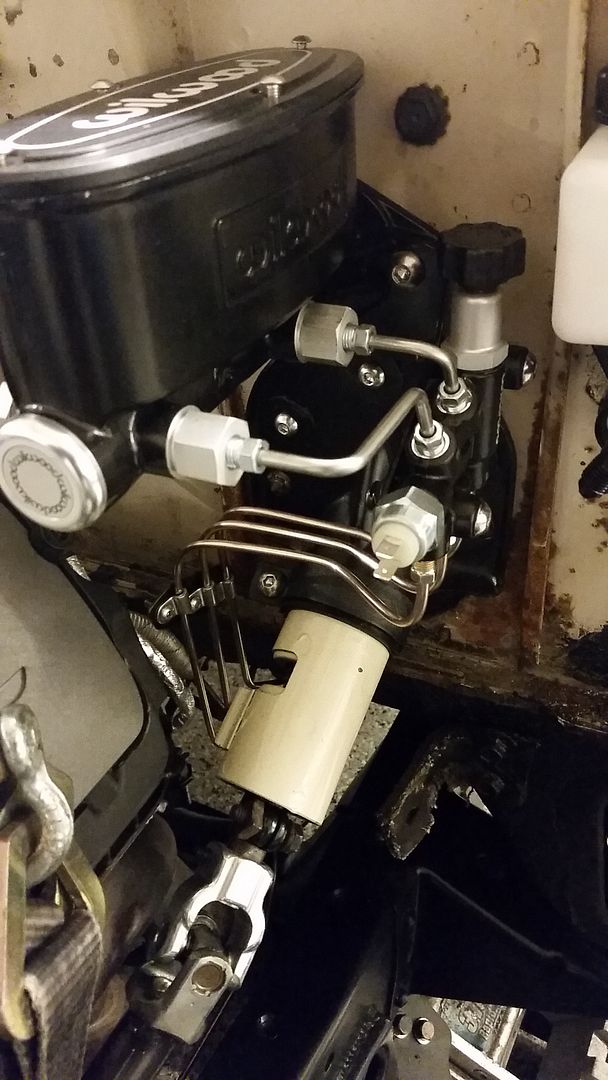
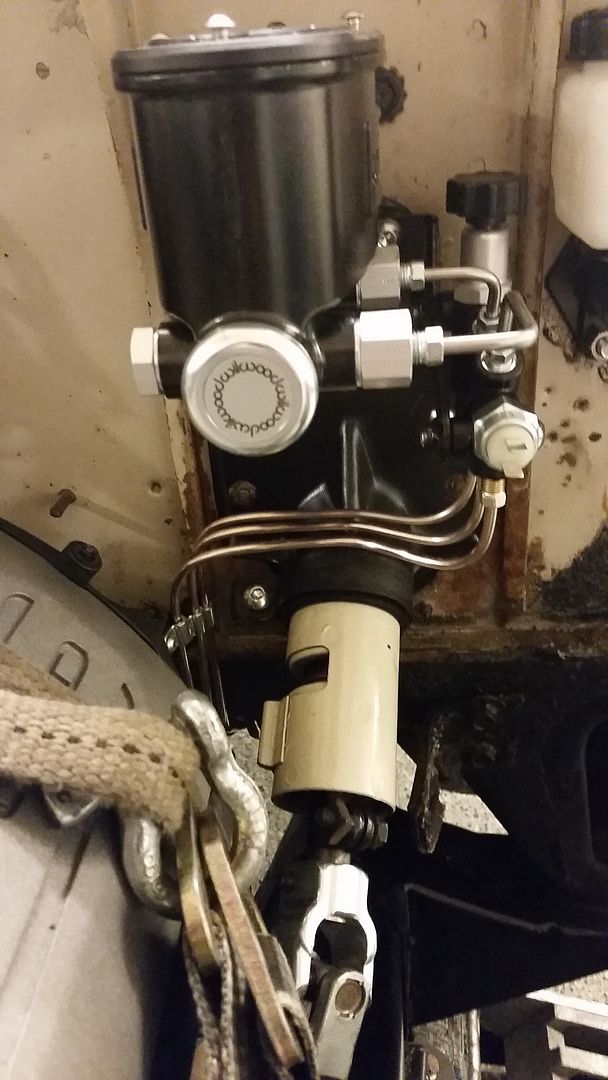
Bracket to hold the lines apart and where they need to go. Probably have another one farther down the line, just trying to keep it clean.
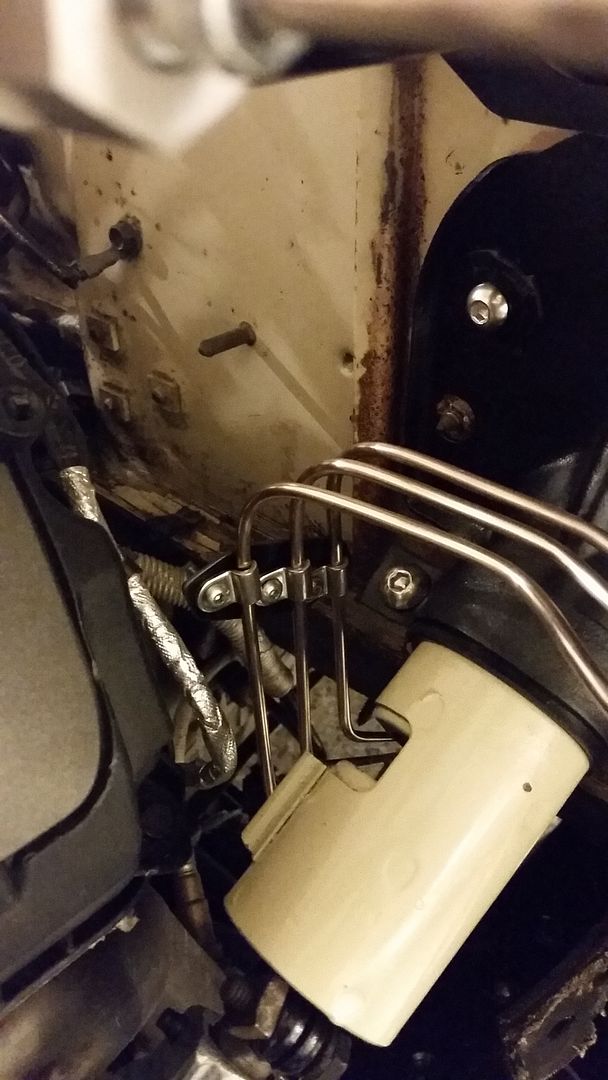
Pretty happy with how they are coming out.
Sean
Does that make sense?
I got the mastercool today. Oh lord jesus that thing is amazing. Perfect flares everytime.


Bending up some of the front lines. This one goes from the master Cylinder over to the passenger side of the crossmember. Ill have a union there.

I also tore off the brake line under the cab and ran it in the framerail. Should have done it that way the first go around. Looks so much better.

Brake lines up to the master cylinder. Rear is the farthest one back, Passenger next and driver to the front.


Bracket to hold the lines apart and where they need to go. Probably have another one farther down the line, just trying to keep it clean.

Pretty happy with how they are coming out.
Sean
-
BossGB385

- New Member
- Posts: 22
- Joined: Thu May 21, 2015 10:25 pm
- Location: Ga
Re: Hackster's F100 #2 CV Swap 6 speed manual and Coyote
Very impressive. 
-
IN2FORD
- Preferred User
- Posts: 345
- Joined: Sun Apr 27, 2014 3:54 pm
- Location: Cookeville TN
Re: Hackster's F100 #2 CV Swap 6 speed manual and Coyote
Yea makes good sense Sean. I have tacked the saturn frame to the bed piece I cut out but I may head back to the junkyard and find a round door to work with. Brake lines look good Sean. nicop is the way to go for sure. It was easy to deal with for a first timer like me.
Barry
Barry
-
hackster
- Preferred User
- Posts: 317
- Joined: Fri Oct 18, 2013 11:21 am
Re: Hackster's F100 #2 CV Swap 6 speed manual and Coyote
Thank you!!BossGB385 wrote:Very impressive.
I had a roll of UltraBend nickel copper and a roll of NiCopp. I was was way more impressed with the ultra bend stuff. Thicker, a little harder to bend but stronger.IN2FORD wrote:Yea makes good sense Sean. I have tacked the saturn frame to the bed piece I cut out but I may head back to the junkyard and find a round door to work with. Brake lines look good Sean. nicop is the way to go for sure. It was easy to deal with for a first timer like me.
Barry
Thanks for the props.
Picked up some stainless lines and fittings locally and after a really ***** day at work I bent up the rest of the hard lines, welded the front tabs on, got the stainless lines all fit up and the one union on the truck installed.
Passenger is inside the framerail driver is outside, there was no way to tuck it in there...maybe when I pull the motor this weekend Ill see if I can snake it through there.


Happy with how these turned out. They should be plenty out of the way of the tires at full turn and with that, the brakes are 100% plumbed, just need to weld on the rear tabs and I can tighten up all the fittings, hell I could fill it with fluid and bleed it all too.
Ordered wheels this morning. Nothing custom as I am not 100% sure I can squeeze the big ass tires on there. 18x10's all the way around. Planning on 285/35/18 front and rear, I know its not going to be super low, and I might rub on the sway bar at full lock but if all my measurements are correct I should be damn close to fitting with no rubbing.
Lets see if this will work.. They are not high end, but should be plenty good enough for some auto cross and track days, light and will clear big brakes. Mine are matte black though.
http://i.ebayimg.com/00/s/MTIwMFgxNjAw/ ... VL/$_3.JPG
-
BossGB385
- New Member
- Posts: 22
- Joined: Thu May 21, 2015 10:25 pm
- Location: Ga
Re: Hackster's F100 #2 CV Swap 6 speed manual and Coyote
I like those. They look similar to some I bought a few months ago

-
IN2FORD
- Preferred User
- Posts: 345
- Joined: Sun Apr 27, 2014 3:54 pm
- Location: Cookeville TN
Re: Hackster's F100 #2 CV Swap 6 speed manual and Coyote
so whats the specs on the wheels. Offset and such.
Barry
Barry