You're going to have two trucks done before I even finish mine..
Hackster's F100 #2 CV Swap 6 speed manual and Coyote
Moderator: FORDification
- SATURN5
- New Member

- Posts: 157
- Joined: Tue Oct 02, 2012 1:08 pm
- Location: Kettering, Oh
Re: Hackster's F100 #2 CV Swap 6 speed manual and Coyote
Moving quick! Nice detail in your fab work.
You're going to have two trucks done before I even finish mine..
You're going to have two trucks done before I even finish mine..
Bob
68 F100 Flareside, CVIFS, Cobra IRS, DOHC, M122, MS3, T45, 4.10, Cobra brakes
84 Mustang SVO, B234F, HE351, Full Cobra spec suspension and brakes including IRS, T-tops
96 Mark VIII, Complete chassis bracing, 03 Cobra wheels, Maruader converter, built trans.
68 F100 Flareside, CVIFS, Cobra IRS, DOHC, M122, MS3, T45, 4.10, Cobra brakes
84 Mustang SVO, B234F, HE351, Full Cobra spec suspension and brakes including IRS, T-tops
96 Mark VIII, Complete chassis bracing, 03 Cobra wheels, Maruader converter, built trans.
-
JamesM72CS
- New Member

- Posts: 18
- Joined: Sun Feb 22, 2015 6:56 pm
Re: Hackster's F100 #2 CV Swap 6 speed manual and Coyote
Damn your fast and really skilled man. Keep up the good work!
-
hackster
- Preferred User

- Posts: 317
- Joined: Fri Oct 18, 2013 11:21 am
Re: Hackster's F100 #2 CV Swap 6 speed manual and Coyote
Thank you very much guys.....I like doing the fab work a lot. 
I am however exhausted. This week has been a ton of work.
Had to pick up some welding supplies this morning and get some more metal so it was an early morning on the road too.
Got home and got right to work on the truck until about 10 minutes ago.
Started off by marking off the rear frame for the small c notch and cutting a piece of 4" tubing for the notch. Keep in mind I dont have a lot of big tools here in the little garage so cutting through a piece of 4.5" 1/4" wall pipe was about as big as my little portaband could get through.
You can also see that my work area sometimes turns into a shithole too,
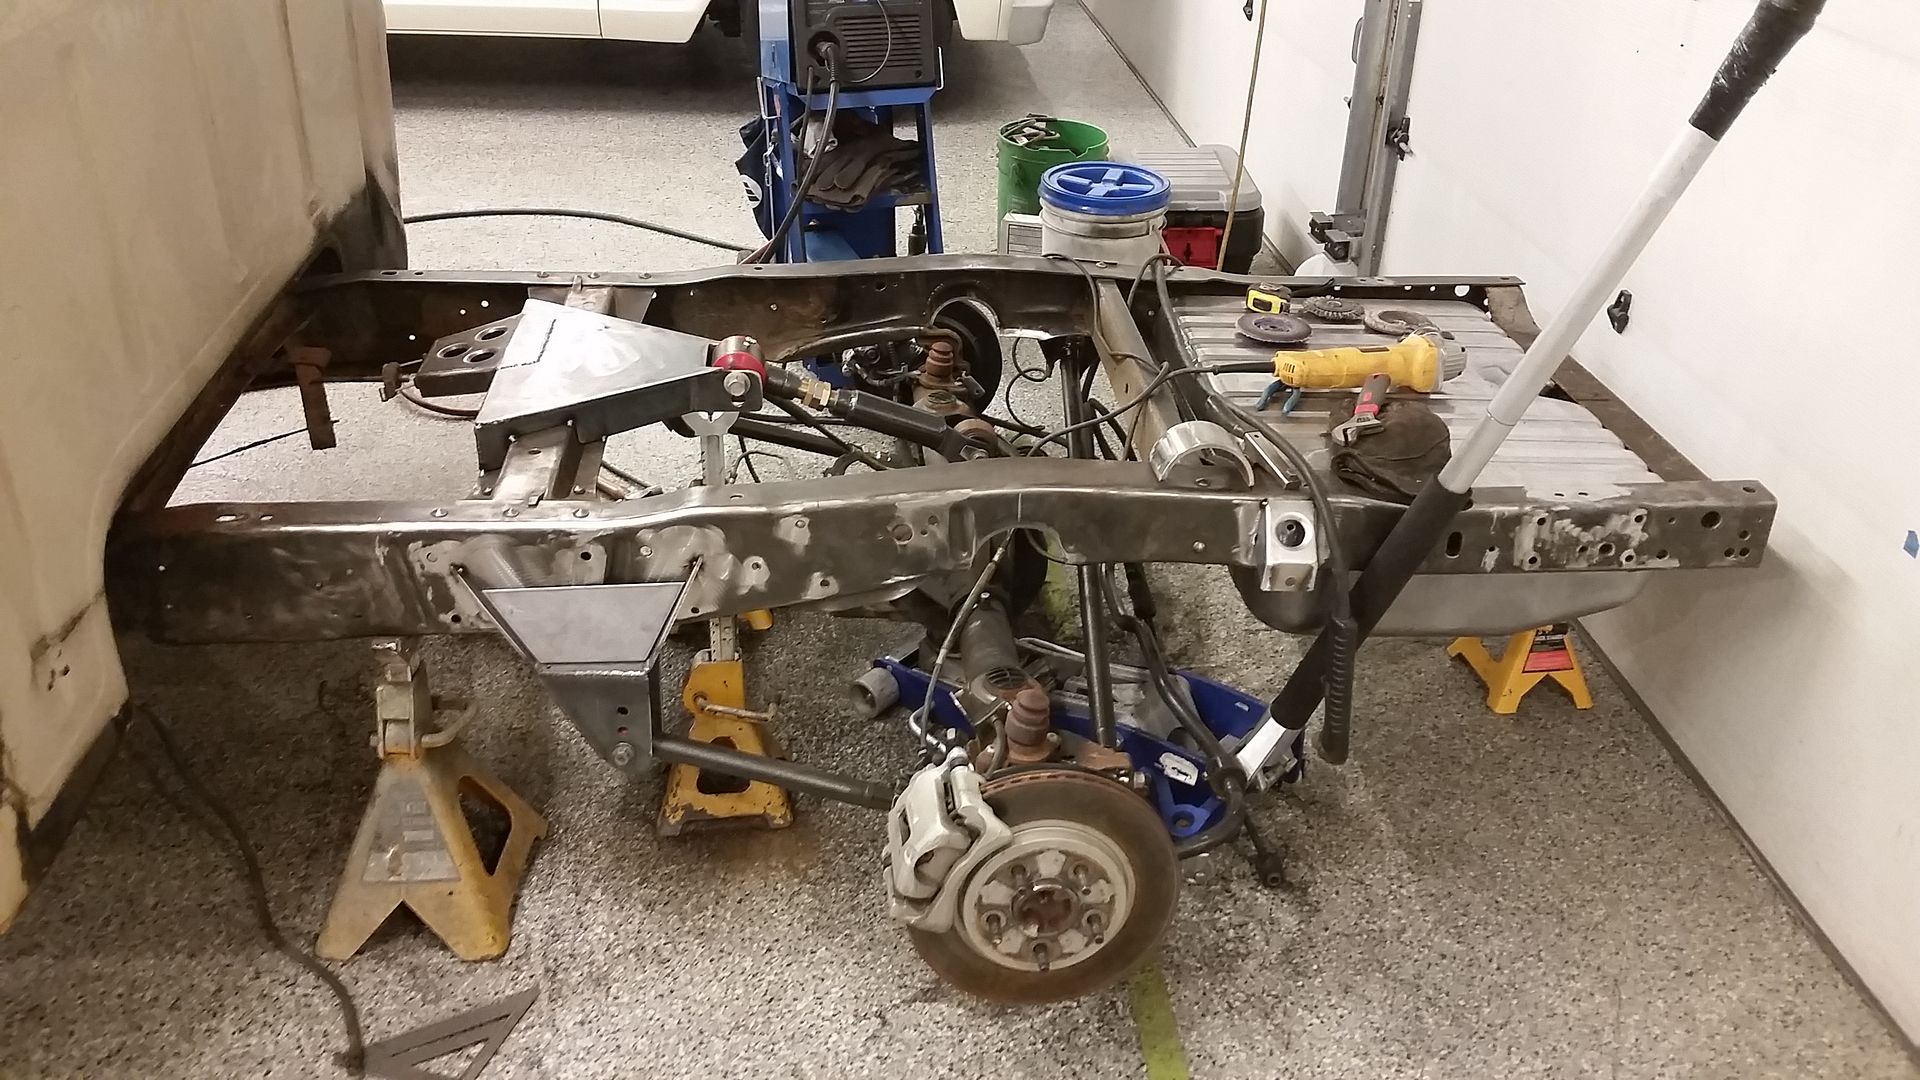
Got it prepped and burned it it good after supporting the rear of the frame.
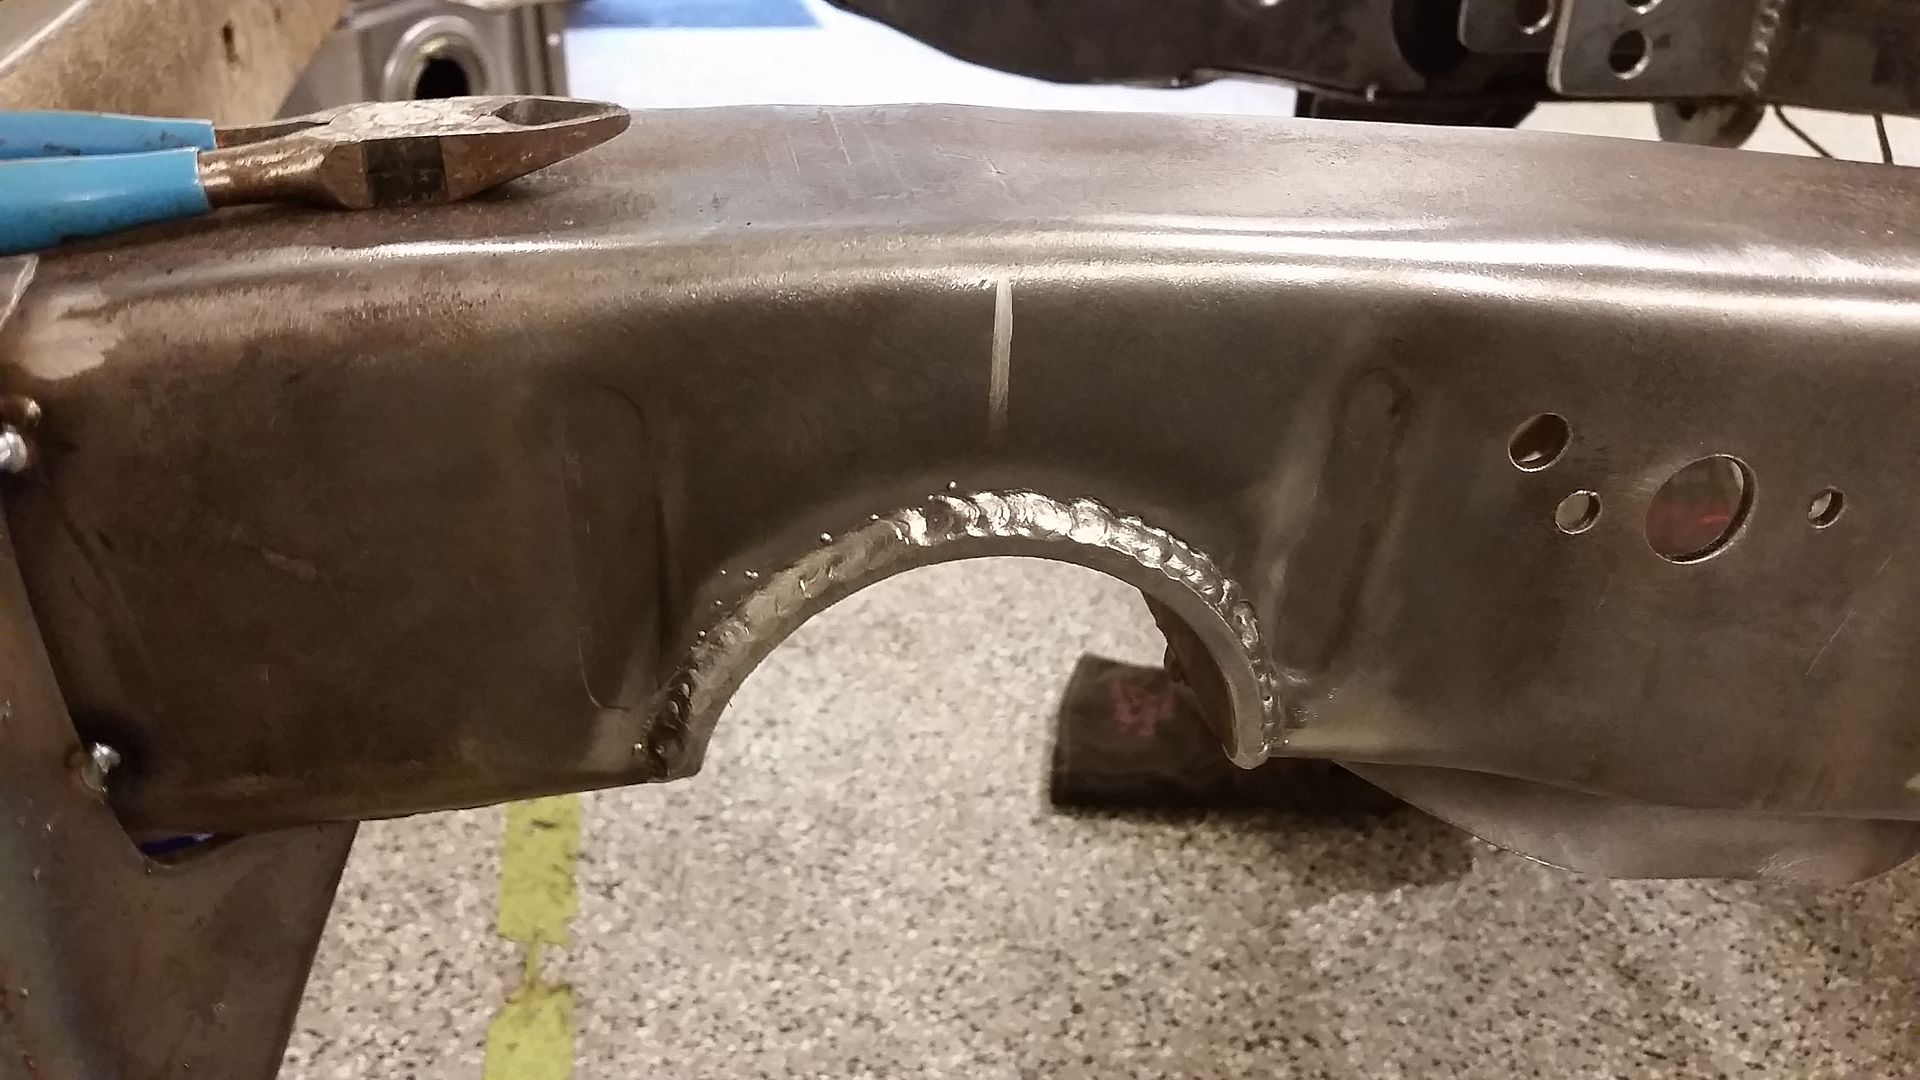
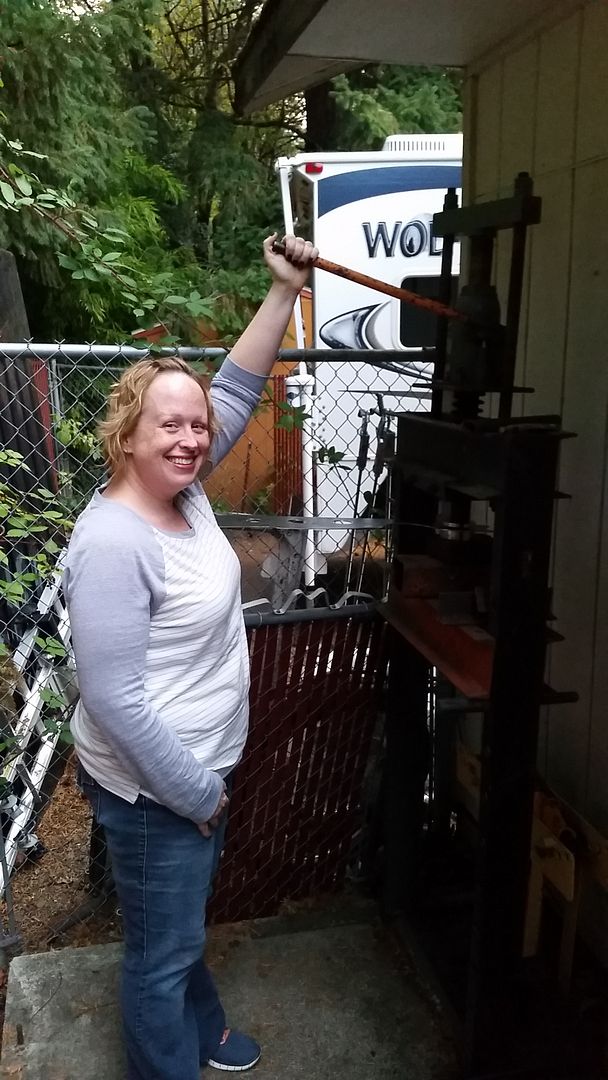
With both sides welded up good and the template made up I got these cut out and ready to get dimple died.....had to wait for my helper, she is the official dimple die operator.
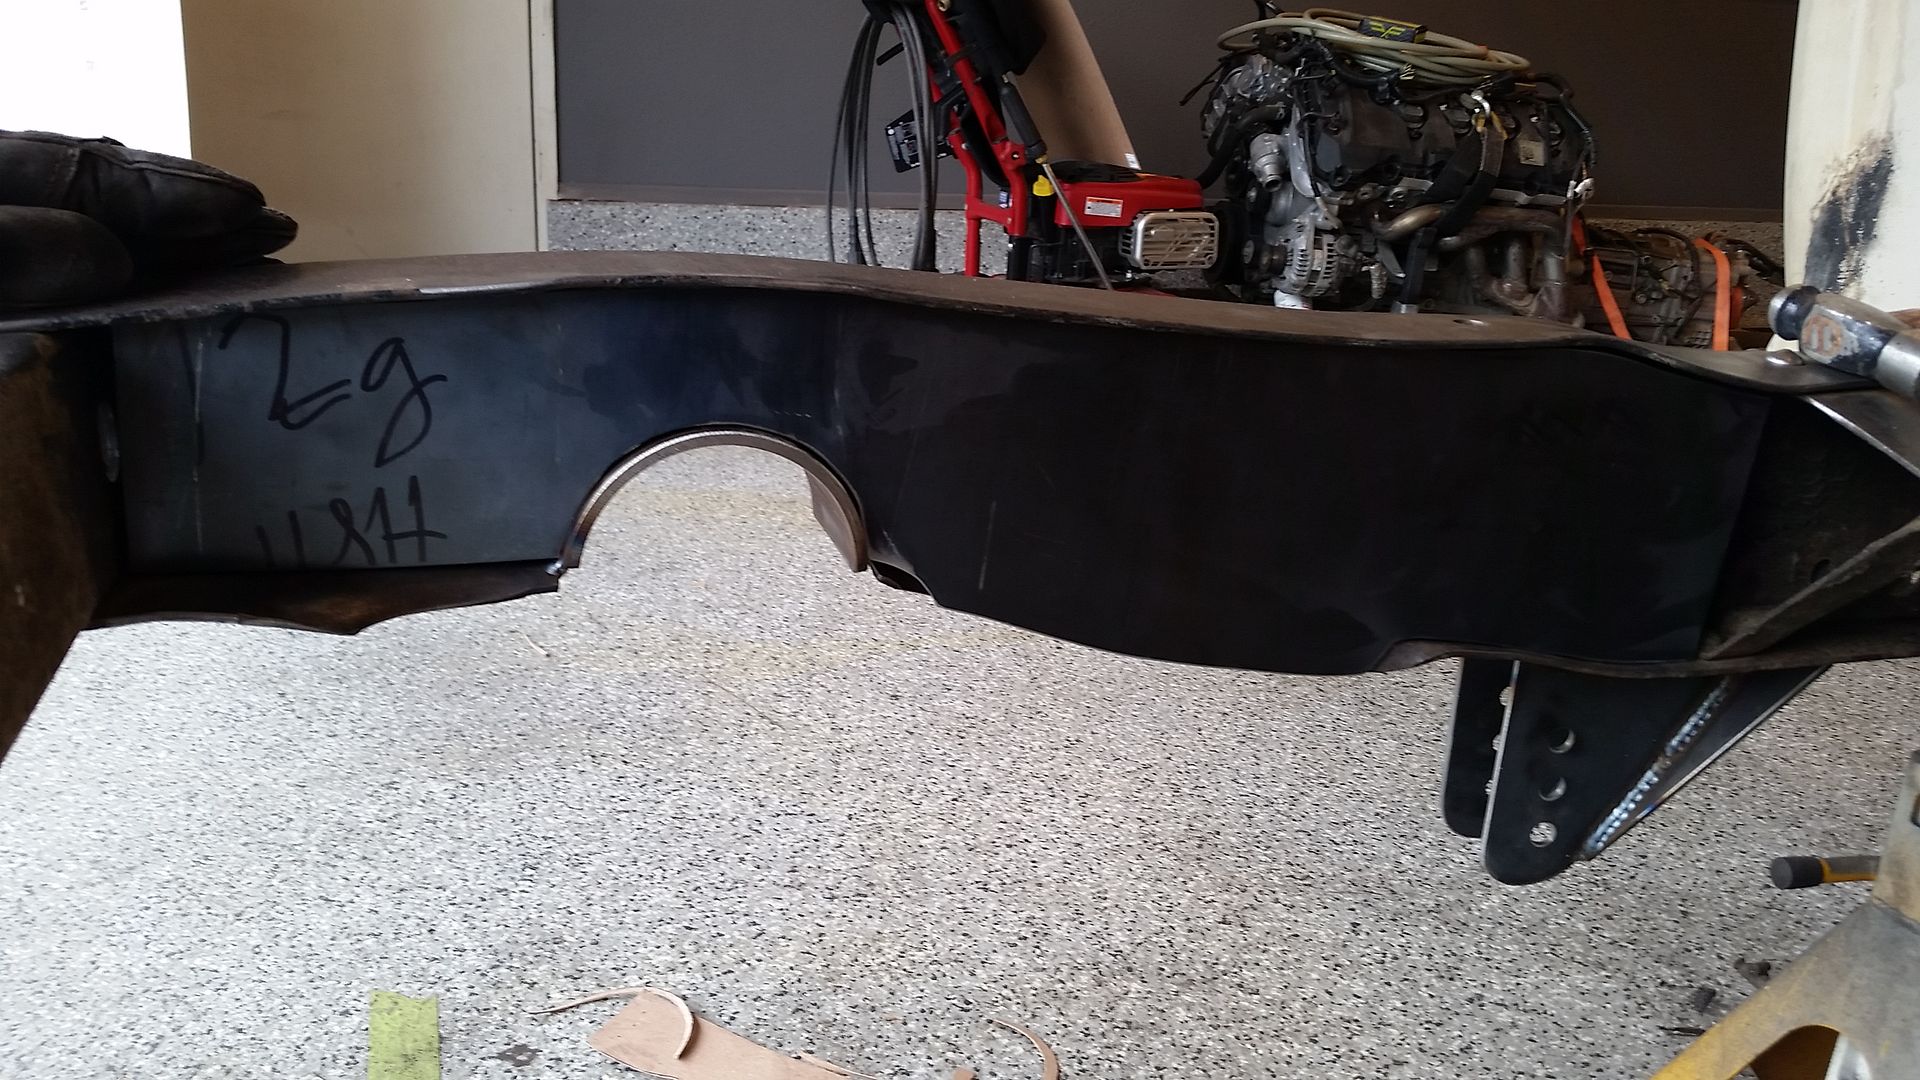
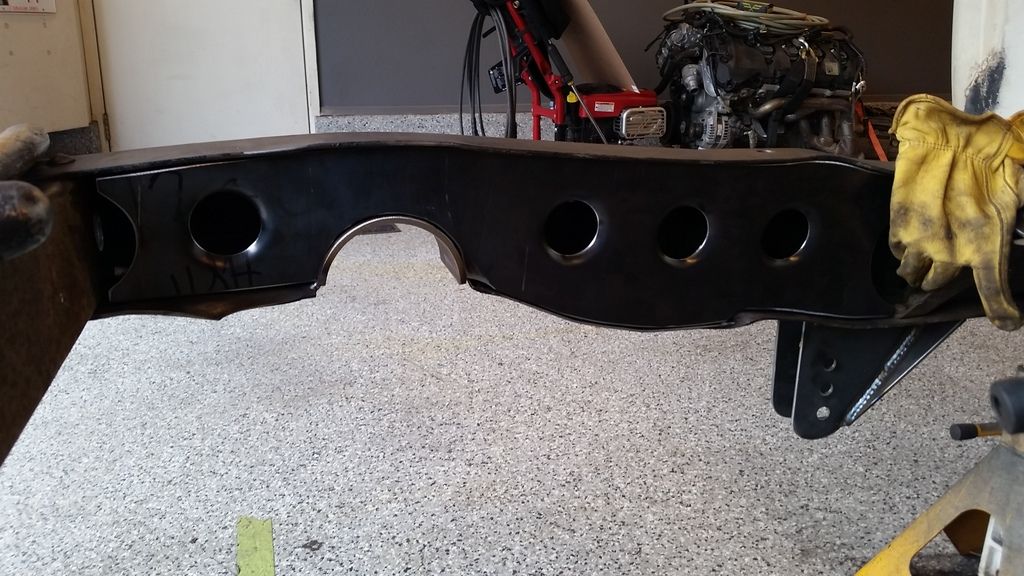
Pulled the tank links and rearend before hand so I could get to cleaning up all the undercoating inside the frame rails...that was fun.
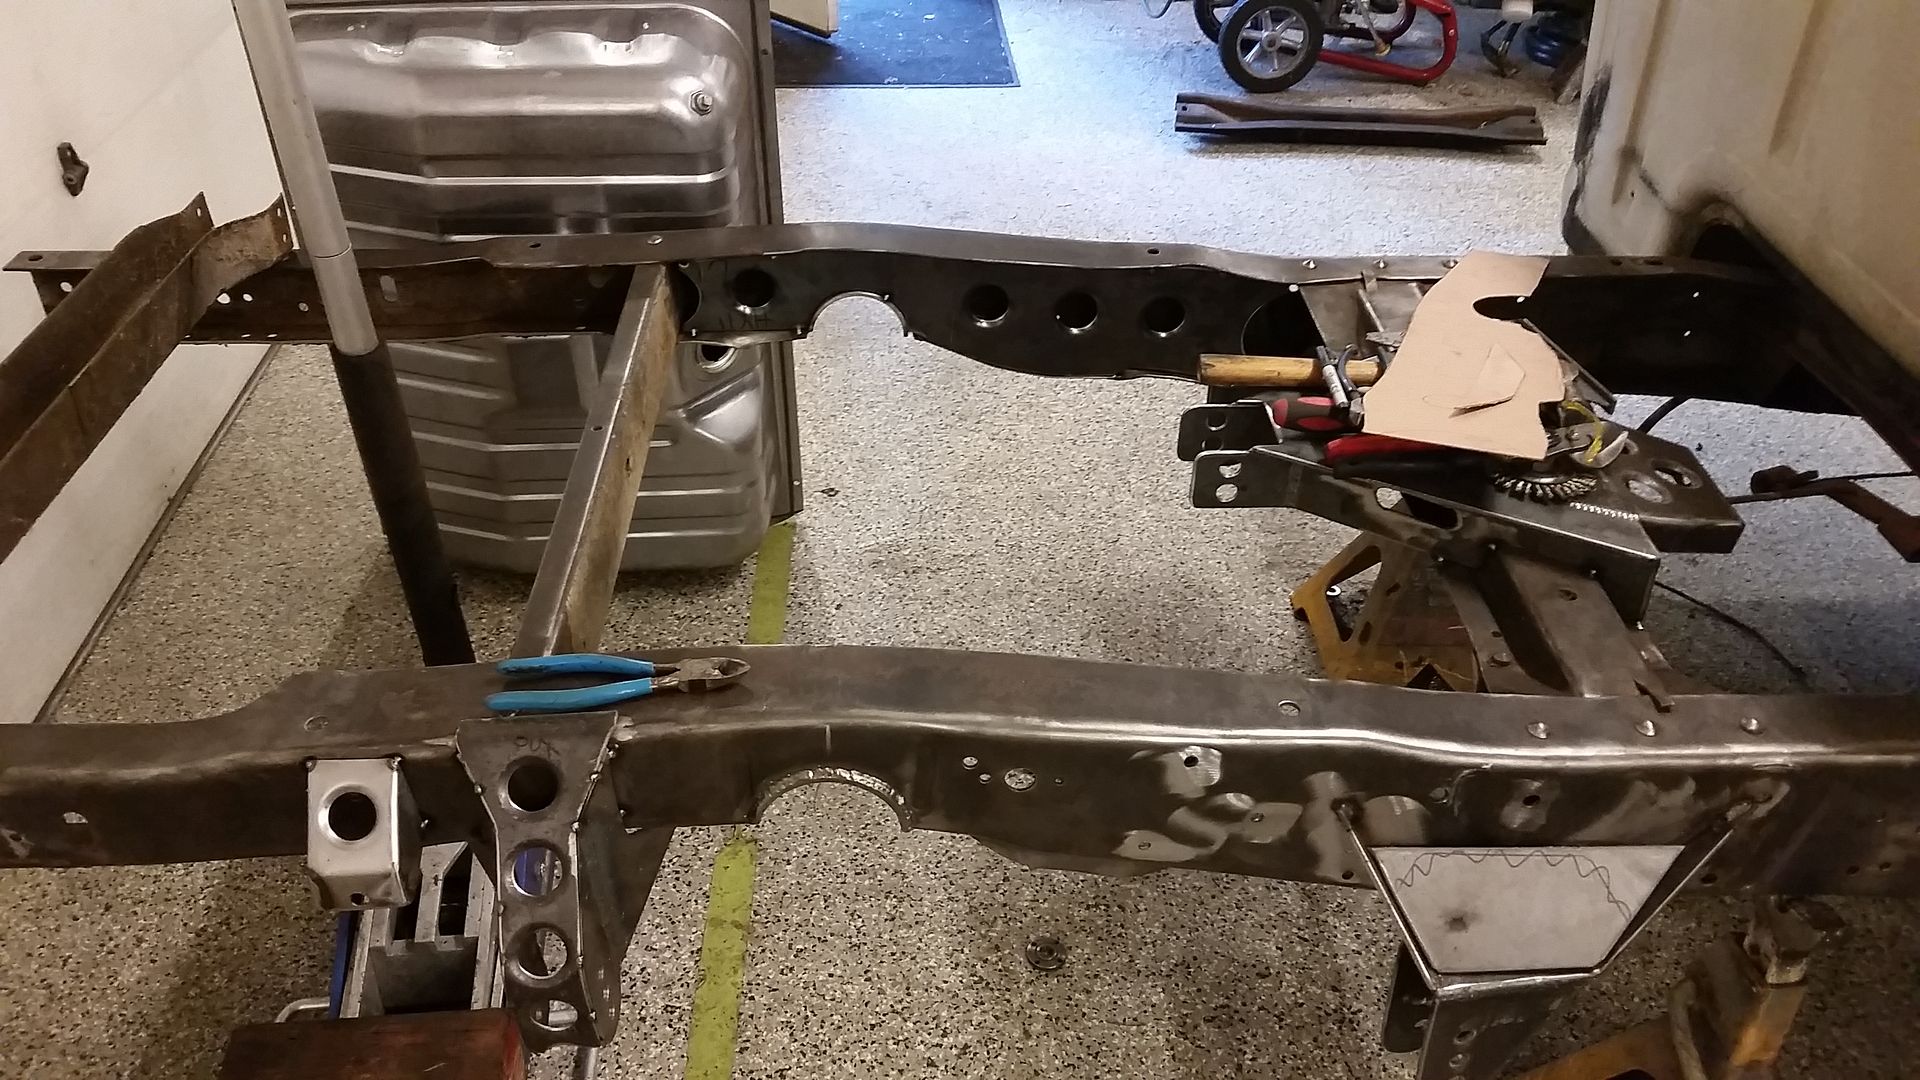
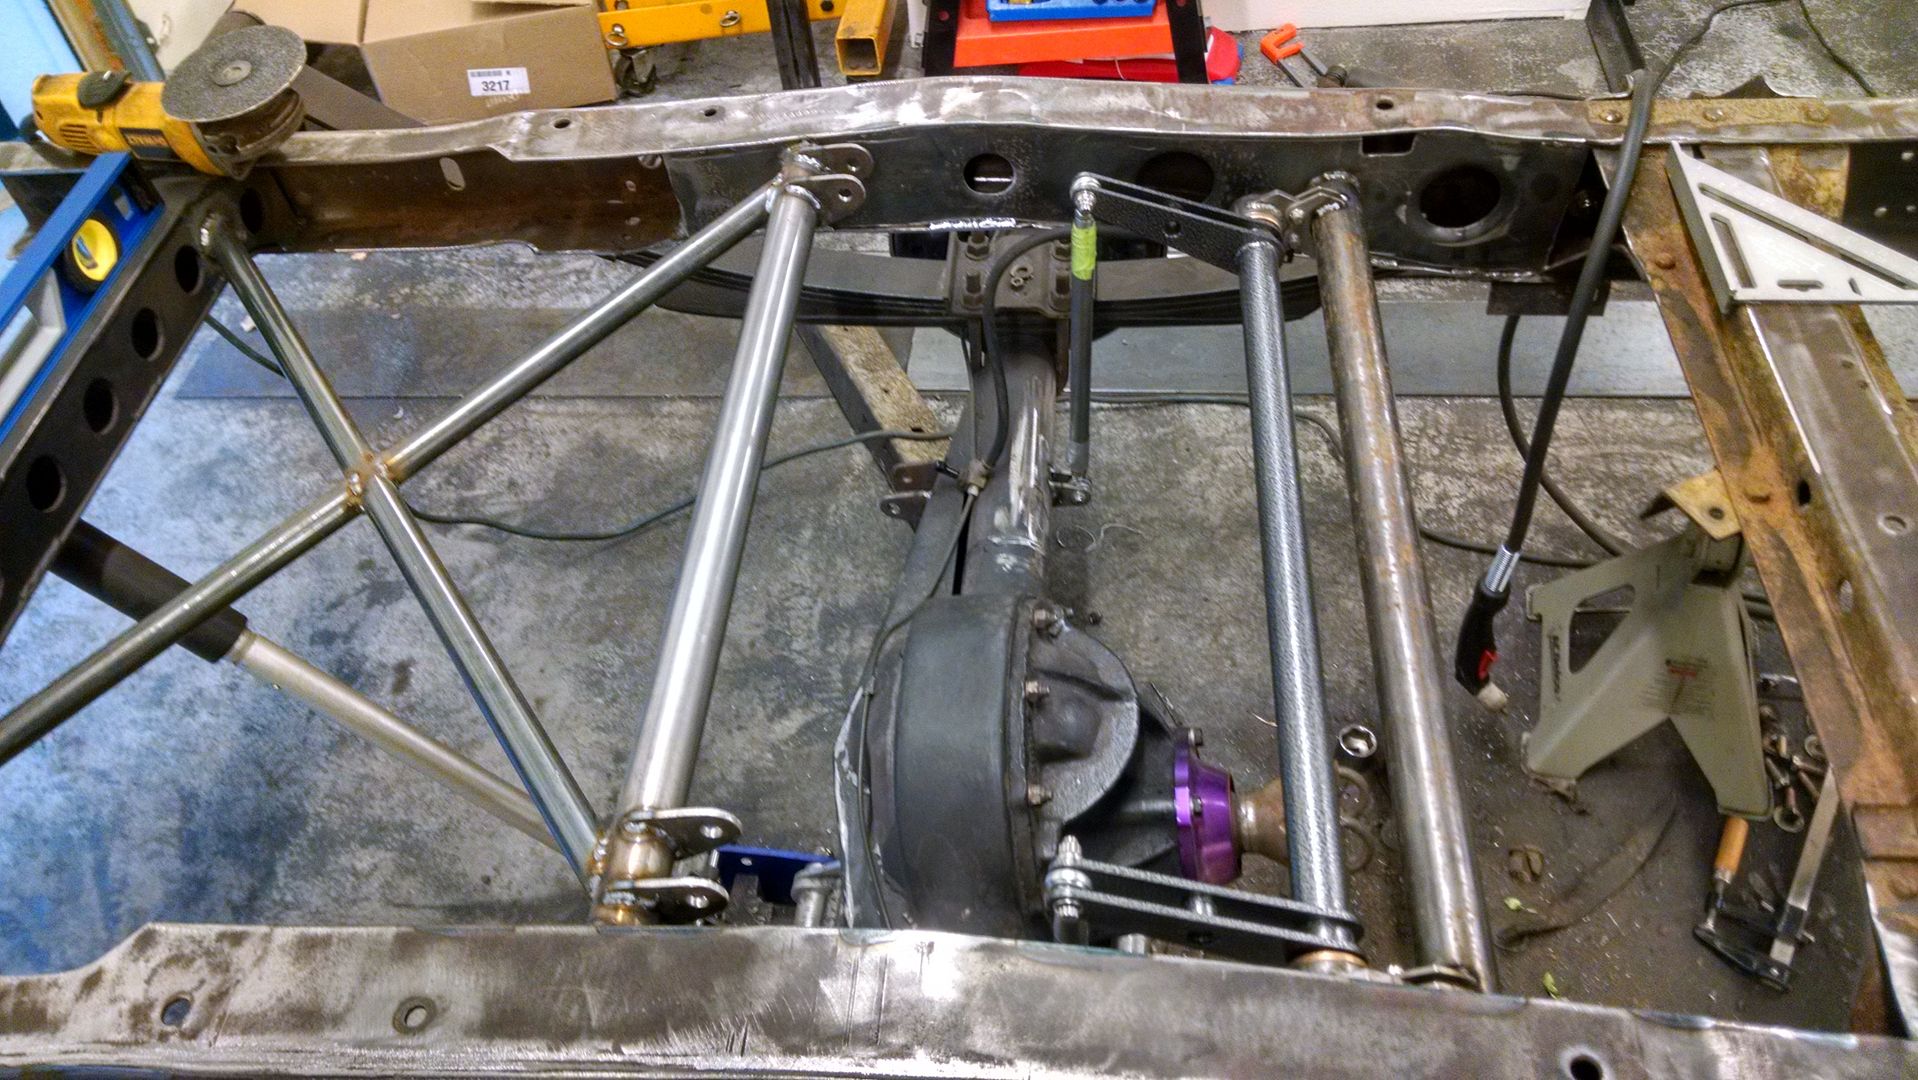
There is a ton of work into the back end of this old beater now......I like this pic.
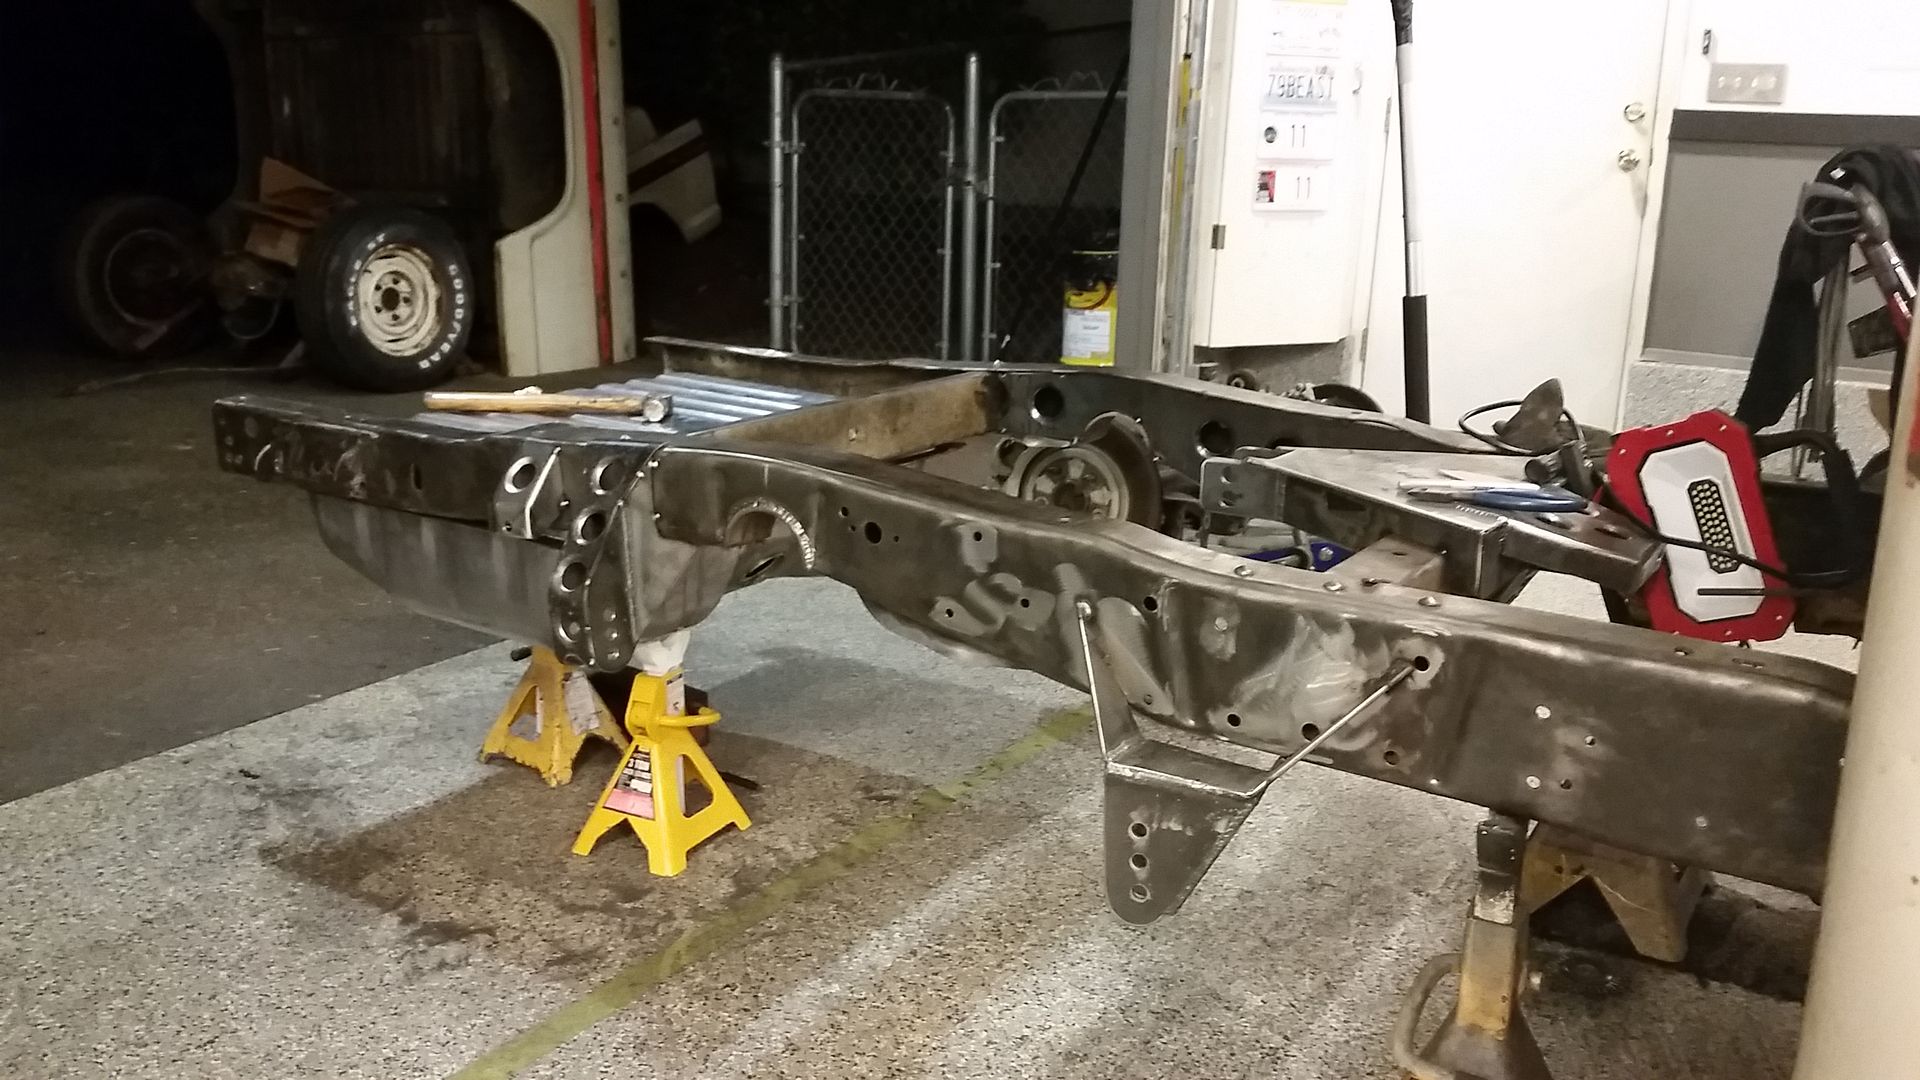
Also rear shocks and springs showed up today but I think they are too short. Anyone following along have a recommendation for how long of a shock you were able to tuck under your bed? Seems like I am going to be stuck with some pretty short guys.
Sean
I am however exhausted. This week has been a ton of work.
Had to pick up some welding supplies this morning and get some more metal so it was an early morning on the road too.
Got home and got right to work on the truck until about 10 minutes ago.
Started off by marking off the rear frame for the small c notch and cutting a piece of 4" tubing for the notch. Keep in mind I dont have a lot of big tools here in the little garage so cutting through a piece of 4.5" 1/4" wall pipe was about as big as my little portaband could get through.
You can also see that my work area sometimes turns into a shithole too,

Got it prepped and burned it it good after supporting the rear of the frame.

With both sides welded up good and the template made up I got these cut out and ready to get dimple died.....had to wait for my helper, she is the official dimple die operator.


Pulled the tank links and rearend before hand so I could get to cleaning up all the undercoating inside the frame rails...that was fun.

There is a ton of work into the back end of this old beater now......I like this pic.

Also rear shocks and springs showed up today but I think they are too short. Anyone following along have a recommendation for how long of a shock you were able to tuck under your bed? Seems like I am going to be stuck with some pretty short guys.
Sean
-
rollercam1
- New Member

- Posts: 129
- Joined: Thu May 14, 2015 10:34 am
Re: Hackster's F100 #2 CV Swap 6 speed manual and Coyote
I just installed my calvert racing 9 way adjustable shocks behind the rear. They ended up being installed at 14" ride height and 17" overall at full extension. The thing is, when the shock is at a vertical state, the shock rate is very fast. This makes them prone to heat up so a good shock is better. The more angle they are mounted, the slower the shock rate. This is why drag races mount the shocks vertical and manufactures mount them on an angle. It all depends on your desired results. The calverts are a really nice, heavy duty piece. Plus the adjustability is awesome. I think I paid a couple hundred for the pair shipped to Alaska. Here is a couple of pic's of mine during the mock up and install. The upper shock mount is at the very top of the frame, and the bottom is mounted at mid-point of the axle.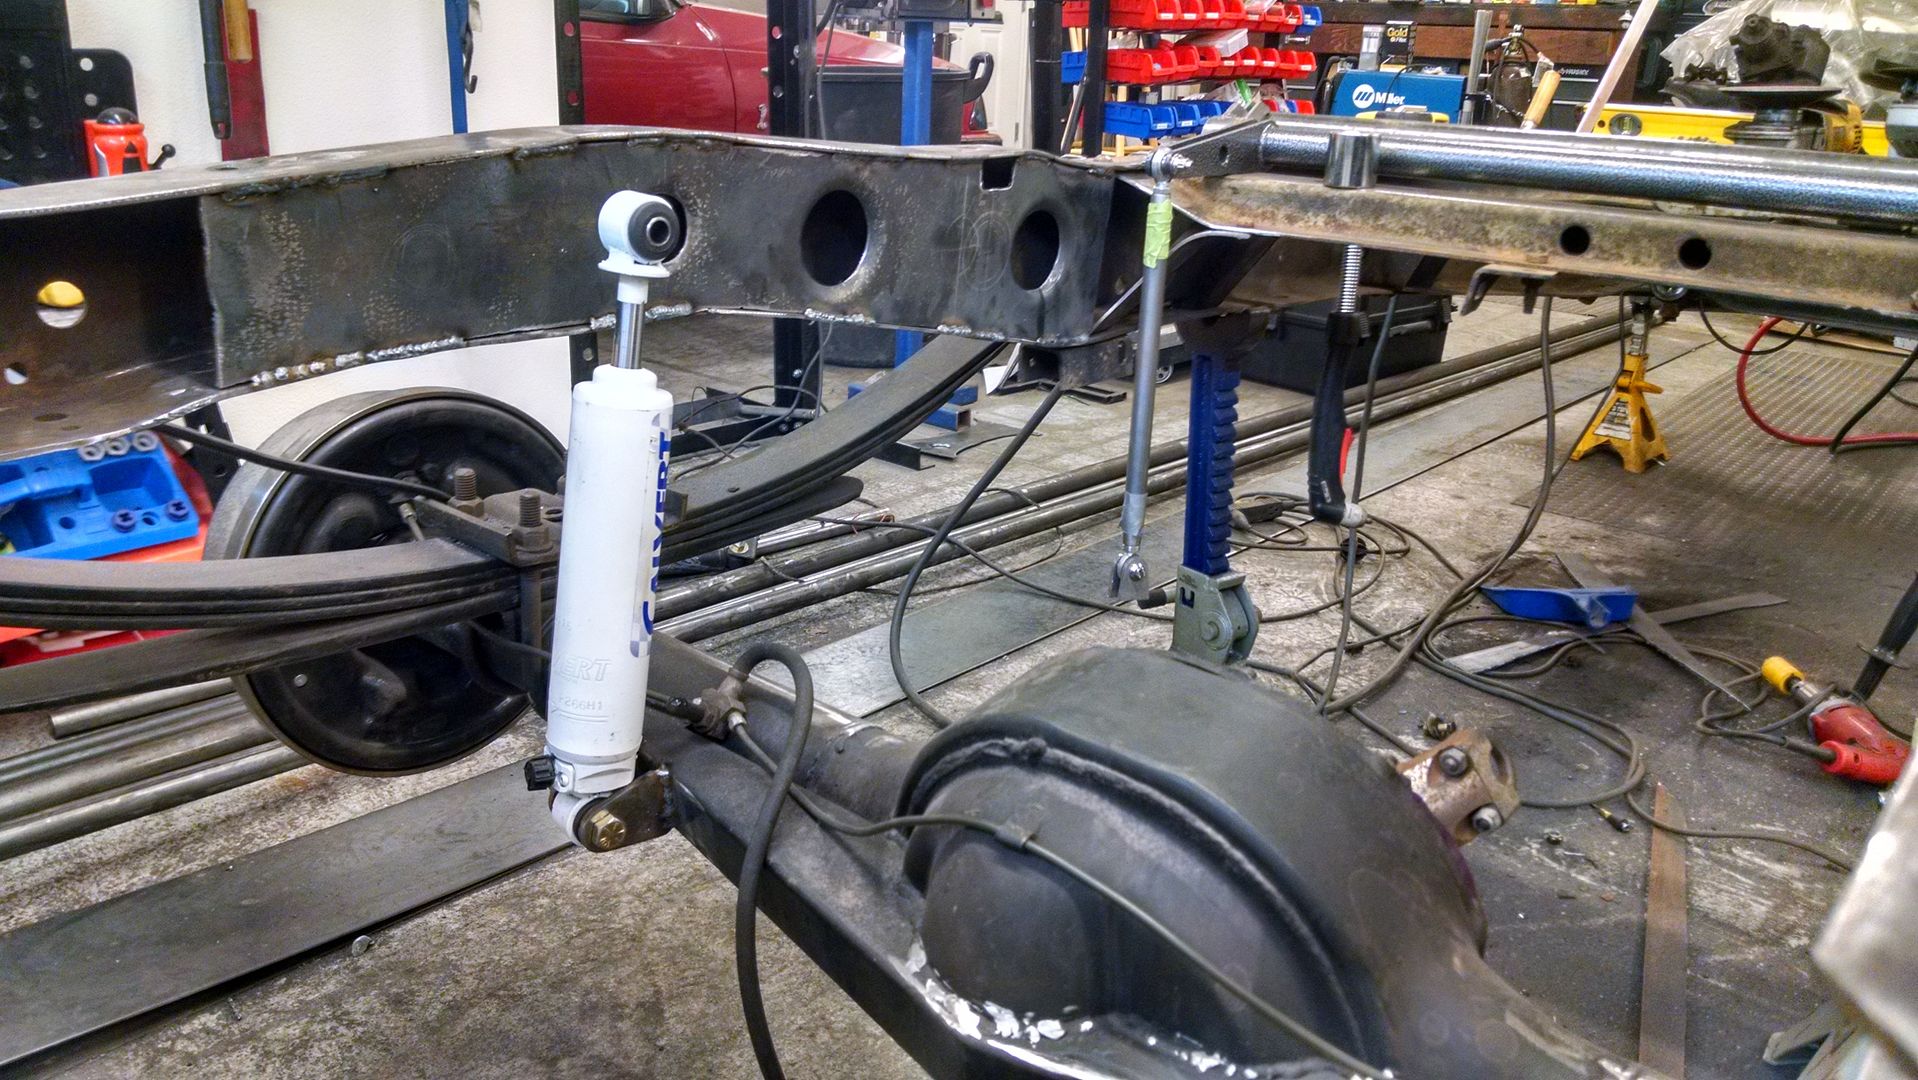


-
hackster
- Preferred User

- Posts: 317
- Joined: Fri Oct 18, 2013 11:21 am
Re: Hackster's F100 #2 CV Swap 6 speed manual and Coyote
Well thanks for the reply!! Good looking setup as well.
I am going for a little different setup on the truck it is going to be a corner carving machine so running that long of a shock is not really an option, especially at the desired ride height.
Is there a big car scene in Alaska? I drove from here to Homer and back a couple summers ago. Amazing country once you get north of Vancouver British Columbia.
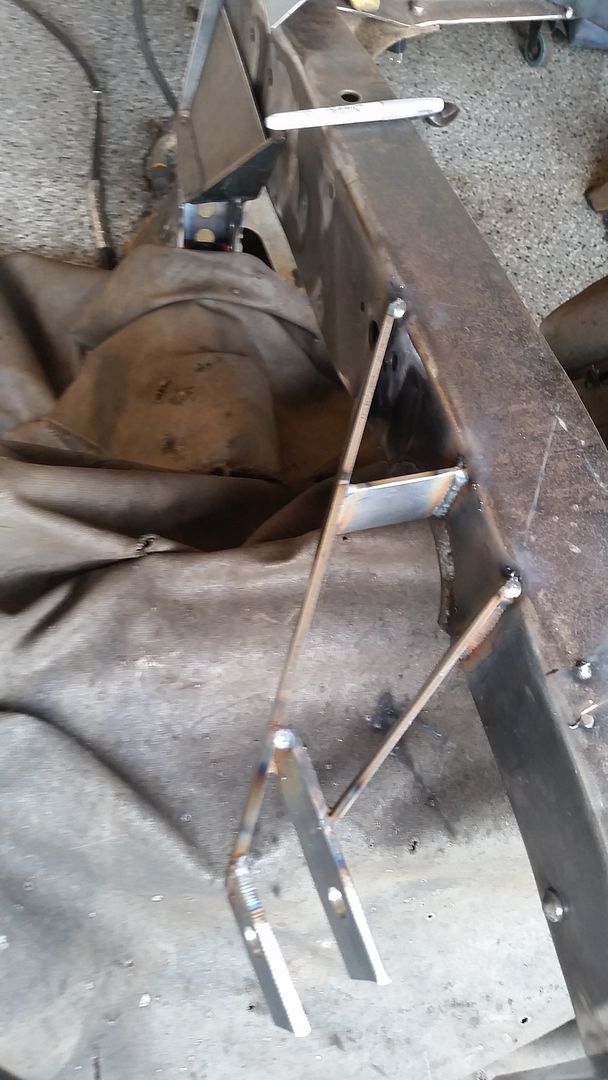
I struggle with the shock mounts today. Took me till about 3 this afternoon to get the first one done. I ended up getting the next longest QA1 which is a 14" extended 10.125 collapsed shock with a single adjuster. For my intended purpose for the truck I needed to have the shocks and springs at the outside of the framerails yet try and clear the tires, brakes, panhard bar, sway bar oh and keep them under the bed floor.
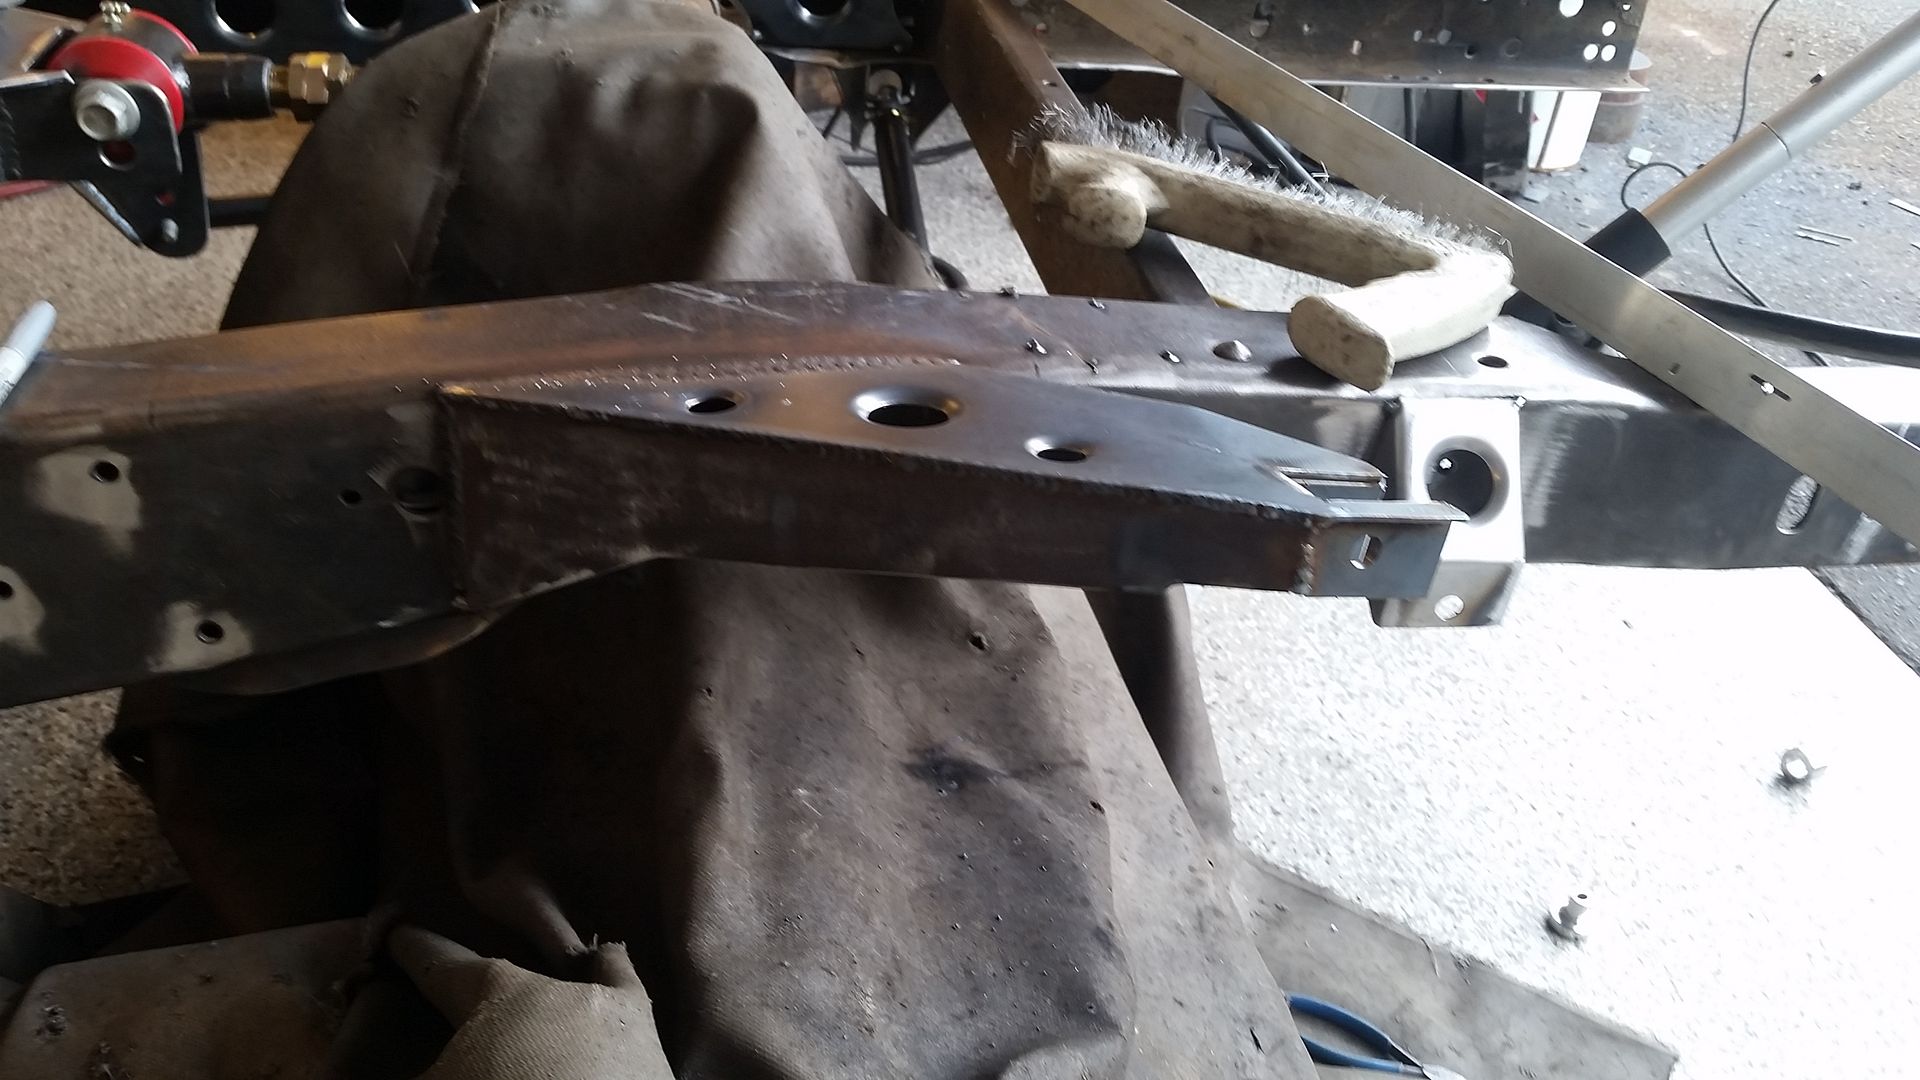
Here is what I came up with today.
In progress.
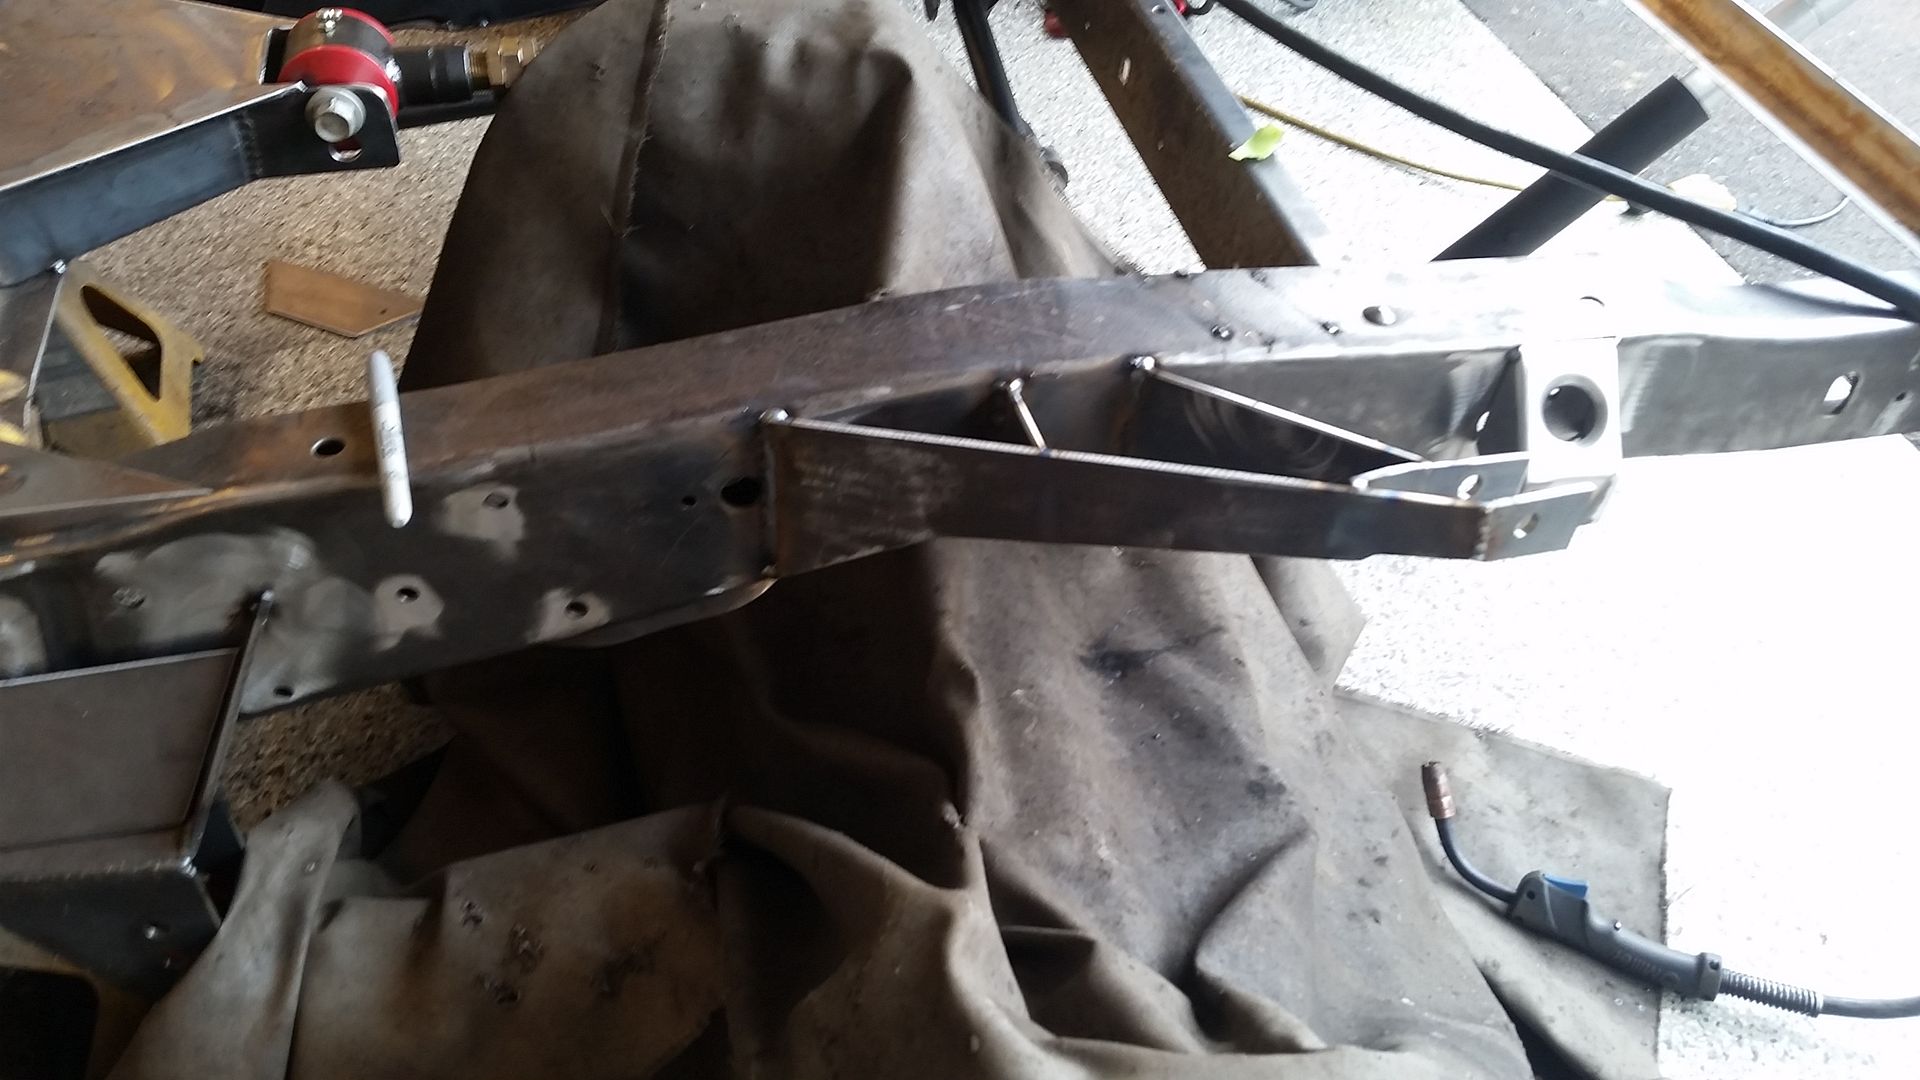
Capped off.
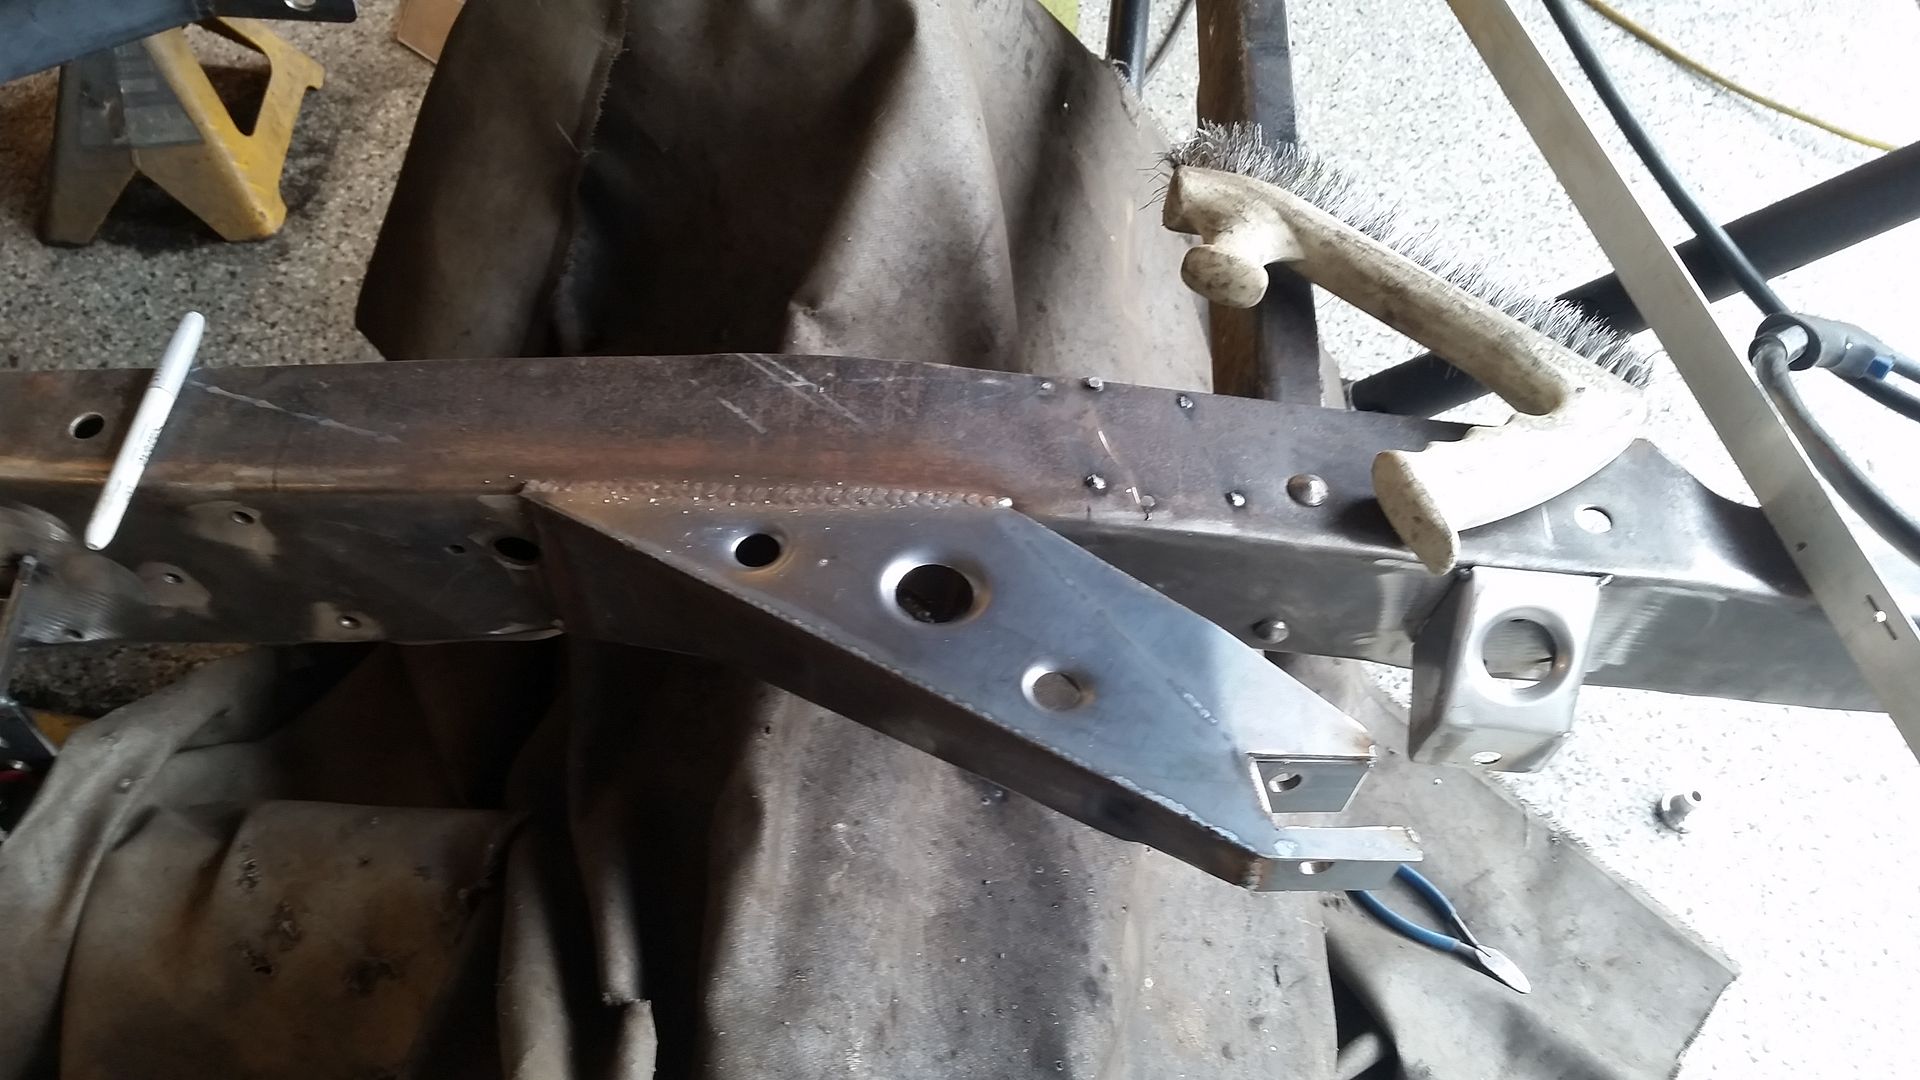
With the shock and spring in there.
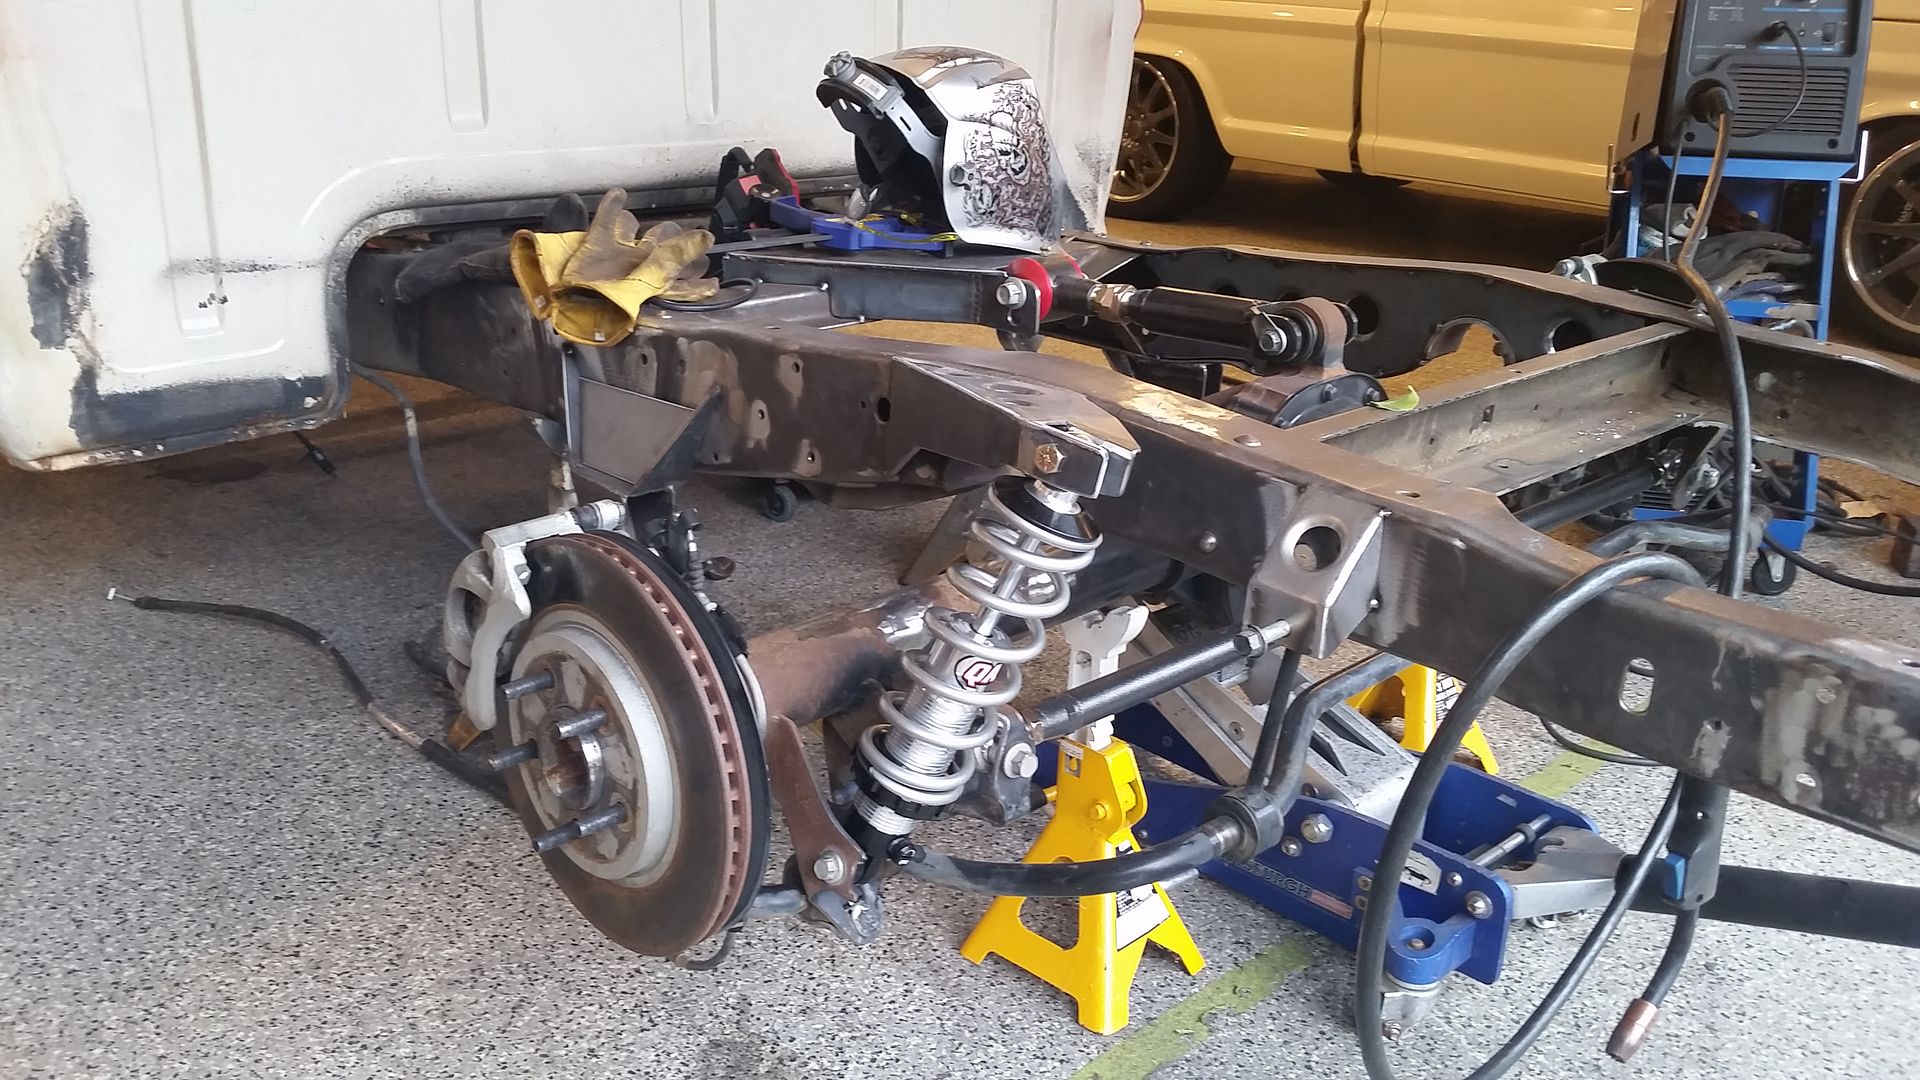
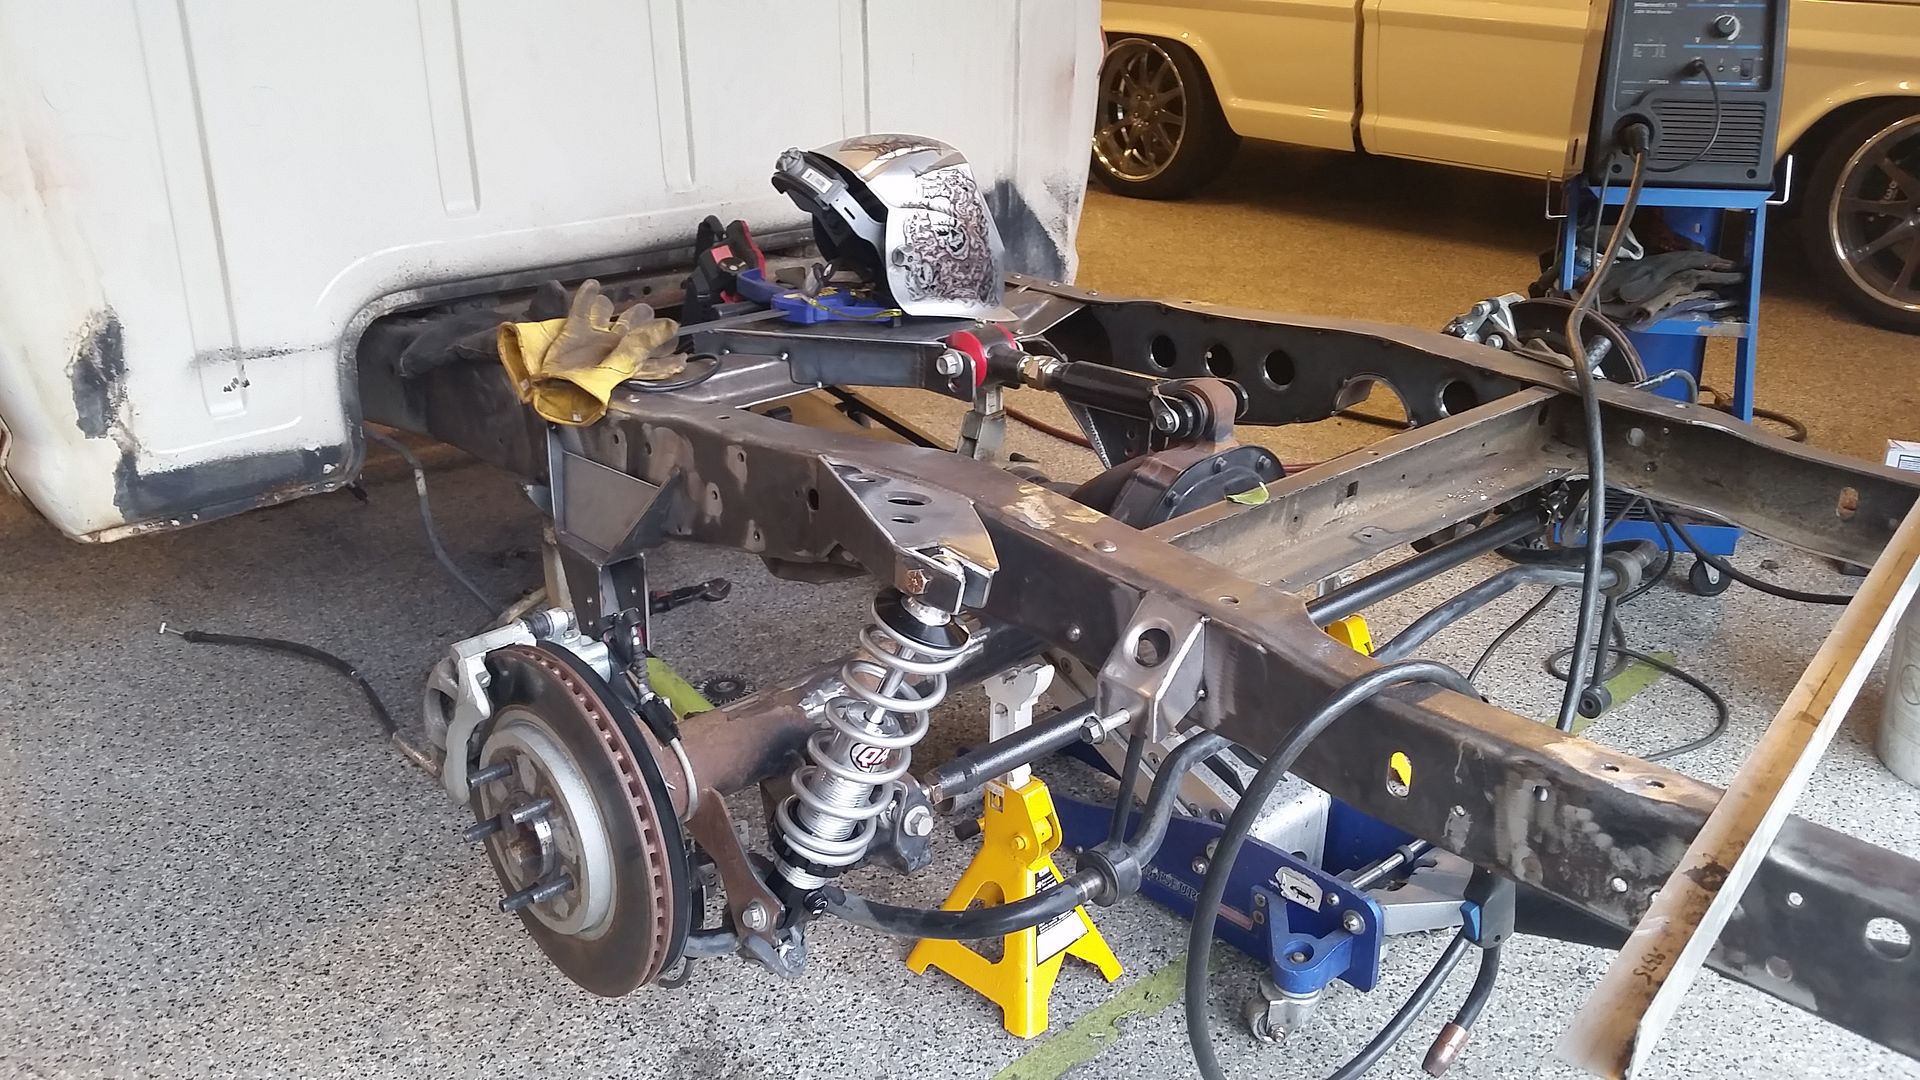
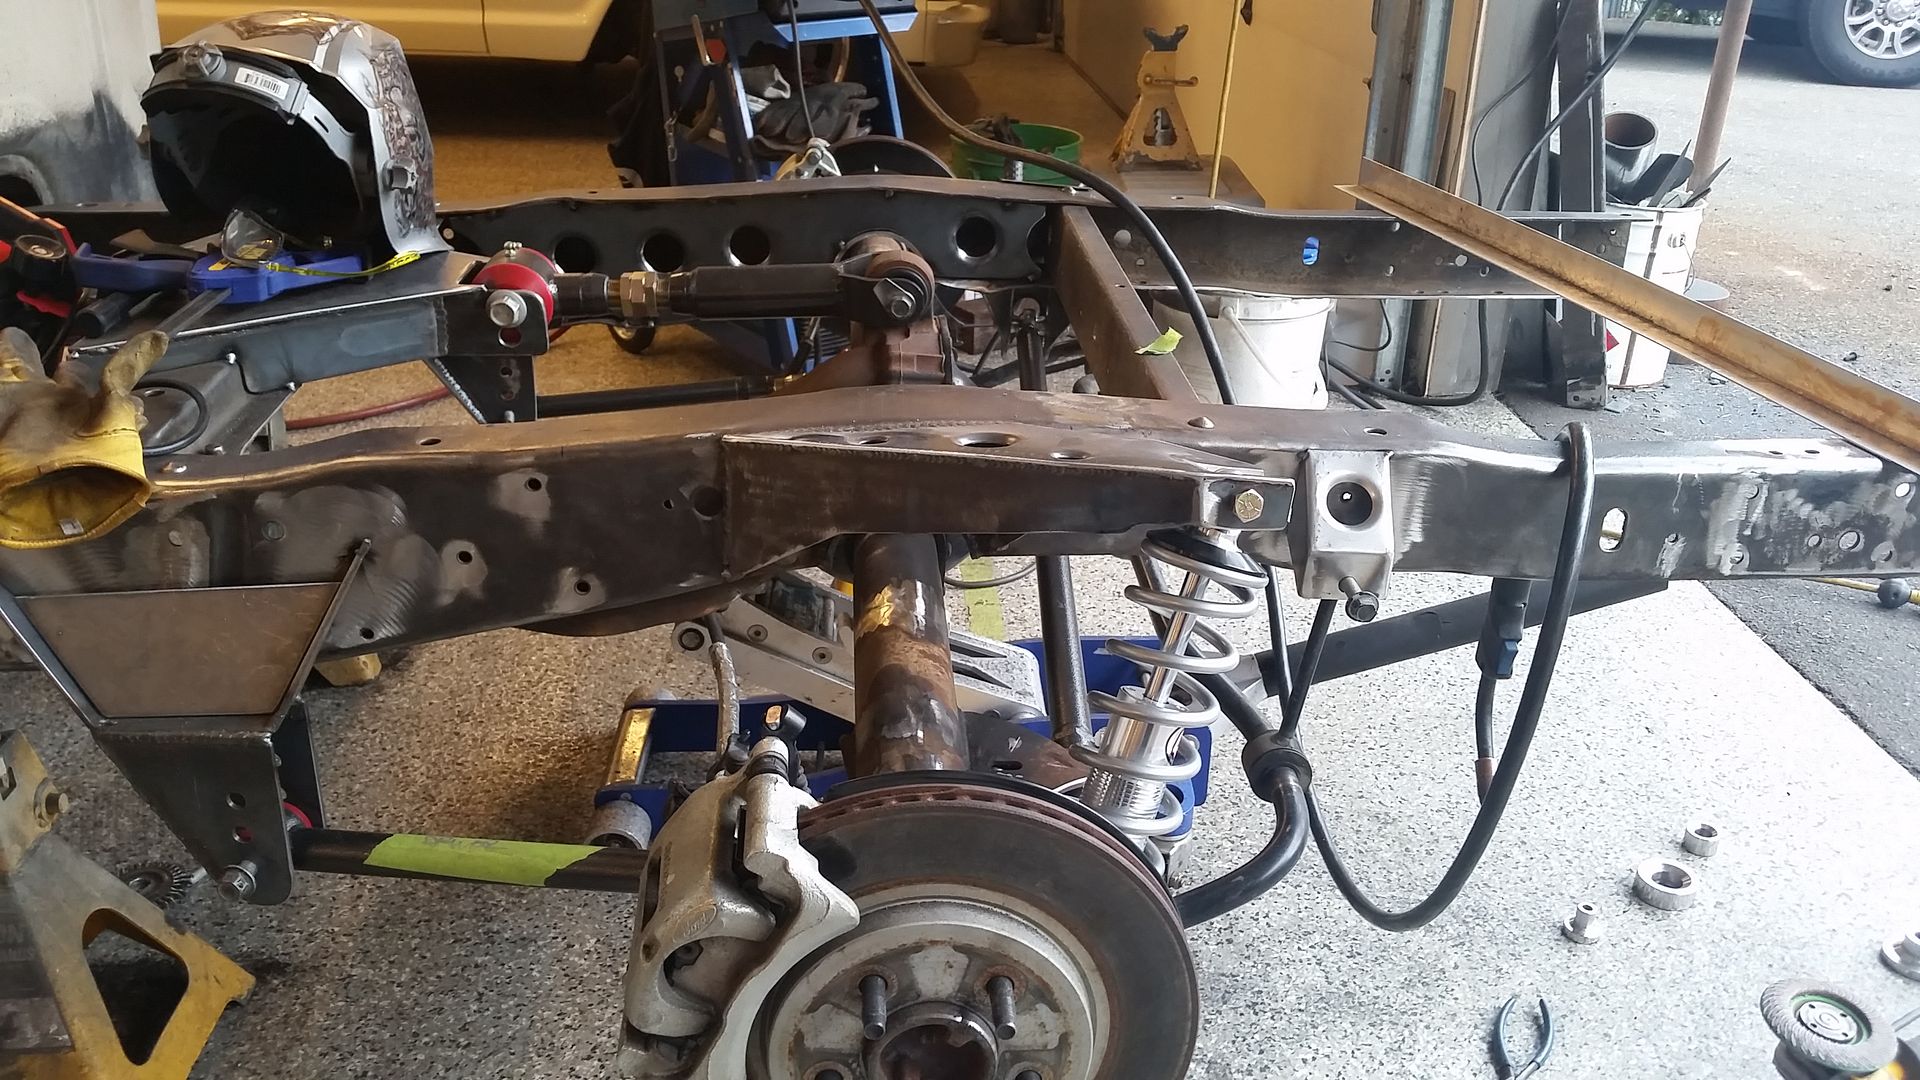
Passenger side done, just needs a little bit more clean up and I might plate the bottom of these, they need a little something on the bottom.
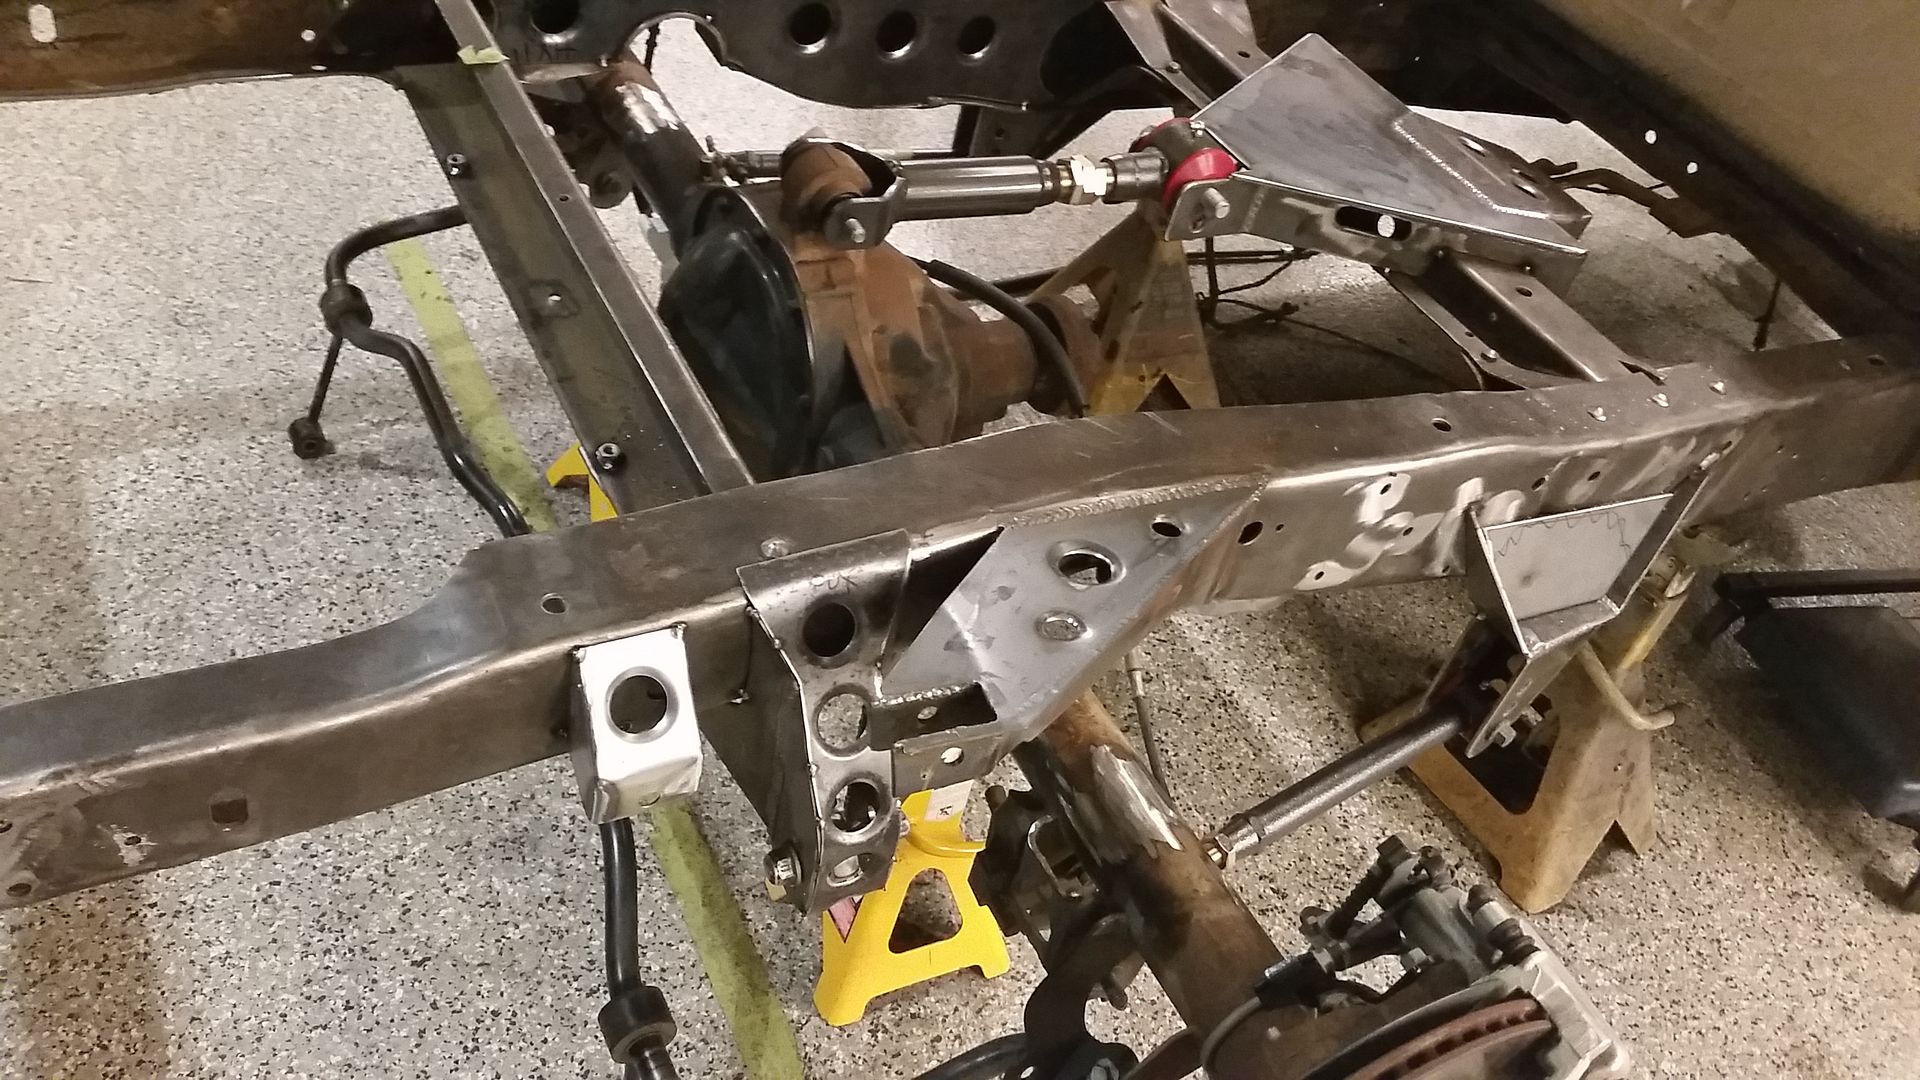
I am happy with the placement of the shocks, not so much with the design but there was just so many limitations I was working in. I wanted to do tube but there was just no room for it.
Shocks are right where they should be, ride height is in the center of the stroke and I have 4.75" total travel.
Thanks for following along in the build.
Sean
I am going for a little different setup on the truck it is going to be a corner carving machine so running that long of a shock is not really an option, especially at the desired ride height.
Is there a big car scene in Alaska? I drove from here to Homer and back a couple summers ago. Amazing country once you get north of Vancouver British Columbia.
I struggle with the shock mounts today. Took me till about 3 this afternoon to get the first one done. I ended up getting the next longest QA1 which is a 14" extended 10.125 collapsed shock with a single adjuster. For my intended purpose for the truck I needed to have the shocks and springs at the outside of the framerails yet try and clear the tires, brakes, panhard bar, sway bar oh and keep them under the bed floor.
Here is what I came up with today.
In progress.


Capped off.


With the shock and spring in there.


Passenger side done, just needs a little bit more clean up and I might plate the bottom of these, they need a little something on the bottom.

I am happy with the placement of the shocks, not so much with the design but there was just so many limitations I was working in. I wanted to do tube but there was just no room for it.
Shocks are right where they should be, ride height is in the center of the stroke and I have 4.75" total travel.
Thanks for following along in the build.
Sean
- sargentrs
- 100% FORDified!

- Posts: 9866
- Joined: Fri Jun 22, 2007 9:30 am
- Location: Georgia, Jasper
Re: Hackster's F100 #2 CV Swap 6 speed manual and Coyote
Amazing work and I really like that dimpled look on all the brackets and bracing.  Not trying to arm chair quarterback but you might want to consider another brace point where your shock mount is out at the top end. A lot of upward force out there. Maybe a plate from the inner front side down to the upper sway bar bracket at the frame? Just my
Randy
1970 F100 Sport Custom Limited LWB, 302cid, 3 on the tree. NO A/C, NO P/S, NO P/B. Currently in 1000 pcs while rebuilding. Project thread: http://www.fordification.com/forum/view ... 22&t=59995 Plan: 351w, C4, LSD, pwr front disc, p/s, a/c, bucket seats, new interior and paint.
1987 F-150 XLT Lariat, 5.0/C6 auto.
-
IN2FORD
- Preferred User

- Posts: 345
- Joined: Sun Apr 27, 2014 3:54 pm
- Location: Cookeville TN
Re: Hackster's F100 #2 CV Swap 6 speed manual and Coyote
Looking good Sean!
Barry
Barry
-
hackster
- Preferred User

- Posts: 317
- Joined: Fri Oct 18, 2013 11:21 am
Re: Hackster's F100 #2 CV Swap 6 speed manual and Coyote
I do not disagree with your observation about the force, however with the amount of plate, support and weld that is on there I think I am going to roll with it and see how it does. I ended up plating the entire bottom of that shock bracket and tying it into the frame. The only real way to make it stronger would be to add something above or below it.sargentrs wrote:Amazing work and I really like that dimpled look on all the brackets and bracing.Not trying to arm chair quarterback but you might want to consider another brace point where your shock mount is out at the top end. A lot of upward force out there. Maybe a plate from the inner front side down to the upper sway bar bracket at the frame? Just my
Mocked up the plating on the bottom of the shock mount spent a couple more hours with the wire wheel on the frame and fired up the old welder. I did replace the lens in my hood today, man that makes a world of difference.
Worked back and forth, side to side and up and down to keep the heat moving around on the frame, the frame was also supported on the rear and I was loading it to try and get rid of a little sag on the passenger rear.
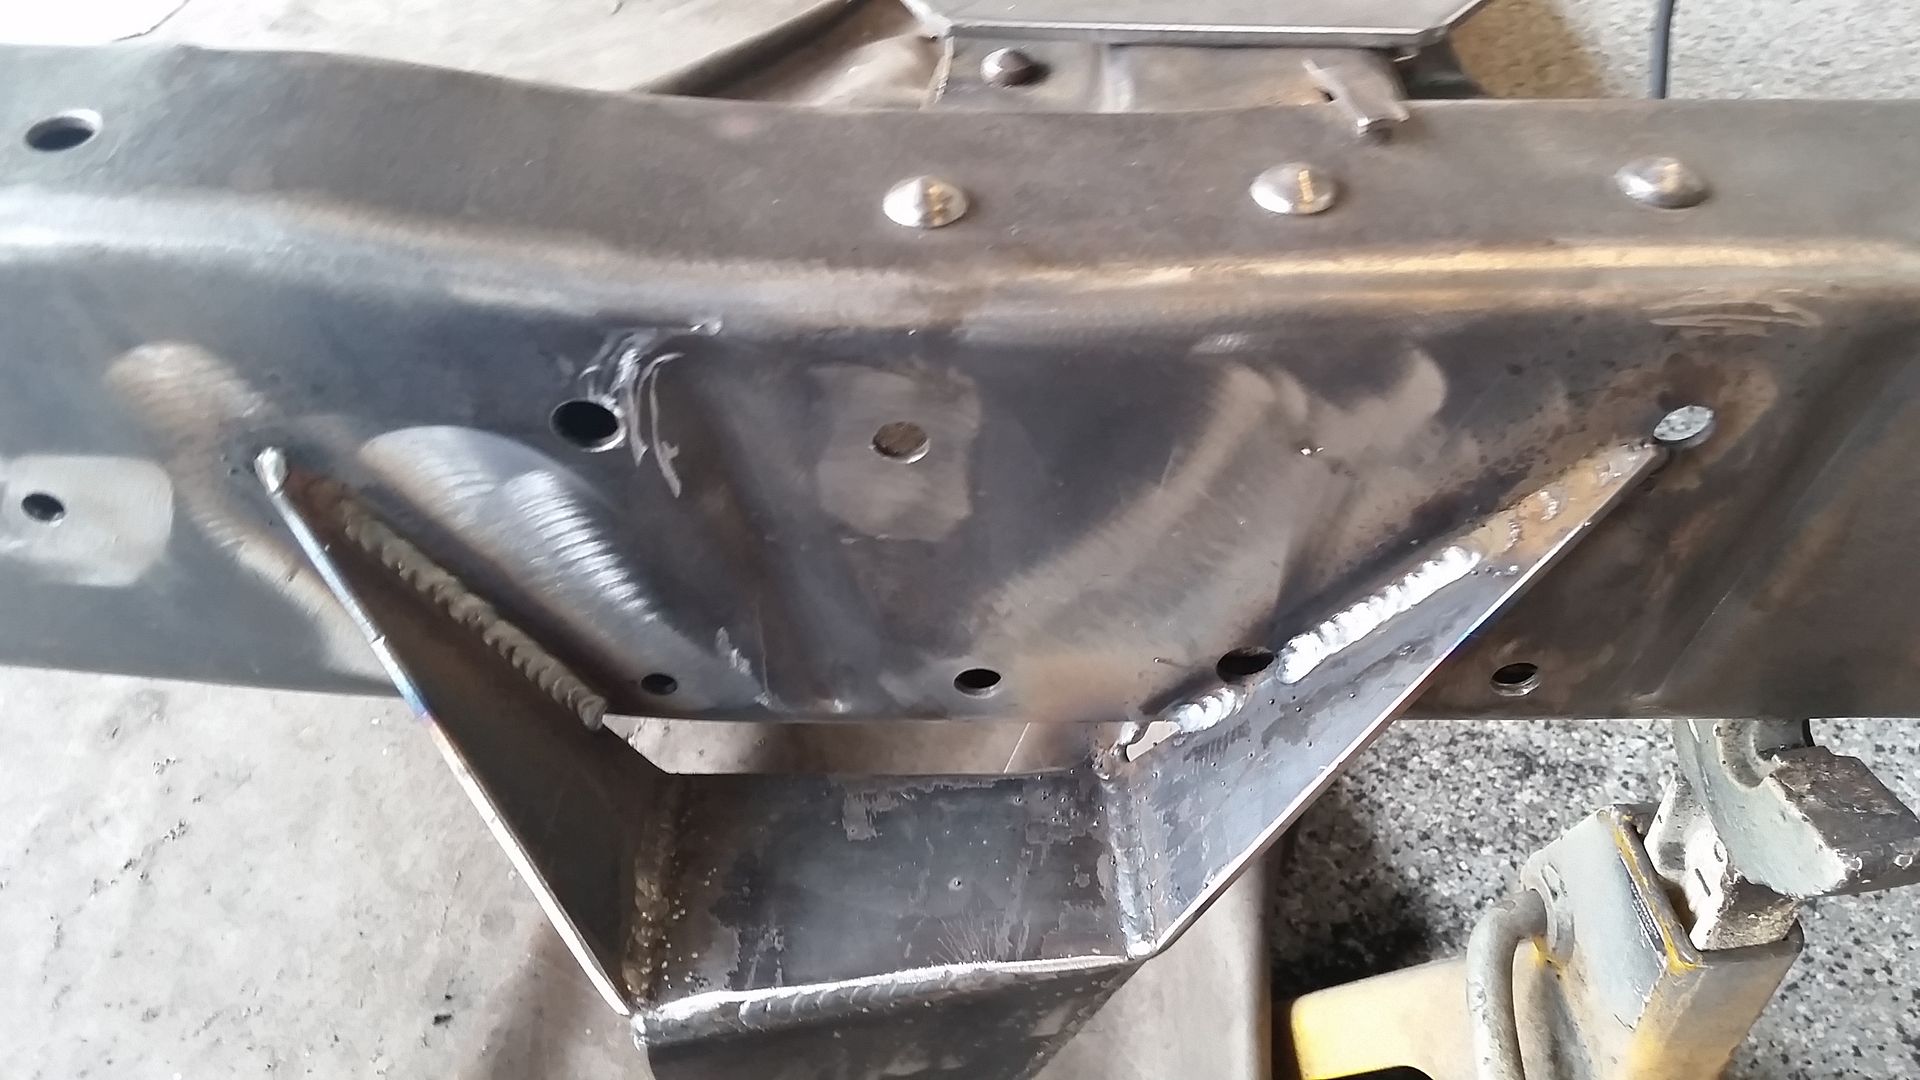
Pretty happy about this progress right here. Wish I would have taken a better photo and removed my welding blanket.
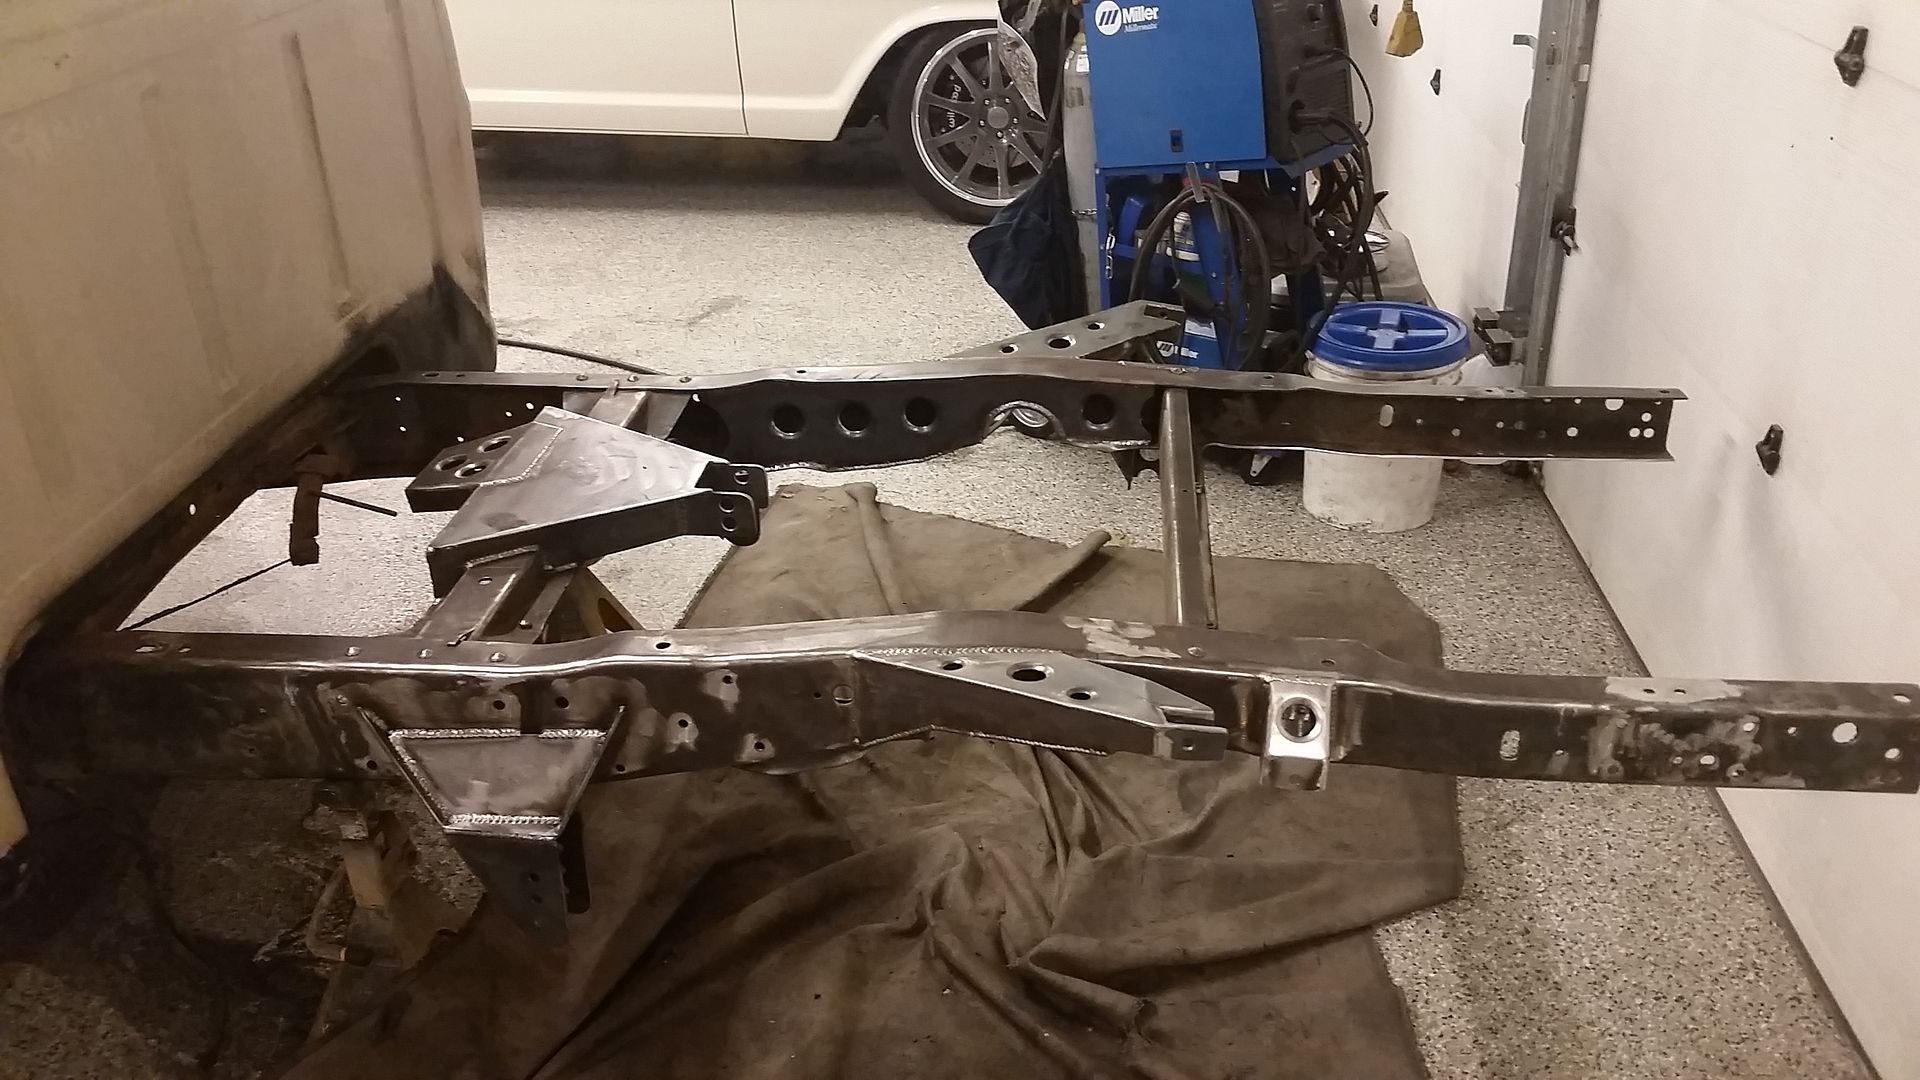
Funny thing about trying to crank out work is I forgot to snap many more of the progress pictures. But here is a rundown of what happened. Tear the rearend apart, clean the backing plates, dust shield, anti vibe plates, sway bar, bushings, wire wheel the entire rearend, clean paint and reasemble.
Wire wheel the entire frame from the crossmember back, clean up all the weld splatter, clean and paint the back half of the frame.
Build new custom width spacer for the QA1 coilovers, drill out the shock mounting holes to 9/16".
Drill out holes in frame for fuel tank straps, weld in nuts....do this before painting =)
Final assembly...
My goal was to roll the truck in on monday and have it on the suspension by the end of my vacation.
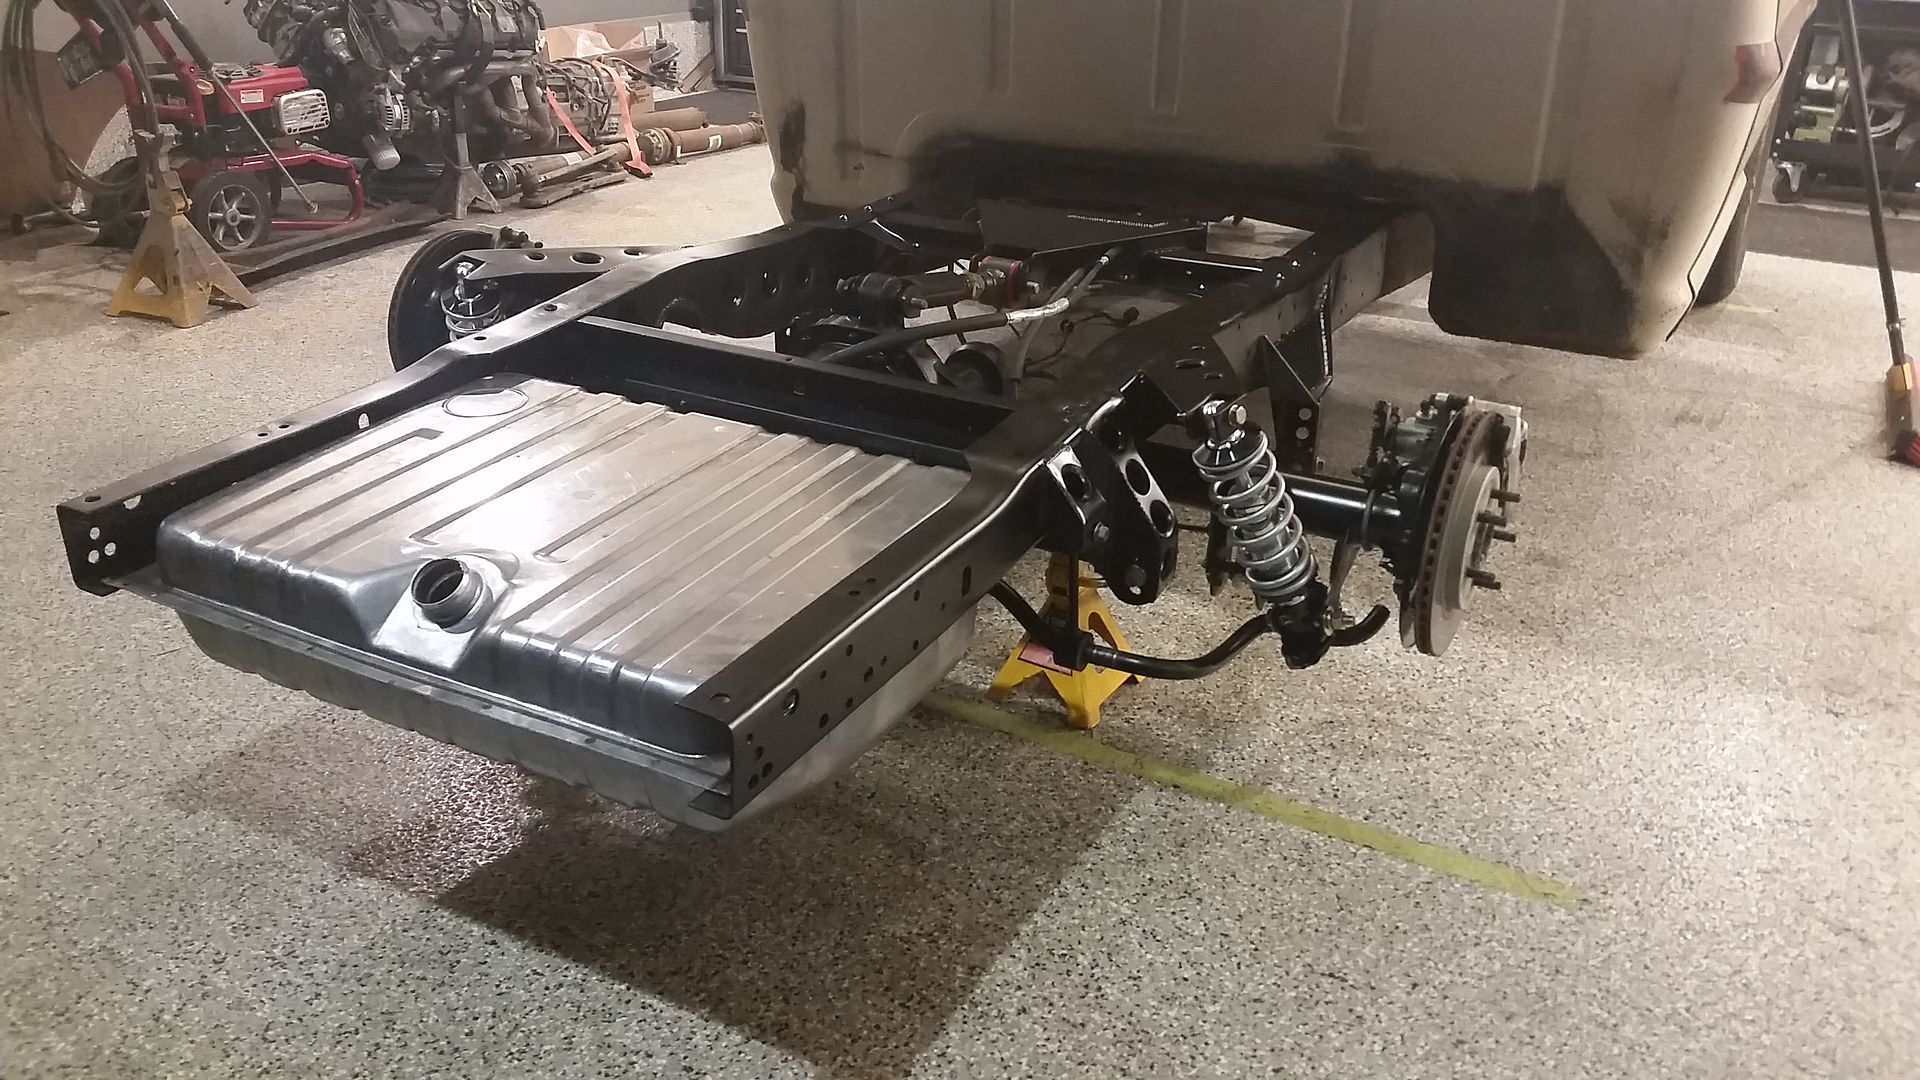
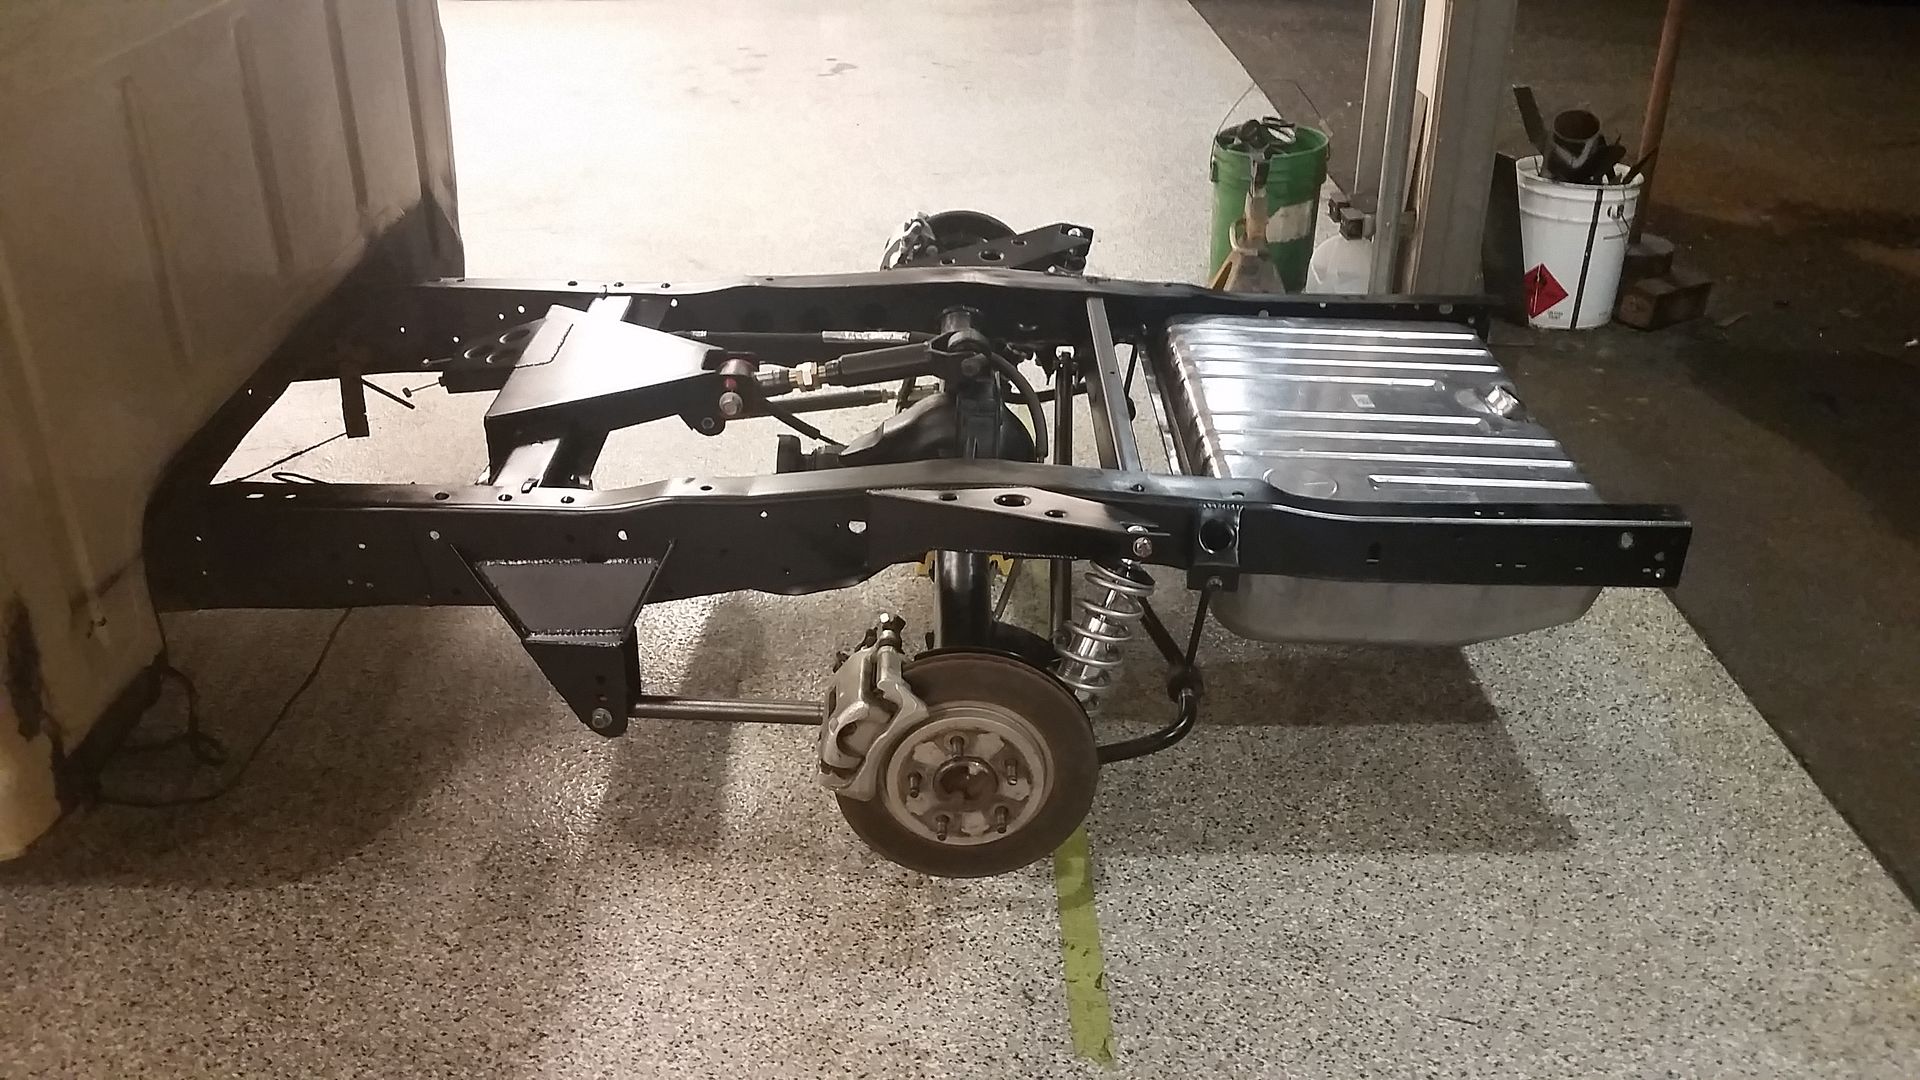
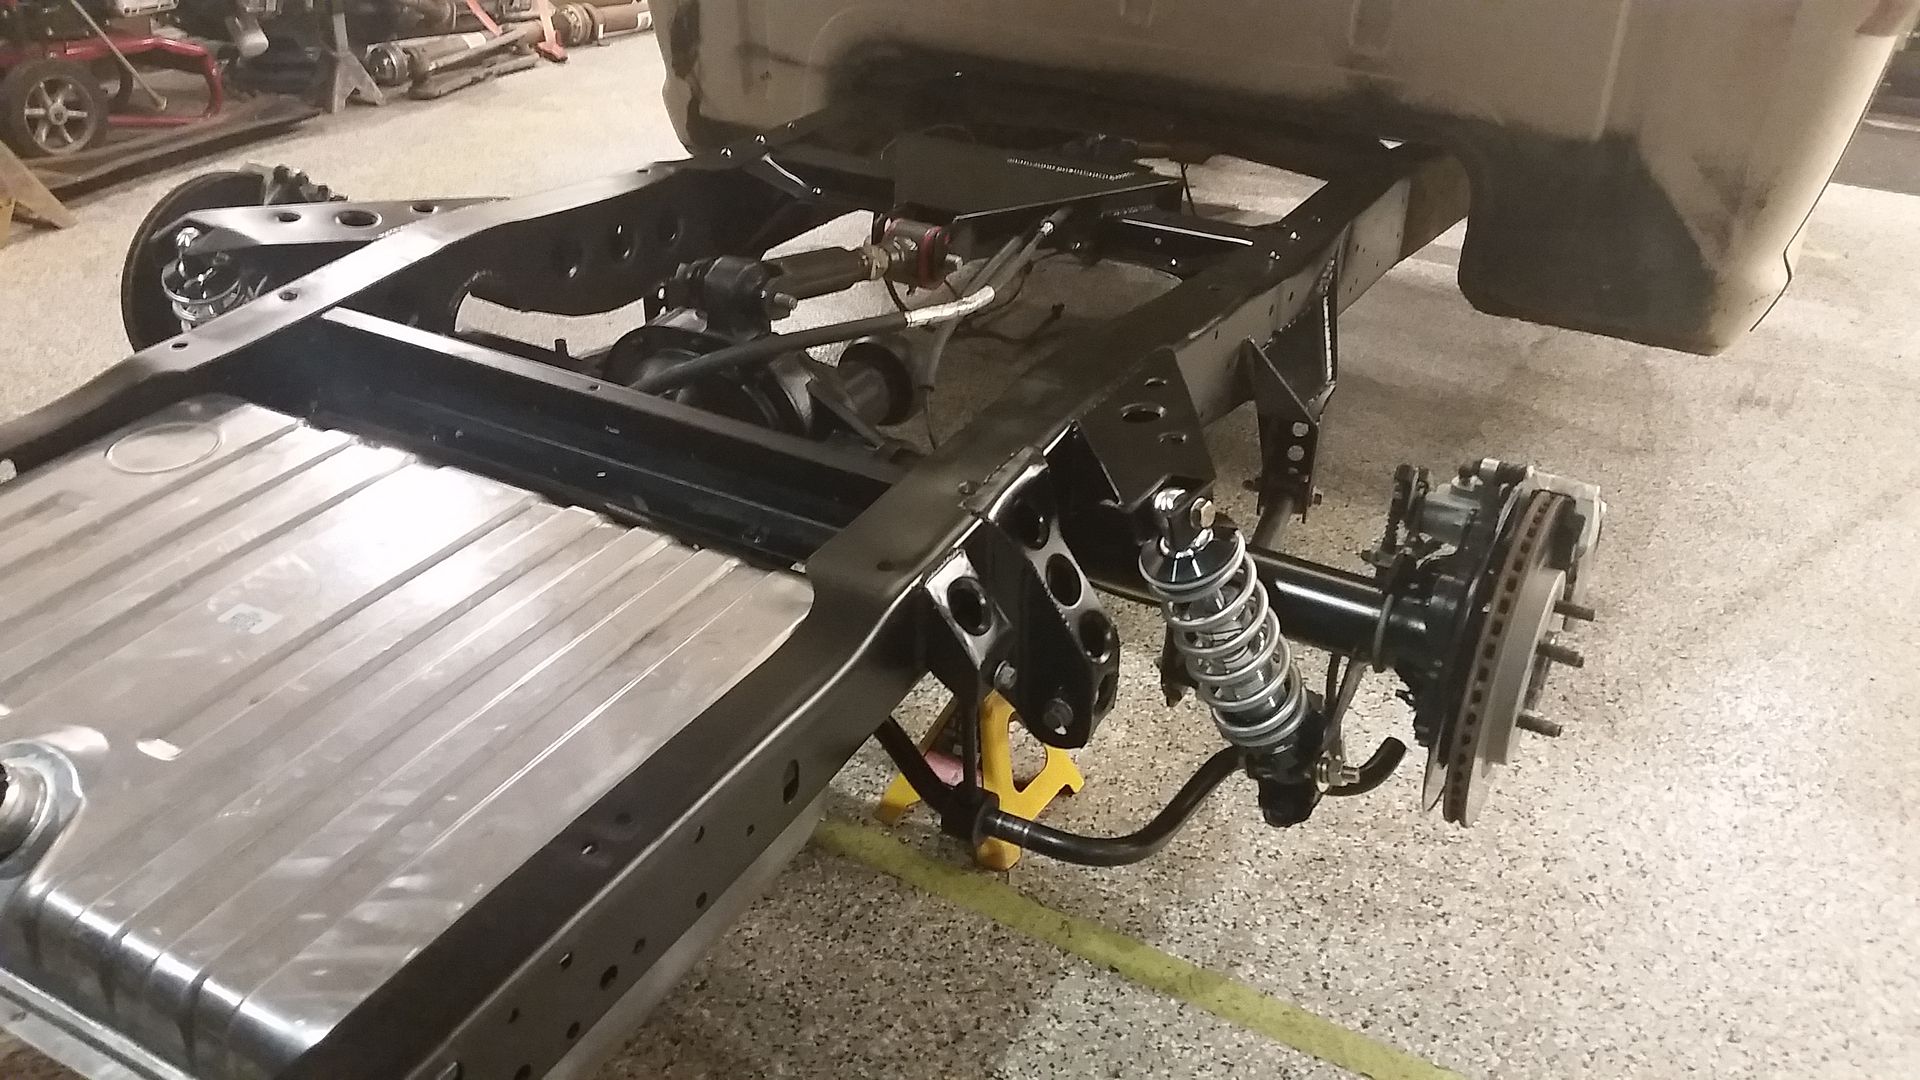
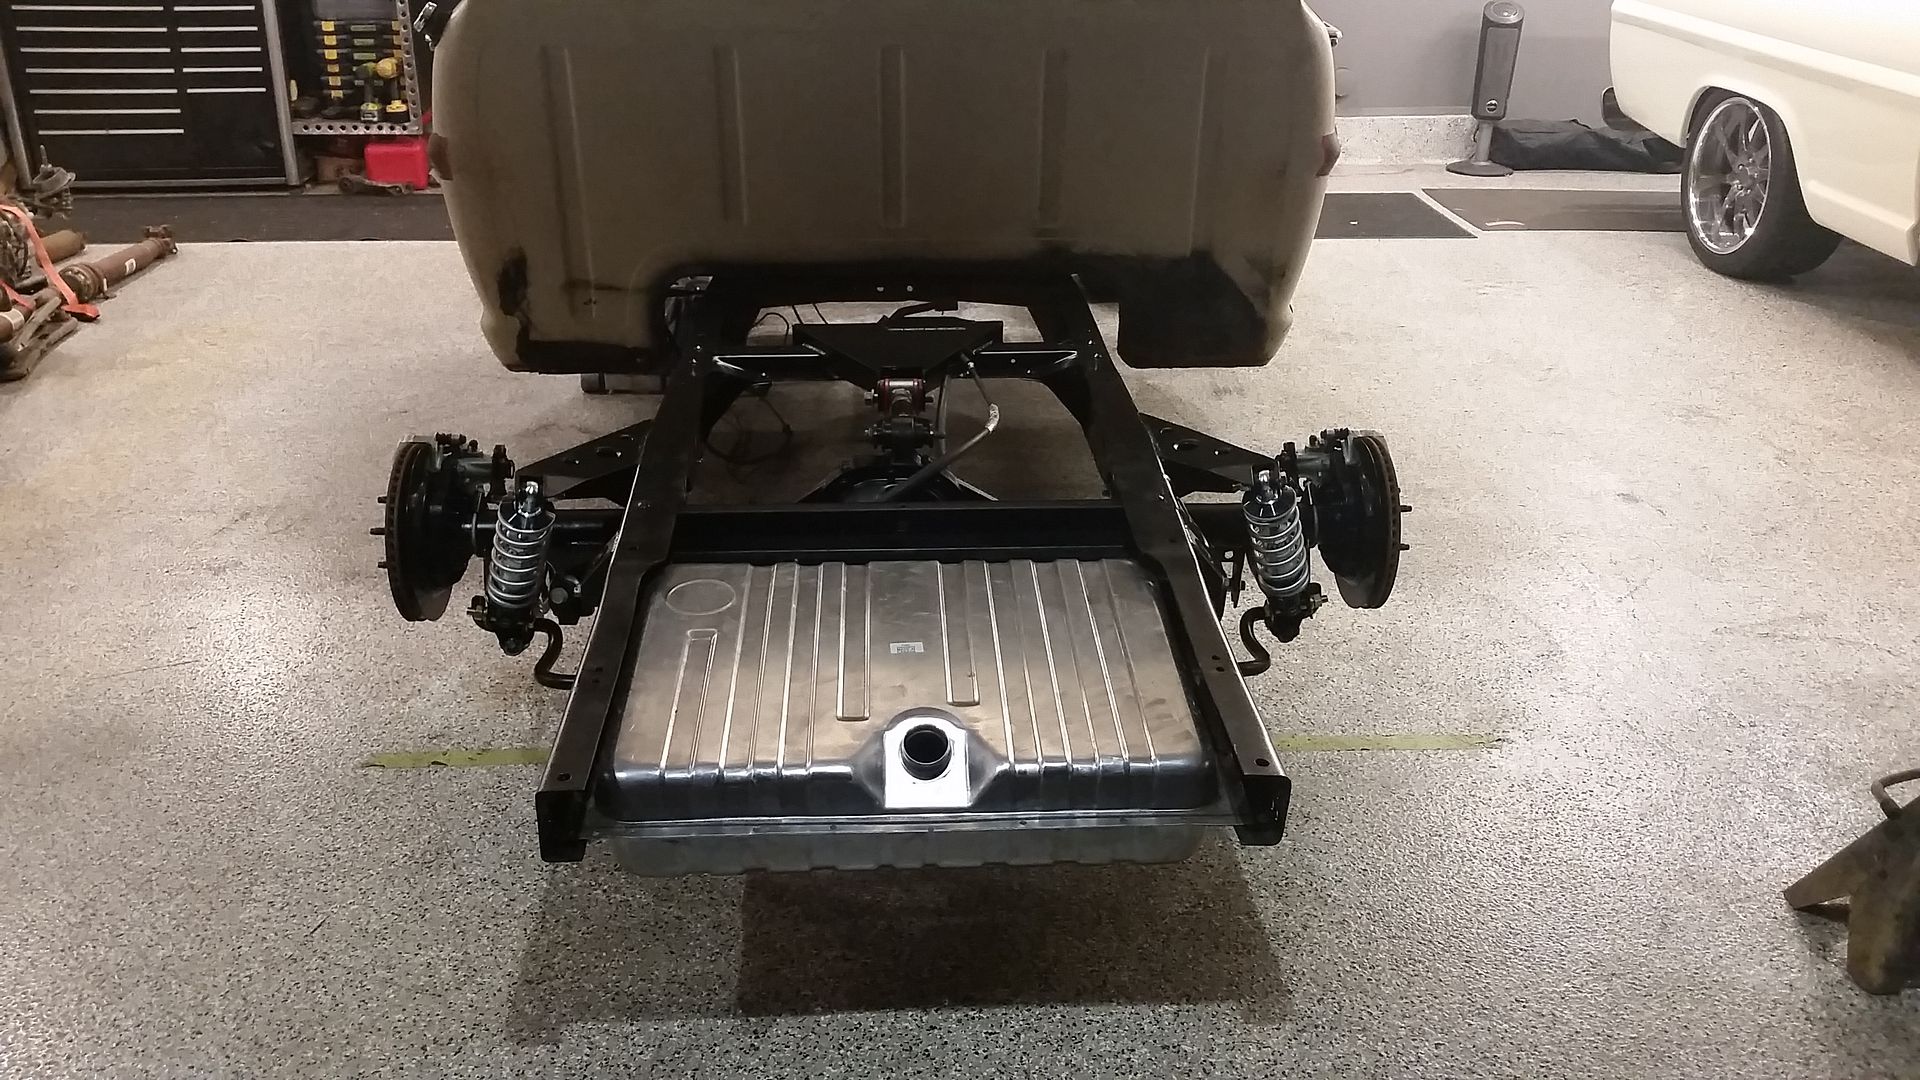
Super stoked about the progress, rear springs are just the first stab at it, likely will need to change but with no tension on them, its at about ride height. They are 220 lb springs.
Net up, Master cylinder, booster and brake lines, steering column and steering shaft adapted to crown vic. But next weekend Ill be dirbiking all weekend =)
Hope to have that stuff wrapped up in the next few weeks and the motor dropped in soon.
Parting shot for the night. New project and last years project..
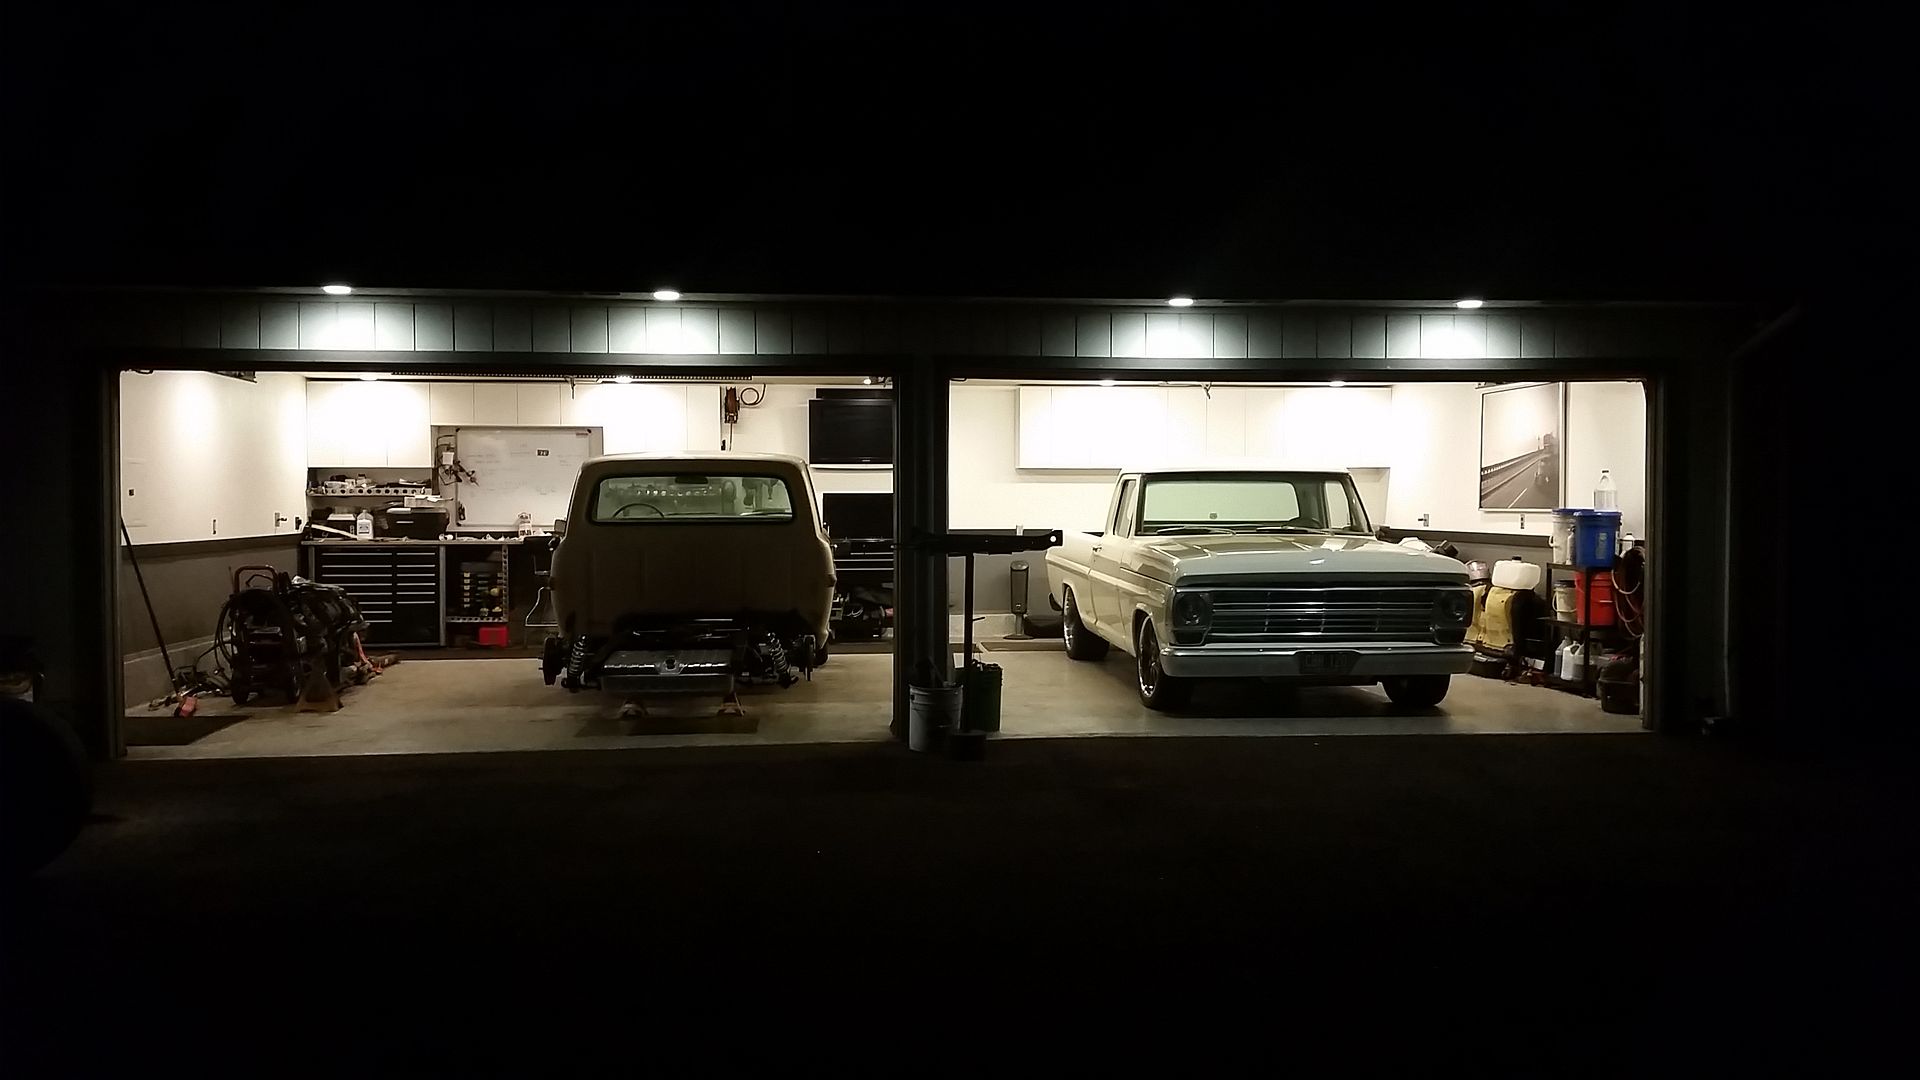
Sean
- sargentrs
- 100% FORDified!

- Posts: 9866
- Joined: Fri Jun 22, 2007 9:30 am
- Location: Georgia, Jasper
Re: Hackster's F100 #2 CV Swap 6 speed manual and Coyote
Everything's looking awesome! I think you're right about that shock mount. With the addition of the bottom plate and the way it's widened out to tie into the frame, it's probably just fine. Great work!
Randy
1970 F100 Sport Custom Limited LWB, 302cid, 3 on the tree. NO A/C, NO P/S, NO P/B. Currently in 1000 pcs while rebuilding. Project thread: http://www.fordification.com/forum/view ... 22&t=59995 Plan: 351w, C4, LSD, pwr front disc, p/s, a/c, bucket seats, new interior and paint.
1987 F-150 XLT Lariat, 5.0/C6 auto.
1970 F100 Sport Custom Limited LWB, 302cid, 3 on the tree. NO A/C, NO P/S, NO P/B. Currently in 1000 pcs while rebuilding. Project thread: http://www.fordification.com/forum/view ... 22&t=59995 Plan: 351w, C4, LSD, pwr front disc, p/s, a/c, bucket seats, new interior and paint.
1987 F-150 XLT Lariat, 5.0/C6 auto.
- SATURN5
- New Member

- Posts: 157
- Joined: Tue Oct 02, 2012 1:08 pm
- Location: Kettering, Oh
Re: Hackster's F100 #2 CV Swap 6 speed manual and Coyote
You've managed more in a couple weeks than I have all summer.... 
Bob
68 F100 Flareside, CVIFS, Cobra IRS, DOHC, M122, MS3, T45, 4.10, Cobra brakes
84 Mustang SVO, B234F, HE351, Full Cobra spec suspension and brakes including IRS, T-tops
96 Mark VIII, Complete chassis bracing, 03 Cobra wheels, Maruader converter, built trans.
68 F100 Flareside, CVIFS, Cobra IRS, DOHC, M122, MS3, T45, 4.10, Cobra brakes
84 Mustang SVO, B234F, HE351, Full Cobra spec suspension and brakes including IRS, T-tops
96 Mark VIII, Complete chassis bracing, 03 Cobra wheels, Maruader converter, built trans.
-
hackster
- Preferred User

- Posts: 317
- Joined: Fri Oct 18, 2013 11:21 am
Re: Hackster's F100 #2 CV Swap 6 speed manual and Coyote
Haha....it goes in waves man. Either you have the time or you have the money, never both at the same time.SATURN5 wrote:You've managed more in a couple weeks than I have all summer....
Worked on building a motorcycle carrier for the tow rig last night and spent a little bit looking over the back of the truck, pretty happy with it at this point, planning next steps now.
Fuel pump, regulator and lines.
Steering Column from a manual truck or maybe an ididit column even? Coupler to the crown vic setup.
Booster bracket and master cylinder from a later model disc brake truck, brake bias controller, brake lines.
Clutch master cylinder adapted to pedal assembly. I have a master from a 90's f150 that I believe should operate the mustang clutch setup.
Then I can drop the motor in and work on that, no real reason to do it right now though.
Sean
-
golfmiser
- New Member

- Posts: 3
- Joined: Tue Oct 13, 2015 3:18 pm
Re: Hackster's F100 #2 CV Swap 6 speed manual and Coyote
Great build. I like both of those trucks. I am right in the middle of a transplant myself '03 mercury marauder into a '67 short box. I was curious about the gas tank. Where is your filler neck going to be located? I was looking at having mine come out behind the license plate. I like the way yours is mounted but I was thinking about using the in tank fuel pump off of the marauder. Not sure if it will work. Thanks
- jimmy828
- 100% FORDified!

- Posts: 1611
- Joined: Thu Dec 23, 2010 6:47 pm
- Location: asheville,NC
Re: Hackster's F100 #2 CV Swap 6 speed manual and Coyote
I wish i was that talented with metal and engineering. That thing should hug a curve like a go-cart. Great work 

-
hackster
- Preferred User

- Posts: 317
- Joined: Fri Oct 18, 2013 11:21 am
Re: Hackster's F100 #2 CV Swap 6 speed manual and Coyote
Thank you....You would have to mount the tank really, really low in the chassis to get the tank to fill from behind the license plate. With the mustang tank, its pretty close to the bottom of the bed floor. Ill do like i did in my other truck and put the filler door in the bottom of the bed floor. I just used a 6" hole saw and reused the piece I cut out, a hinge from a chevy gas door and voila...filler door in the bed floor.golfmiser wrote:Great build. I like both of those trucks. I am right in the middle of a transplant myself '03 mercury marauder into a '67 short box. I was curious about the gas tank. Where is your filler neck going to be located? I was looking at having mine come out behind the license plate. I like the way yours is mounted but I was thinking about using the in tank fuel pump off of the marauder. Not sure if it will work. Thanks
No idea on the marauder pump in the mustang tank, that might be a tough one. You have lots and lots of options for fuel pumps though.
Got a build thread on the truck yet?
Just takes time and a some desire to learn, its just metal. Hope it drives like a go cart =)jimmy828 wrote:I wish i was that talented with metal and engineering. That thing should hug a curve like a go-cart. Great work
Thanks for the props.
Sean
-
golfmiser
- New Member

- Posts: 3
- Joined: Tue Oct 13, 2015 3:18 pm
Re: Hackster's F100 #2 CV Swap 6 speed manual and Coyote
Appreciate the feed back on the tank. I like the way you mounted your tank rather than mine being mounted behind the seat. I will have to come up with something. I have not started a build thread yet. I am in the process of doing the rear for 4- link hook up. Once I kinda get that going I will take some pictures. I wish now I had went with the 5.0 swap. There is a lot more info on those than doing the marauder swap. Keep up the good work, I look forward to seeing more.