Calf's 69 Crew build, and CNM67's 67 shorty build
Moderator: FORDification
-
Calfdemon

- 100% FORDified!

- Posts: 2672
- Joined: Tue May 25, 2010 11:31 pm
- Location: California, Santa Clarita
Re: Calf's 69 Crew build, and CNM67's 67 shorty build
I hear ya... The easy up I bought was made by the brand "Garden Treasures". But unfortunately it quickly turned into a Driveway Nightmare. Luckily for me, mine is only a scratch even if it is on a brand new paint job. I would have been in tears if it had been a dent like you suffered. Dents dont belong on Bumps. I felt a little better after beating up the easy up and winning. Lesson learned. Next time I need shade over the truck, it will be a blue tarp attached to the garage itself like I used to do. No more free-standing shade devices next to a newly painted vehicle... 
-Rich
Current toys -
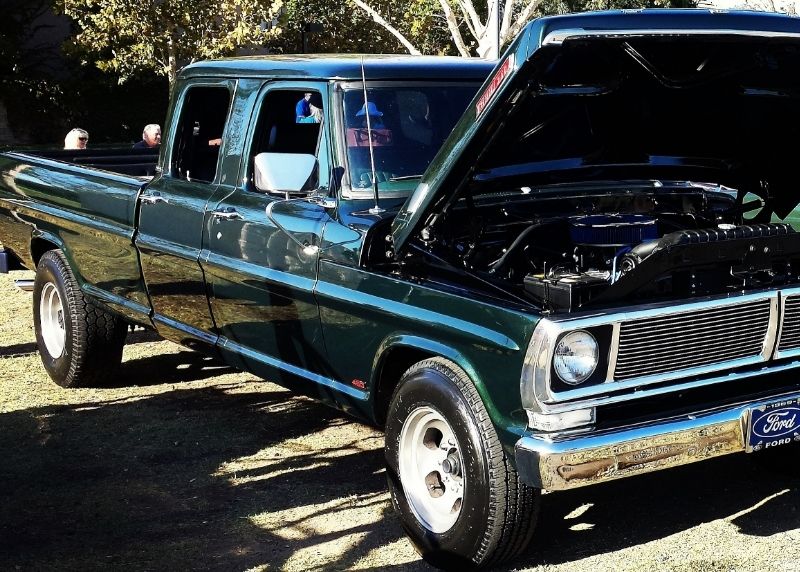
69 Ford F350 Crew Cab - 460 / C6 - http://i253.photobucket.com/albums/hh67 ... lqgskp.jpg
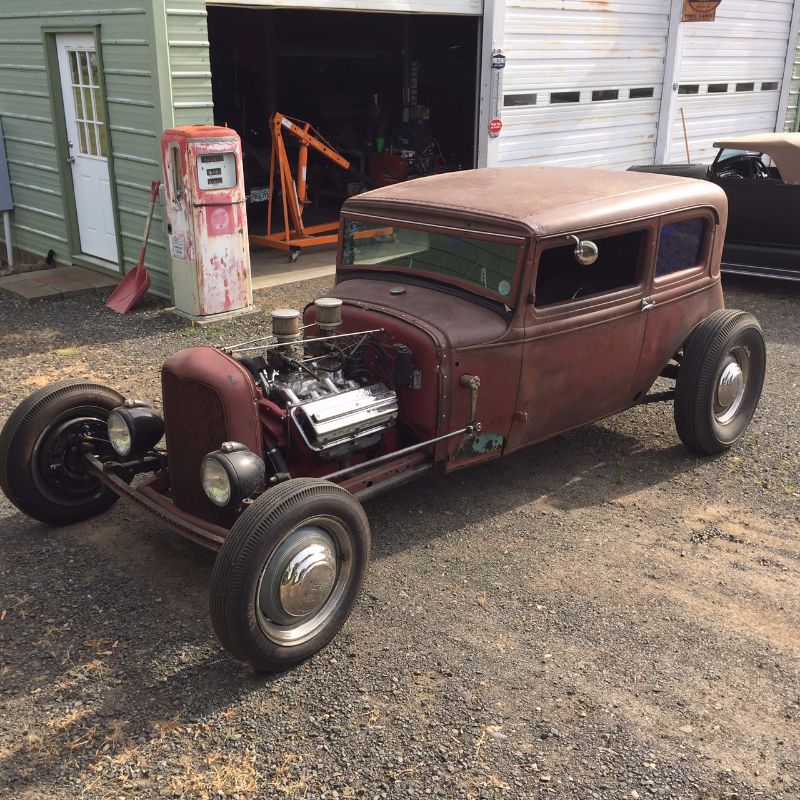
31 Ford Vicky - 1955 270 Red Ram Hemi / 4 speed - http://i253.photobucket.com/albums/hh67 ... bsibvn.jpg
Former toys -
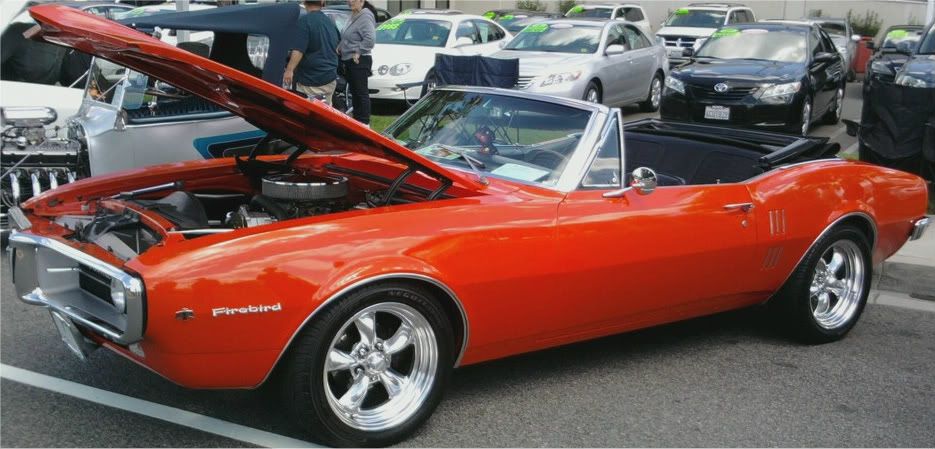
67 Pontiac Firebird 400 convertible (sold 9/13) - http://i253.photobucket.com/albums/hh67 ... bird-1.jpg
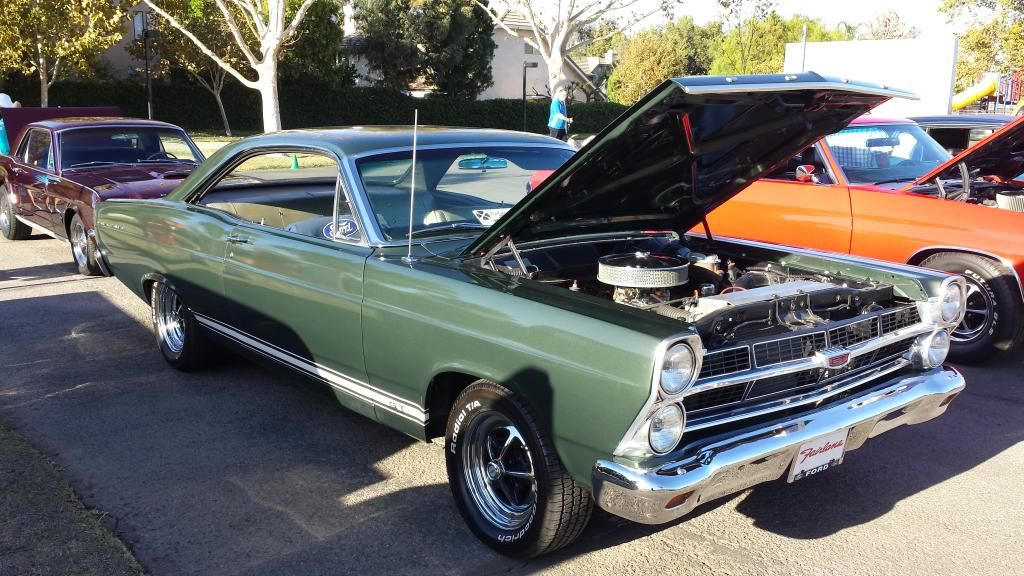
67 Ford Fairlane GT - 390 / 4 speed (sold 7/15) - http://i253.photobucket.com/albums/hh67 ... c5hu8z.jpg
Current toys -
69 Ford F350 Crew Cab - 460 / C6 - http://i253.photobucket.com/albums/hh67 ... lqgskp.jpg
31 Ford Vicky - 1955 270 Red Ram Hemi / 4 speed - http://i253.photobucket.com/albums/hh67 ... bsibvn.jpg
Former toys -
67 Pontiac Firebird 400 convertible (sold 9/13) - http://i253.photobucket.com/albums/hh67 ... bird-1.jpg
67 Ford Fairlane GT - 390 / 4 speed (sold 7/15) - http://i253.photobucket.com/albums/hh67 ... c5hu8z.jpg
-
CrypticRacer13
- Blue Oval Guru

- Posts: 1177
- Joined: Fri Jun 03, 2011 11:01 pm
- Location: Burney Ca.
Re: Calf's 69 Crew build, and CNM67's 67 shorty build
NiceCalfdemon wrote: Dents dont belong on Bumps.
Looking good Rich, An Caleb the motor looks mint with the valve covers
-Mike-
ECV 1849
Build>http://fordification.com/forum/viewtopi ... 22&t=68225
69' F250 Highboy 390ci.,NP435,Dana 24,HPD44,D60
67' Dodge Coronet R/T 440ci.4speed,D60, all numbers correct
72' Dodge Dart 440ci.727,D60,10ptcage street strip on meth 10.40s
05' Chevy Tahoe LT loaded for the wife an the baby duty
12' Ford Focus Titanium Hatch Back, Gas saver for the work week
-
Calfdemon
- 100% FORDified!
- Posts: 2672
- Joined: Tue May 25, 2010 11:31 pm
- Location: California, Santa Clarita
Re: Calf's 69 Crew build, and CNM67's 67 shorty build
Ive been spending the last week or so trying to plan out my wiring and AC/Heat install... So nothing to really document involving any of that as I have not done anything to the truck, just scattered crap all over the garage to help me plan it better in my head.
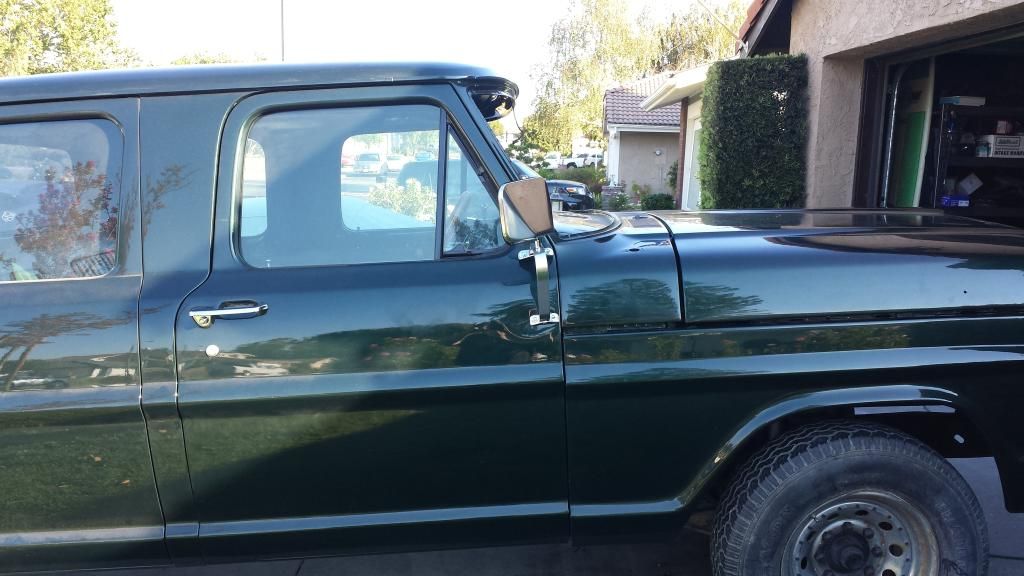
Today, I decided to mount my mirrors though. I bought dentside mirrors instead of going with my West Coast mirrors. After seeing too many trucks with dented doors from people hitting those unforgiving mirrors, and hearing horror stories of kids hanging on them as if they were a jungle gym (resulting in more dented doors), I just feel better using the dentside era mirrors that fold in if run into. I would have loved to run the sport mirrors like I had on my 72, but I could barely see when they were on that truck, and this truck is 3 feet longer. So I need bigger mirrors.
Anyway, after putting the mirrors up to the truck, there really was only one place I could mount them where the brackets would sit flush with the body of the door. I did not want to fabricate adapters or try to modify the mounts to fit them elsewhere, so I went ahead and mounted them in the only place they lined up. I am not completely sure I like them where they are, but oh well... 4 holes drilled in each door make this location permanent. They are about a foot forward from where they should be mounted. The support bars of the mirrors should line up with the bar between the wing window and the main window. But I climbed in the truck and mimicked the driving position. I can see both mirrors well from the driver's position. The passenger mirror is partially blocked by the front pillar, but only partially. Most of the mirror is in view and it is enough to see what I need to see on that side of the truck.
I will add the stick on wide angle circle mirrors in the outside corners of these mirrors anyway. So then i will be able to see everything.
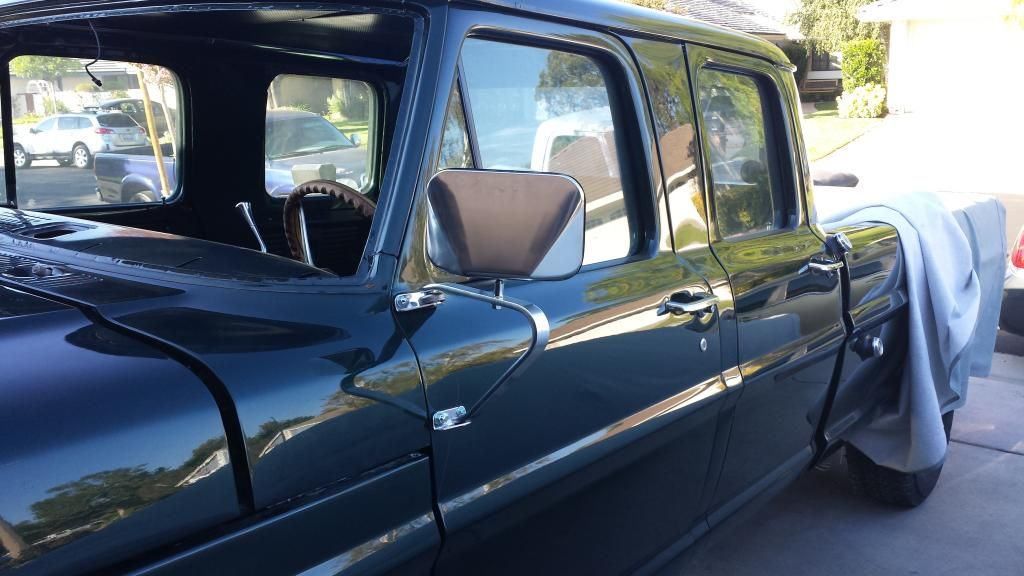
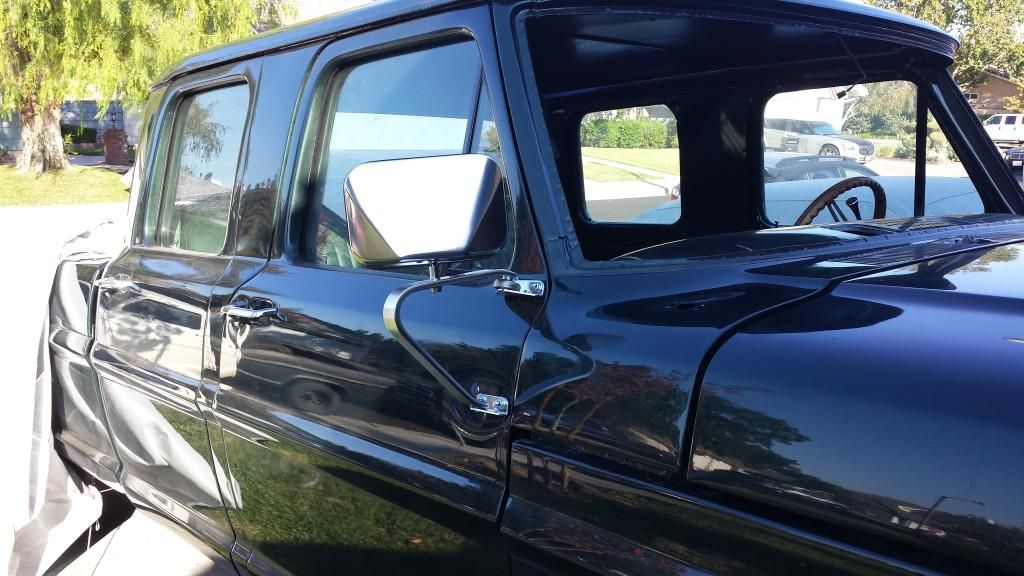
The other thing that annoyed me is that I was really careful drilling and mounting, but when I tighten down the mirror brackets to the truck, the lower bracket on each side slightly warped the metal causing a small ripple dent. It would not even be noticeable except the brand new paint is like a mirror and the reflections are now warped in that spot. I think I am being too anal about the truck, but things like that just annoy me when everything was freshly done.
Oh well, they are on and will be functional. Its the cosmetic issues that are bothering me, but hopefully I will get over it...
-Rich
Current toys -
69 Ford F350 Crew Cab - 460 / C6 - http://i253.photobucket.com/albums/hh67 ... lqgskp.jpg
31 Ford Vicky - 1955 270 Red Ram Hemi / 4 speed - http://i253.photobucket.com/albums/hh67 ... bsibvn.jpg
Former toys -
67 Pontiac Firebird 400 convertible (sold 9/13) - http://i253.photobucket.com/albums/hh67 ... bird-1.jpg
67 Ford Fairlane GT - 390 / 4 speed (sold 7/15) - http://i253.photobucket.com/albums/hh67 ... c5hu8z.jpg
-
Calfdemon
- 100% FORDified!
- Posts: 2672
- Joined: Tue May 25, 2010 11:31 pm
- Location: California, Santa Clarita
Re: Calf's 69 Crew build, and CNM67's 67 shorty build
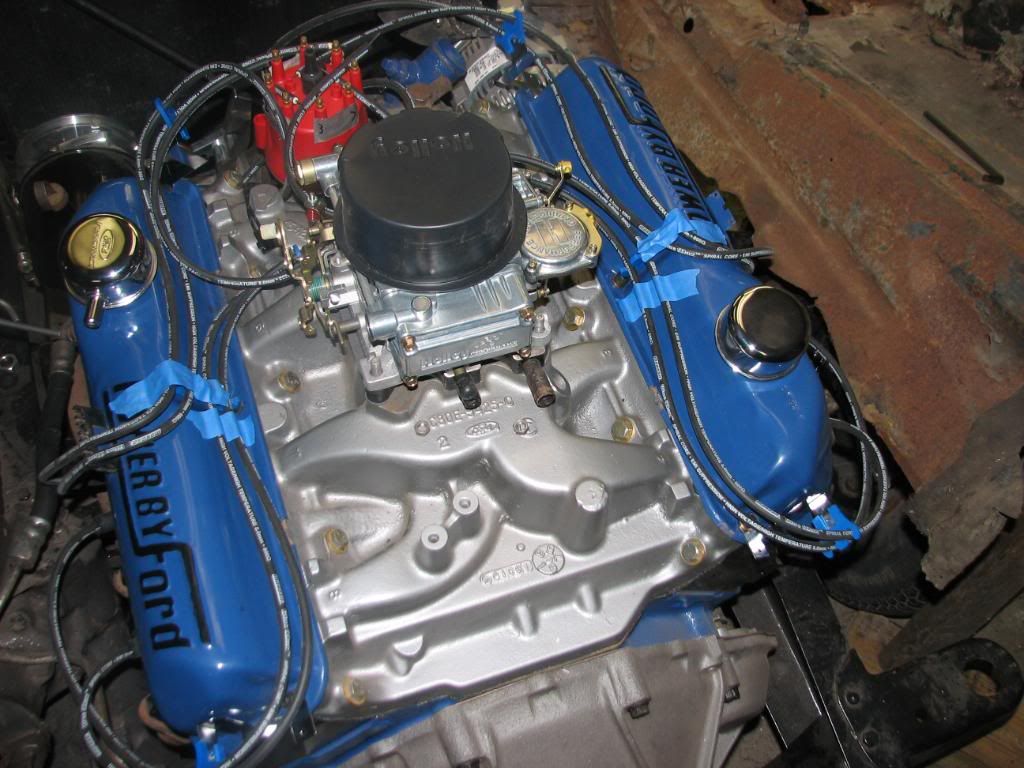
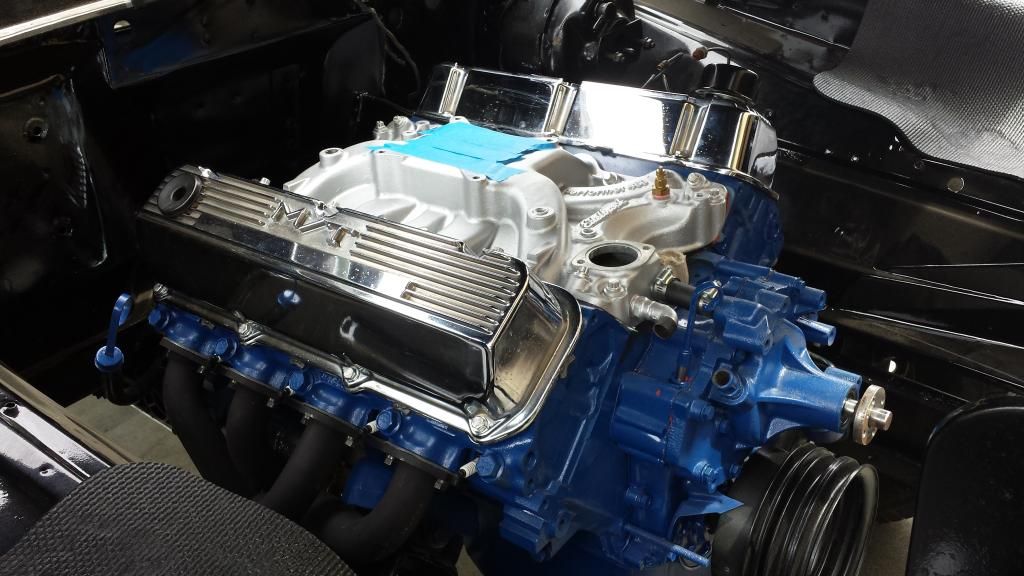
And another post to solicit opinions because I cannot make up my mind... My motor currently wears a pristine set of stock 460 valve covers with the old school POWER BY FORD script on them.
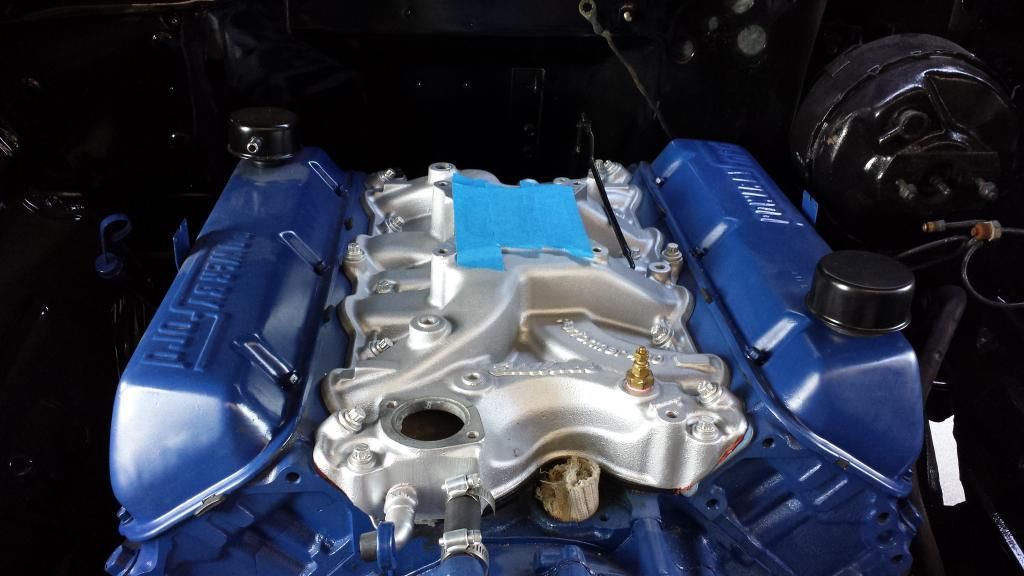
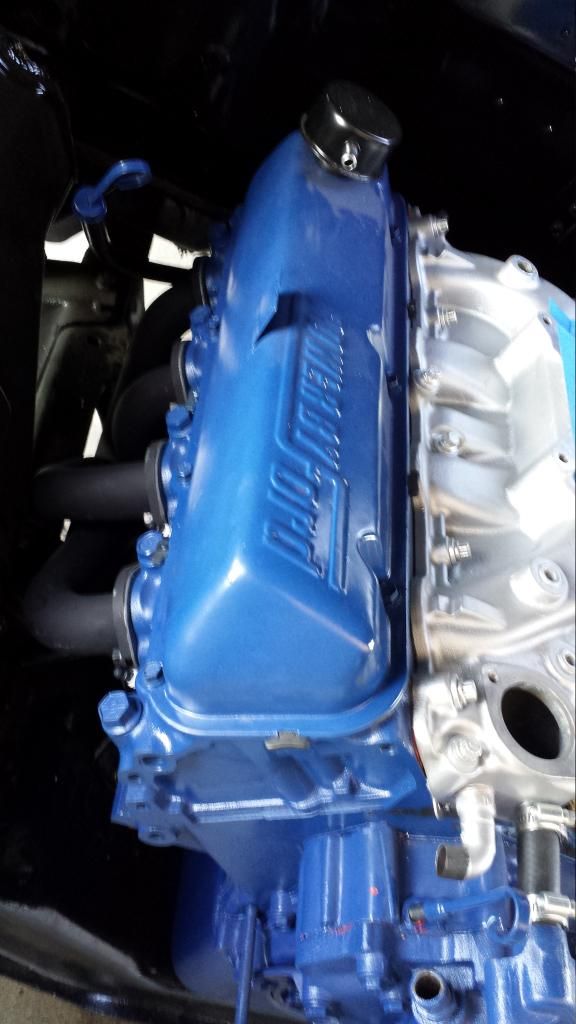
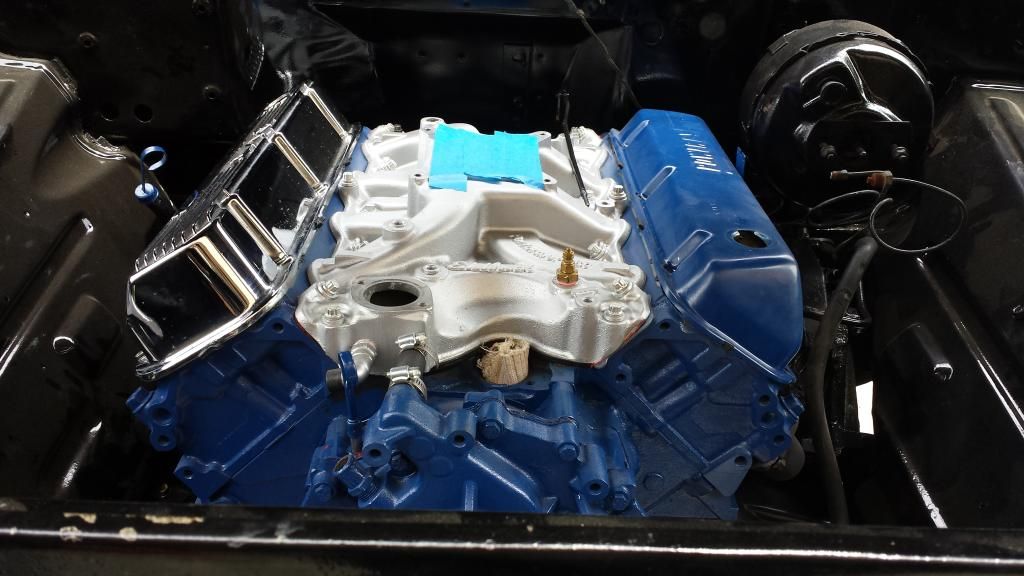
I recently scored a set of old school Mickey Thompson valve covers for the 460 as well. I have not cleaned them up yet as UPS just dropped them off and I just took them out of the box. But these are from the 70's and are no longer made (and rare). I put them over the current valve covers just to get an idea of what they would look like on the motor...
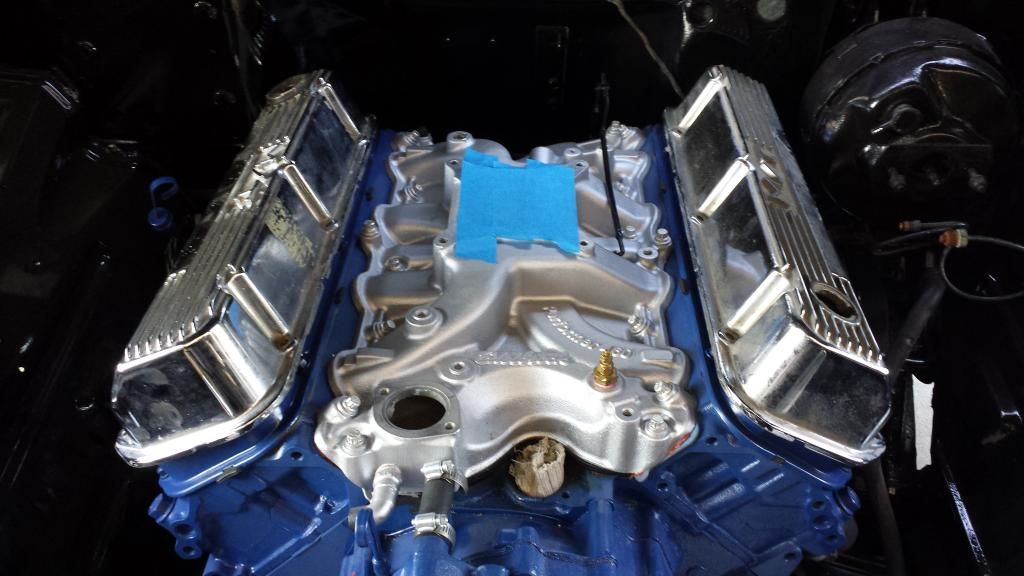
I am not sure which way to go.. I love how the stock valve covers peak in a way that the top of the valve covers are flat when on the motor. They are also PERFECT without a single dent or flaw in them. However, the Mickey Thompson valve covers are rarer and have a great look to them. They have no dents, but have some pitting and will not be completely perfect, but should clean up pretty well. I don't know which way to go. I am kinda leaning towards the MT valve covers, but would love some opinions...


I recently scored a set of old school Mickey Thompson valve covers for the 460 as well. I have not cleaned them up yet as UPS just dropped them off and I just took them out of the box. But these are from the 70's and are no longer made (and rare). I put them over the current valve covers just to get an idea of what they would look like on the motor...


I am not sure which way to go.. I love how the stock valve covers peak in a way that the top of the valve covers are flat when on the motor. They are also PERFECT without a single dent or flaw in them. However, the Mickey Thompson valve covers are rarer and have a great look to them. They have no dents, but have some pitting and will not be completely perfect, but should clean up pretty well. I don't know which way to go. I am kinda leaning towards the MT valve covers, but would love some opinions...
-Rich
Current toys -
69 Ford F350 Crew Cab - 460 / C6 - http://i253.photobucket.com/albums/hh67 ... lqgskp.jpg
31 Ford Vicky - 1955 270 Red Ram Hemi / 4 speed - http://i253.photobucket.com/albums/hh67 ... bsibvn.jpg
Former toys -
67 Pontiac Firebird 400 convertible (sold 9/13) - http://i253.photobucket.com/albums/hh67 ... bird-1.jpg
67 Ford Fairlane GT - 390 / 4 speed (sold 7/15) - http://i253.photobucket.com/albums/hh67 ... c5hu8z.jpg
Current toys -
69 Ford F350 Crew Cab - 460 / C6 - http://i253.photobucket.com/albums/hh67 ... lqgskp.jpg
31 Ford Vicky - 1955 270 Red Ram Hemi / 4 speed - http://i253.photobucket.com/albums/hh67 ... bsibvn.jpg
Former toys -
67 Pontiac Firebird 400 convertible (sold 9/13) - http://i253.photobucket.com/albums/hh67 ... bird-1.jpg
67 Ford Fairlane GT - 390 / 4 speed (sold 7/15) - http://i253.photobucket.com/albums/hh67 ... c5hu8z.jpg
-
BobbyFord

- 100% FORDified!
- Posts: 5383
- Joined: Sun Feb 04, 2007 9:52 am
- Location: Chatsworth, California
Re: Calf's 69 Crew build, and CNM67's 67 shorty build
Nice!!! Looks like some serious progress.
Sweet job on the Easy-Up
Sweet job on the Easy-Up
-
67mann

- 100% FORDified!
- Posts: 1706
- Joined: Thu Feb 07, 2008 7:19 am
- Location: NY..Mt.Morris 3rdgen. homestead
Re: Calf's 69 Crew build, and CNM67's 67 shorty build
I've had enough and I'm not alone
http://s267.photobucket.com/albums/ii304/67mann/
http://s267.photobucket.com/albums/ii304/67mann/
-
Calfdemon
- 100% FORDified!
- Posts: 2672
- Joined: Tue May 25, 2010 11:31 pm
- Location: California, Santa Clarita
Re: Calf's 69 Crew build, and CNM67's 67 shorty build
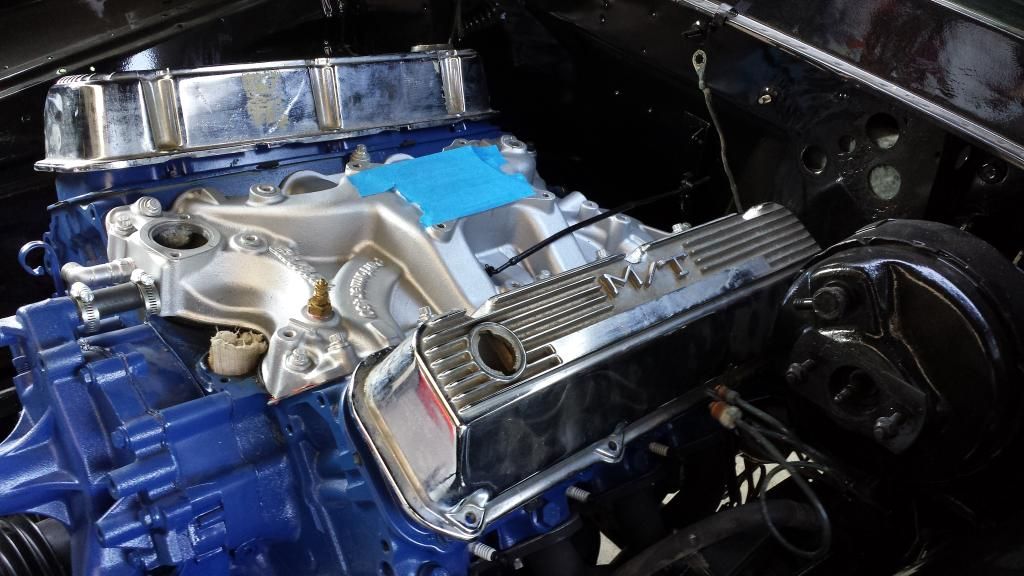
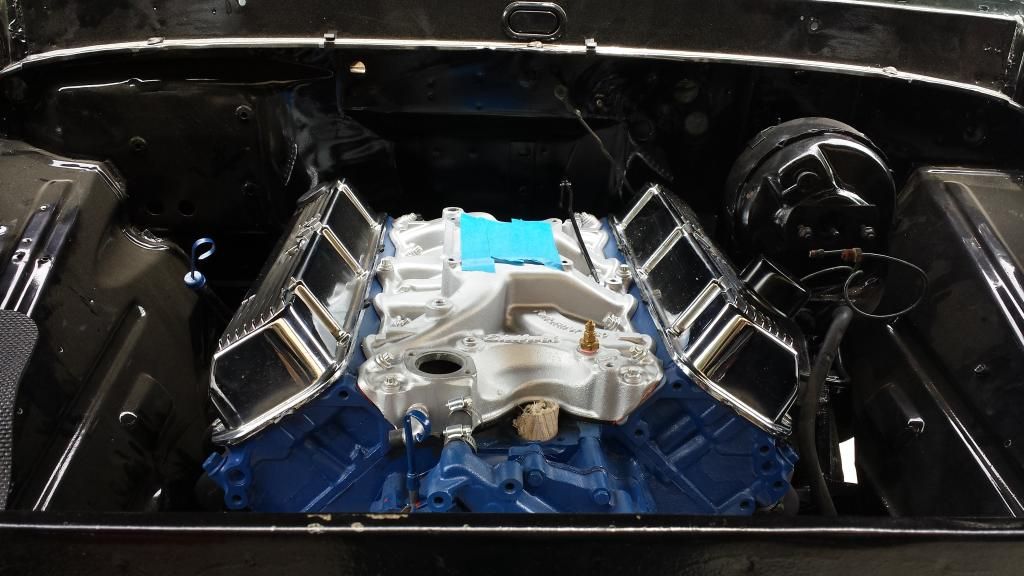
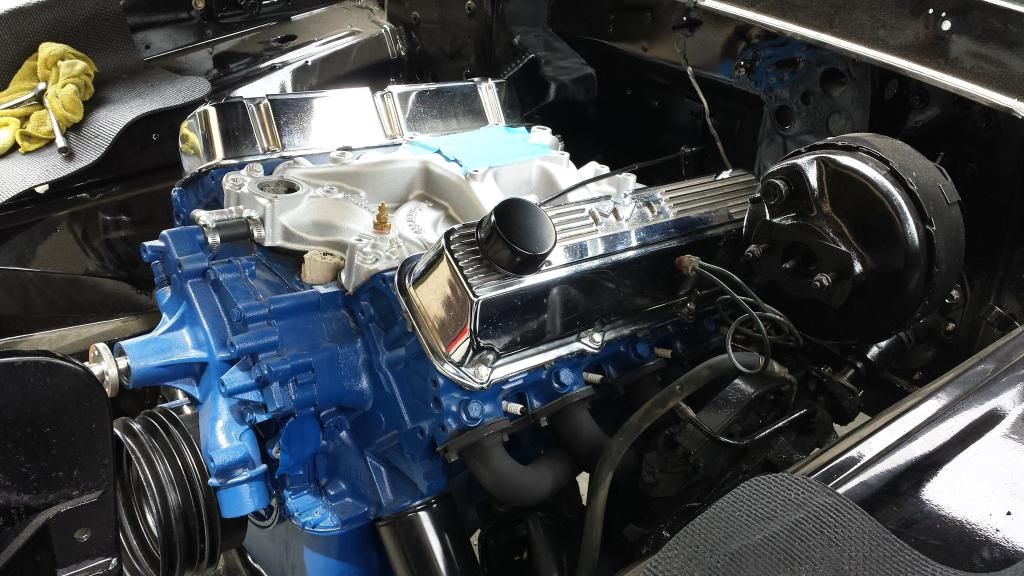
Thanks for the vote 67mann, but I had been leaning towards the MT's... I went out today and got another set of 460 gaskets and decided to put one valve cover on to help me decide...
After seeing it actually installed right next to the stock valve cover, it sold me... I went ahead and put them on and am very happy with them. I am going to keep the stock covers in case I ever want to change it up (they have brand new gaskets on them too), but right now, the MT's won out...
As for everything else, I am on the verge of doing the heating/AC and then the wiring... Just need to get that push to get started and a second set of hands for the heating/AC. The wife was in the hospital for a week with double pneumonia and is now on bed rest, so she can't help me. And CNM67 is in the process of apartment hunting and getting ready to move due to his new job position, so his days off are full as well. Eventually I will get this stuff done, but only so much I can do alone.
Its pretty cool though because there really is not that much left to do. If I had a weeks vacation and a second person, I would be done with this truck in a week. But pretty much doing everything by myself with a few hours after work each day, and a day here and there on the weekends, I dunno... I hope to have it done by the end of September. That is my goal...

After seeing it actually installed right next to the stock valve cover, it sold me... I went ahead and put them on and am very happy with them. I am going to keep the stock covers in case I ever want to change it up (they have brand new gaskets on them too), but right now, the MT's won out...


As for everything else, I am on the verge of doing the heating/AC and then the wiring... Just need to get that push to get started and a second set of hands for the heating/AC. The wife was in the hospital for a week with double pneumonia and is now on bed rest, so she can't help me. And CNM67 is in the process of apartment hunting and getting ready to move due to his new job position, so his days off are full as well. Eventually I will get this stuff done, but only so much I can do alone.
Its pretty cool though because there really is not that much left to do. If I had a weeks vacation and a second person, I would be done with this truck in a week. But pretty much doing everything by myself with a few hours after work each day, and a day here and there on the weekends, I dunno... I hope to have it done by the end of September. That is my goal...
-Rich
Current toys -
69 Ford F350 Crew Cab - 460 / C6 - http://i253.photobucket.com/albums/hh67 ... lqgskp.jpg
31 Ford Vicky - 1955 270 Red Ram Hemi / 4 speed - http://i253.photobucket.com/albums/hh67 ... bsibvn.jpg
Former toys -
67 Pontiac Firebird 400 convertible (sold 9/13) - http://i253.photobucket.com/albums/hh67 ... bird-1.jpg
67 Ford Fairlane GT - 390 / 4 speed (sold 7/15) - http://i253.photobucket.com/albums/hh67 ... c5hu8z.jpg
Current toys -
69 Ford F350 Crew Cab - 460 / C6 - http://i253.photobucket.com/albums/hh67 ... lqgskp.jpg
31 Ford Vicky - 1955 270 Red Ram Hemi / 4 speed - http://i253.photobucket.com/albums/hh67 ... bsibvn.jpg
Former toys -
67 Pontiac Firebird 400 convertible (sold 9/13) - http://i253.photobucket.com/albums/hh67 ... bird-1.jpg
67 Ford Fairlane GT - 390 / 4 speed (sold 7/15) - http://i253.photobucket.com/albums/hh67 ... c5hu8z.jpg
-
Calfdemon
- 100% FORDified!
- Posts: 2672
- Joined: Tue May 25, 2010 11:31 pm
- Location: California, Santa Clarita
Re: Calf's 69 Crew build, and CNM67's 67 shorty build
I started messing with the heat/AC last night, but did not get very far as a second person is needed on the other side of the firewall. So test fitted a few things and drilled a few holes, but that was about it.
Today, I am alone again, so figured I would get my front windshield set up and ready for install... Pulled out my rubber and trim and cleaned/polished all of the trim prior to install. Now I have heard from others here that getting the trim back on is a serious pain in the rear, but figured I had about 7 straight hours today with nothing else to do so why not... I read from someone here that had done it before that you need to put the trim in the gasket first, and then put the gasket on the window while trying to keep the trim in the rubber.
I am here to tell you that whoever said that lied... That is absolutely IMPOSSIBLE!! The rubber is hard enough to get on the window without any trim involved, but there is absolutely no way to get the rubber on the window with the trim already on it. So after a wasted hour trying that stupid idea, I took all of the trim out of the rubber and put the rubber on the window. I then started working on the trim. Now I was able to get the first piece of trim (lower drivers side) in the gasket after about an hour of work and have it completely seated. So I know it is possible to do it this way. However, I worked on the 2nd piece of trim (lower passenger side) for about 4 hours and still only have it halfway on. I had it all the way on once, but the gasket slipped partially off the windshield when moving it and when that happened, it popped the trim back out.
Anyway, I have given up for the moment due to back, knee, and finger pain. Oh, and the fact that I wanted to smash the windshield on more than one occasion. I am pretty sure it will go a bit easier with a second person. The problem is that while doing it alone, pressure needs to be held in certain places while I work other areas. And unfortunately, I am unable to hold 3 or 4 places at the same time which causes things to pop and slide off while I try and work other areas.
Anyway, the people that said the windshield trim is a nightmare were not exaggerating. It is probably one of the most frustrating jobs I have undertaken so far on this truck. I will give it another go when I have some help, but if it does not go any easier, then I will be ordering a standard windshield rubber and selling this one with the trim for dirt cheap...
-Rich
Current toys -
69 Ford F350 Crew Cab - 460 / C6 - http://i253.photobucket.com/albums/hh67 ... lqgskp.jpg
31 Ford Vicky - 1955 270 Red Ram Hemi / 4 speed - http://i253.photobucket.com/albums/hh67 ... bsibvn.jpg
Former toys -
67 Pontiac Firebird 400 convertible (sold 9/13) - http://i253.photobucket.com/albums/hh67 ... bird-1.jpg
67 Ford Fairlane GT - 390 / 4 speed (sold 7/15) - http://i253.photobucket.com/albums/hh67 ... c5hu8z.jpg
Current toys -
69 Ford F350 Crew Cab - 460 / C6 - http://i253.photobucket.com/albums/hh67 ... lqgskp.jpg
31 Ford Vicky - 1955 270 Red Ram Hemi / 4 speed - http://i253.photobucket.com/albums/hh67 ... bsibvn.jpg
Former toys -
67 Pontiac Firebird 400 convertible (sold 9/13) - http://i253.photobucket.com/albums/hh67 ... bird-1.jpg
67 Ford Fairlane GT - 390 / 4 speed (sold 7/15) - http://i253.photobucket.com/albums/hh67 ... c5hu8z.jpg
-
Calfdemon
- 100% FORDified!
- Posts: 2672
- Joined: Tue May 25, 2010 11:31 pm
- Location: California, Santa Clarita
Re: Calf's 69 Crew build, and CNM67's 67 shorty build
The front windshield is still on "time-out" and I have just been looking at it in disgust as I walk by it in the garage. In the meantime, I have been tackling my Classic Air Perfect Fit Heat and AC system. I originally was going to do some of the installation modifications that Guhfluh did in his install thread, such as using 90 degree elbows and routing the heater hose through the firewall at the stock location. However, when I tried this with my new ABS firewall pad in place, I just do not have the room to do it with my setup and the heater hoses kept crimping and would not go through the firewall that way. I also was going to use another cowl vent upside down on the passenger side instead of the block-off they provide, however, I could not figure out how to route everything and still make it functional. And since I routed the heater hoses the way they recommend, I just went with a follow the instructions install. I have to say that everything fit perfectly for my truck. The ONLY spot where I had to make a modification is where the top tube leaves the condenser. The system is setup for a standard radiator. I have the super cooler and the radiator support for the super cooler radiators has support beams that go all the way to the top. This is where the exit tube is supposed to travel. So I had to drill some holes in the radiator support so the line could route. Easy enough... Anyway, here are some pictures. Not done as I am waiting to acquire a few interior parts so I can assemble the rest of the system. But I have the main unit in place and have everything under the hood done! 
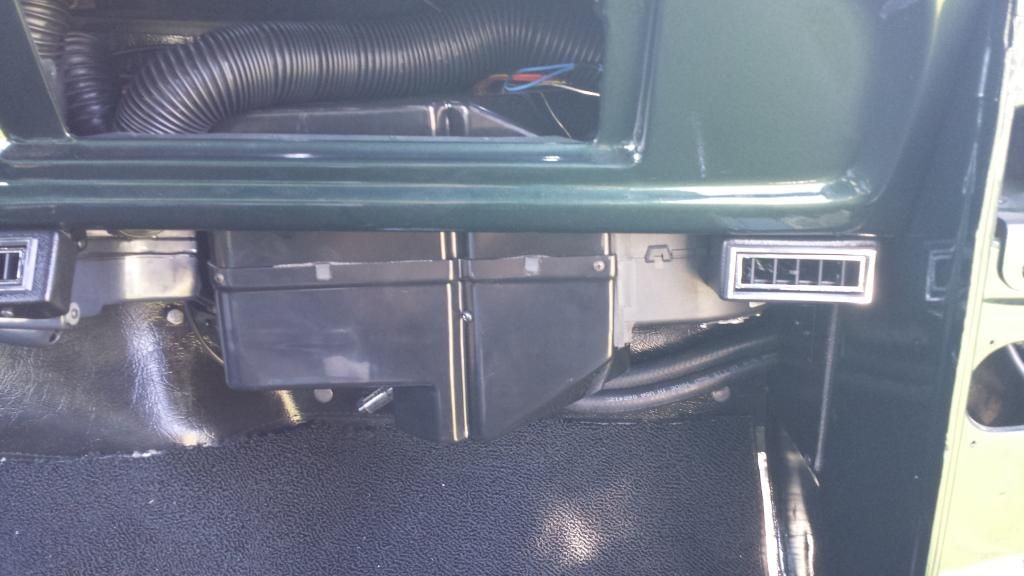
Have the unit installed under the dash:
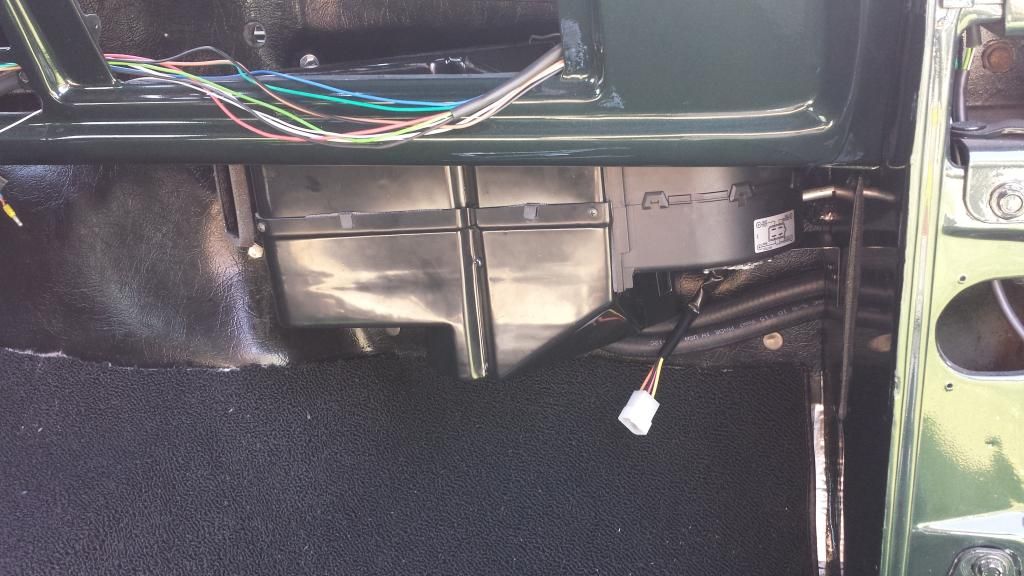
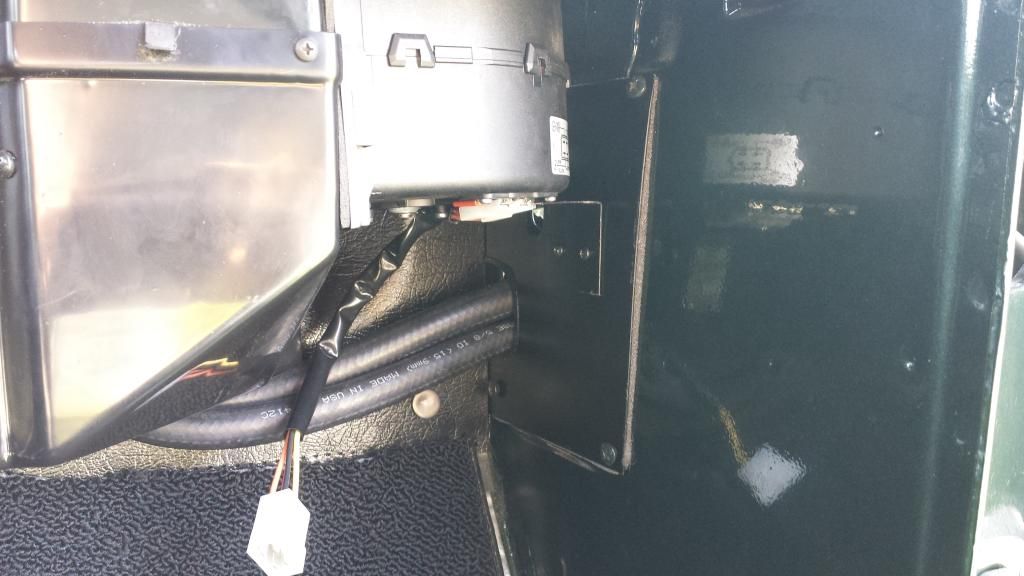
Here is where the 2 AC lines and the 2 heater hoses travel through the passenger side cowl. The supplied block-off is in place and fits a lot better that Guhfluh's did...
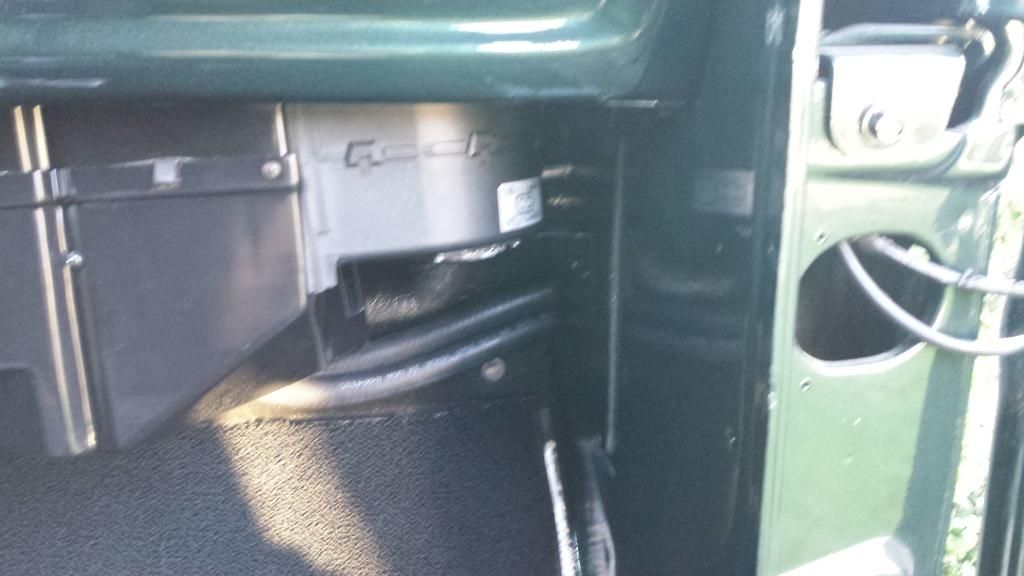
Here is where they come out of the vent area into the wheelwell, and then travel into the engine compartment through the inner fender. I have my fender off so the install was easier to accomplish:
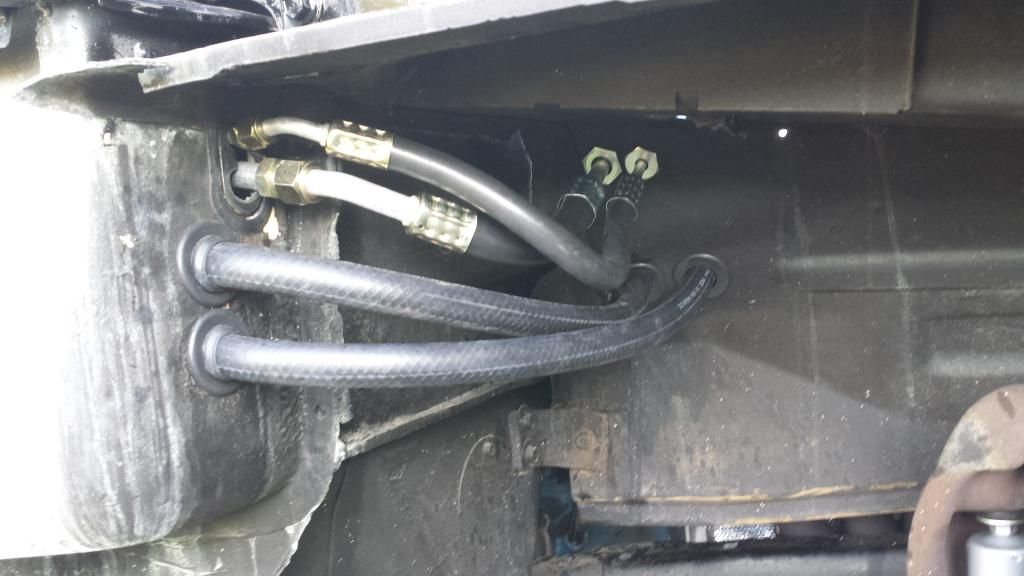
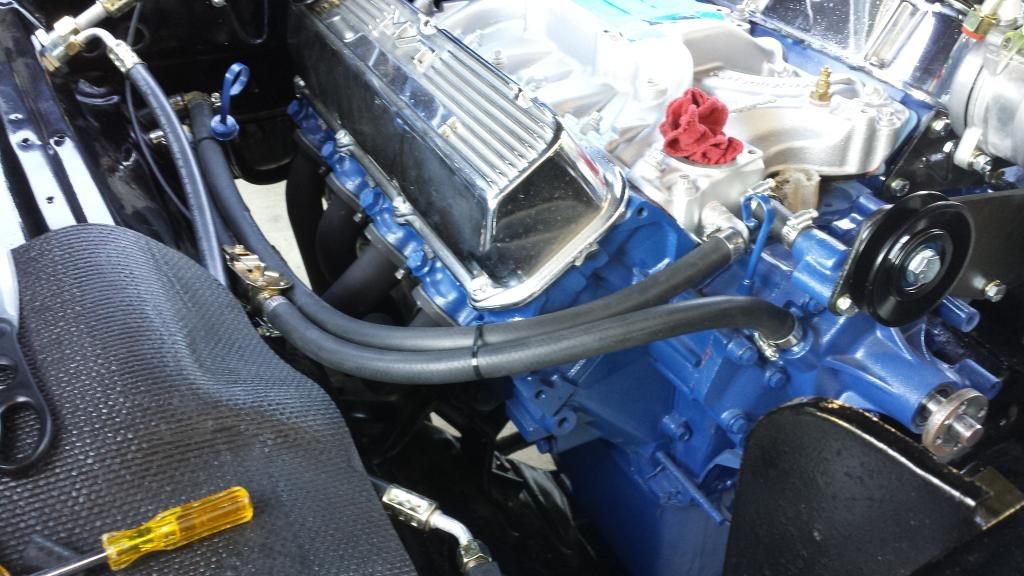
Here is where they enter the engine compartment. I have not done my heater hoses yet and will using 90 degree elbows to bring them forward to the water pump and manifold. Right now, they just end in the engine bay. The larger AC line travels behind the motor and will be secured up high on the firewall to keep it away from the motor. The smaller line travels forward toward the front of the bay:
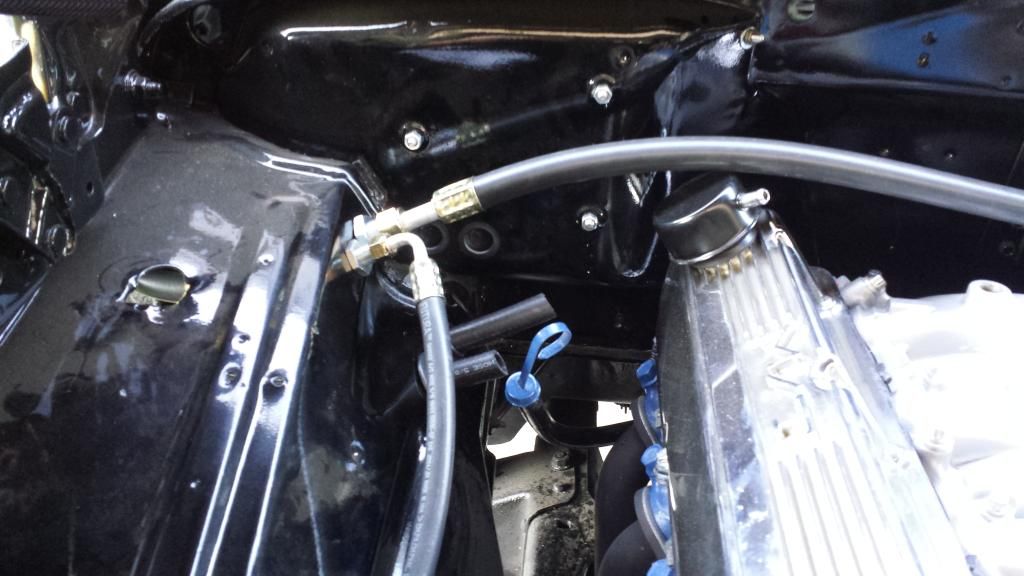
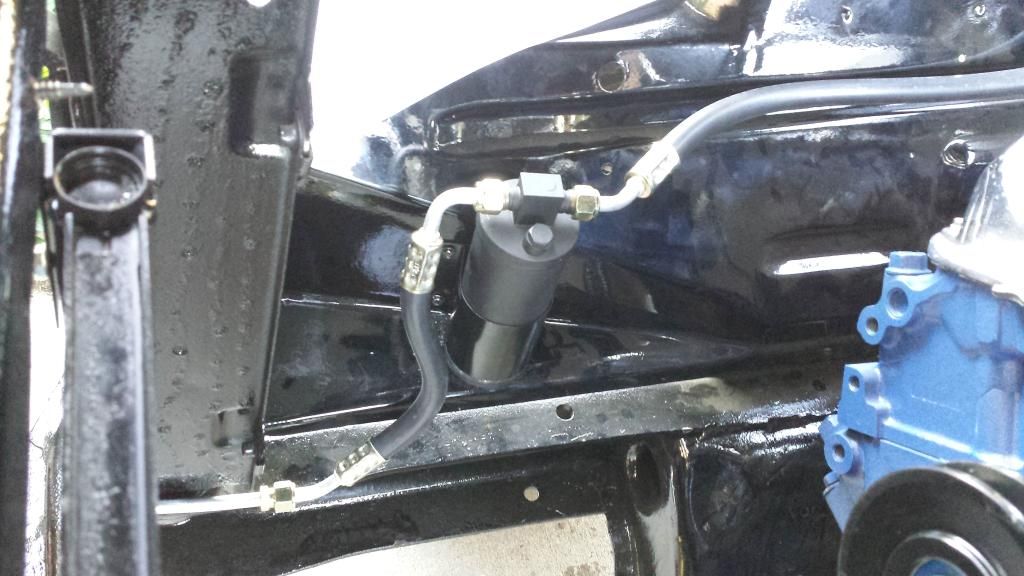
Here is where the smaller AC line travels forward to the dryer, which is mounted on the inner fender. It then continues forward to a long metal line that runs under the condenser to the drivers side where it enters the bottom of the condenser.
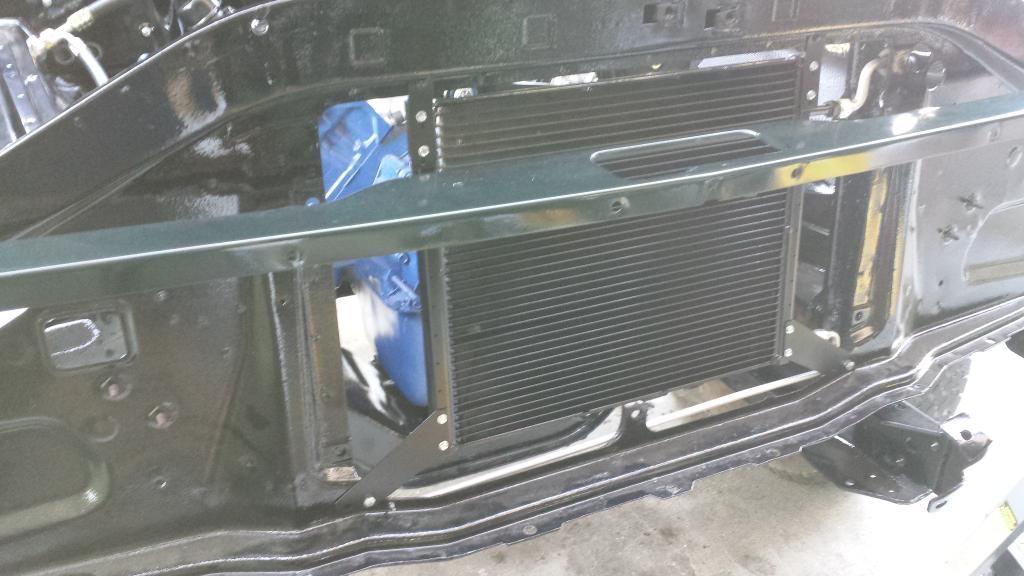
Here is the condenser installed on the radiator support. The radiator drops in right behind it very close. Down at the bottom you can see the aluminum line that runs from the drivers side to the passenger side and then curls back to connect to the condenser. The exit is at the top and I had to drill a hole in the support to pass the line through to the other side. On a regular radiator support, the vertical support beam only goes halfway up the radiator support, so that is not an issue except in the super cooler supports.
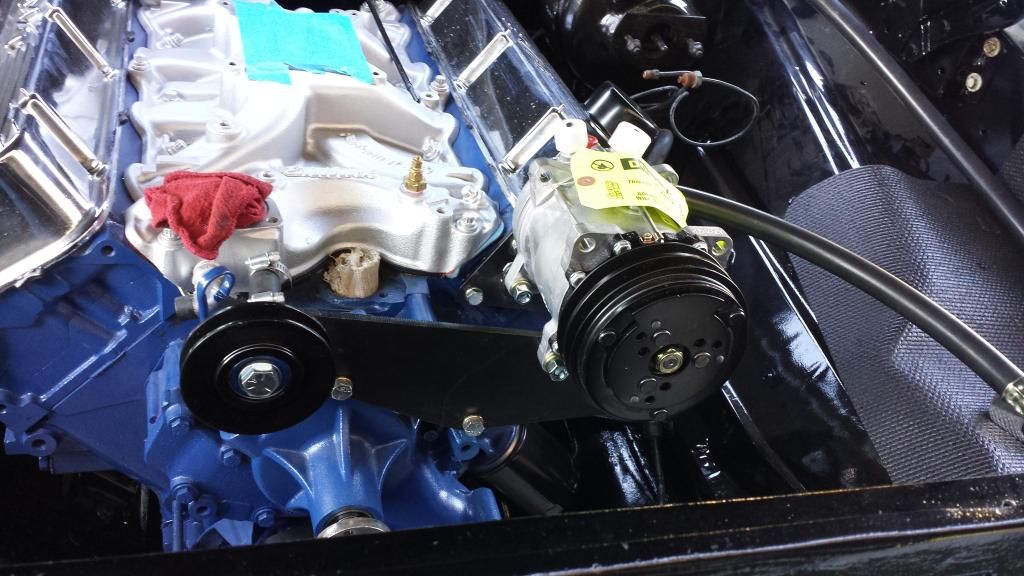
Here is the other side of the radiator support where the line comes out and then connects to the hose that goes to the compressor. The hose is just sitting near the compressor right now as the compressor connections are the only 2 AC connections I still have to do. I did not do these right now as I plan to take the compressor back out while I button up some more of the engine bay. I have it in there for mock up purposes only right now. Thats also why I didn't bother to take the warning tag off the compressor either..
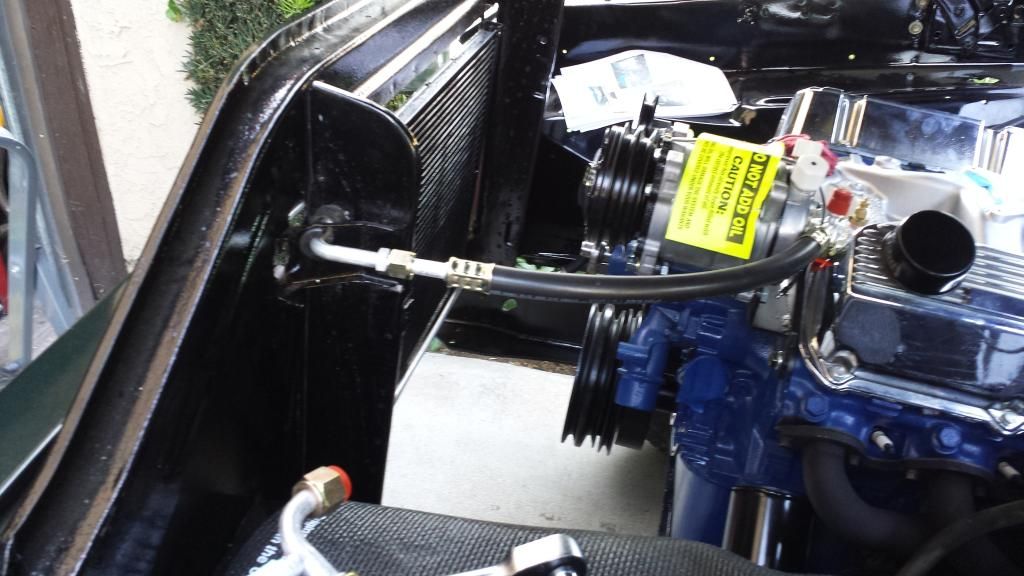
The mount supplied for the 460 motor lined up perfectly as did the idle and compressor to the 3rd groove on my pulley system. Everything in this kit fit perfectly on my truck.
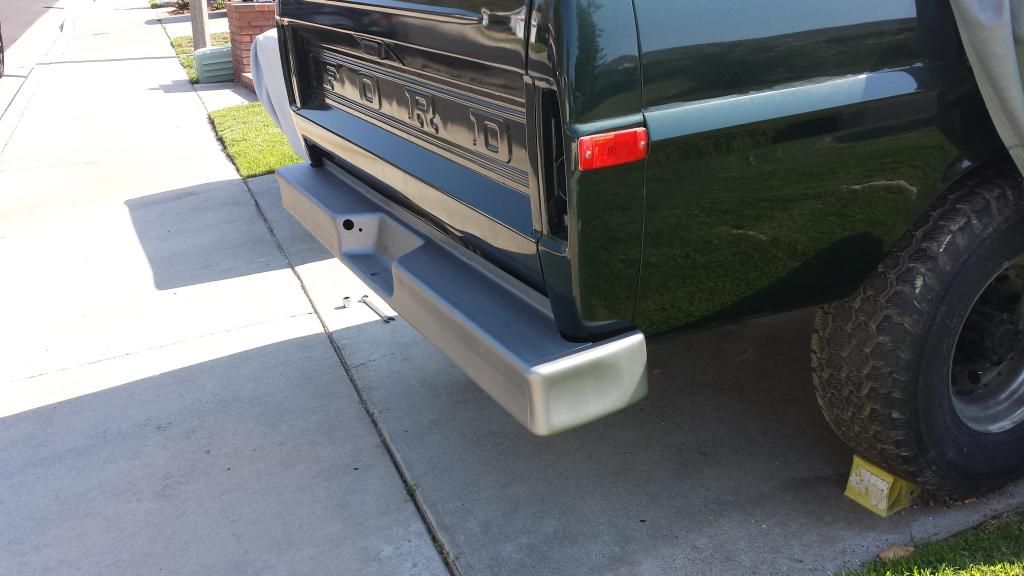
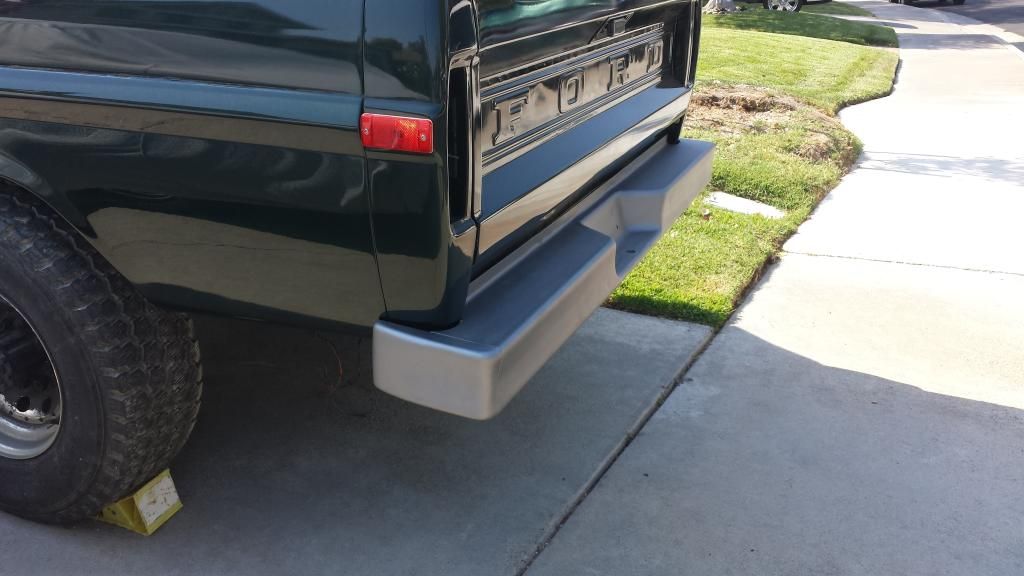
Once I get the other components I need for the inside, I will finish up the interior of the system and get more pictures up. The other minor thing that got done is I got my rear bumper painted and installed... Love this old school bumper.
Thats it for now. I am so happy with the Classic Air system and how it went into my truck. It was one of the things I was worried about as I am completely inexperienced with HVAC stuff, but it was designed for the complete amateur and went in really easy. I had 3 lines that were not pre-crimped as they were designed for me to cut to the length I needed. So when I mocked the whole system up, I marked and cut those 3 lines, and then drove to a local AC shop and he crimped the lines for me. Easy stuff...
Have the unit installed under the dash:

Here is where the 2 AC lines and the 2 heater hoses travel through the passenger side cowl. The supplied block-off is in place and fits a lot better that Guhfluh's did...


Here is where they come out of the vent area into the wheelwell, and then travel into the engine compartment through the inner fender. I have my fender off so the install was easier to accomplish:

Here is where they enter the engine compartment. I have not done my heater hoses yet and will using 90 degree elbows to bring them forward to the water pump and manifold. Right now, they just end in the engine bay. The larger AC line travels behind the motor and will be secured up high on the firewall to keep it away from the motor. The smaller line travels forward toward the front of the bay:

Here is where the smaller AC line travels forward to the dryer, which is mounted on the inner fender. It then continues forward to a long metal line that runs under the condenser to the drivers side where it enters the bottom of the condenser.

Here is the condenser installed on the radiator support. The radiator drops in right behind it very close. Down at the bottom you can see the aluminum line that runs from the drivers side to the passenger side and then curls back to connect to the condenser. The exit is at the top and I had to drill a hole in the support to pass the line through to the other side. On a regular radiator support, the vertical support beam only goes halfway up the radiator support, so that is not an issue except in the super cooler supports.

Here is the other side of the radiator support where the line comes out and then connects to the hose that goes to the compressor. The hose is just sitting near the compressor right now as the compressor connections are the only 2 AC connections I still have to do. I did not do these right now as I plan to take the compressor back out while I button up some more of the engine bay. I have it in there for mock up purposes only right now. Thats also why I didn't bother to take the warning tag off the compressor either..

The mount supplied for the 460 motor lined up perfectly as did the idle and compressor to the 3rd groove on my pulley system. Everything in this kit fit perfectly on my truck.

Once I get the other components I need for the inside, I will finish up the interior of the system and get more pictures up. The other minor thing that got done is I got my rear bumper painted and installed... Love this old school bumper.


Thats it for now. I am so happy with the Classic Air system and how it went into my truck. It was one of the things I was worried about as I am completely inexperienced with HVAC stuff, but it was designed for the complete amateur and went in really easy. I had 3 lines that were not pre-crimped as they were designed for me to cut to the length I needed. So when I mocked the whole system up, I marked and cut those 3 lines, and then drove to a local AC shop and he crimped the lines for me. Easy stuff...
-Rich
Current toys -
69 Ford F350 Crew Cab - 460 / C6 - http://i253.photobucket.com/albums/hh67 ... lqgskp.jpg
31 Ford Vicky - 1955 270 Red Ram Hemi / 4 speed - http://i253.photobucket.com/albums/hh67 ... bsibvn.jpg
Former toys -
67 Pontiac Firebird 400 convertible (sold 9/13) - http://i253.photobucket.com/albums/hh67 ... bird-1.jpg
67 Ford Fairlane GT - 390 / 4 speed (sold 7/15) - http://i253.photobucket.com/albums/hh67 ... c5hu8z.jpg
Current toys -
69 Ford F350 Crew Cab - 460 / C6 - http://i253.photobucket.com/albums/hh67 ... lqgskp.jpg
31 Ford Vicky - 1955 270 Red Ram Hemi / 4 speed - http://i253.photobucket.com/albums/hh67 ... bsibvn.jpg
Former toys -
67 Pontiac Firebird 400 convertible (sold 9/13) - http://i253.photobucket.com/albums/hh67 ... bird-1.jpg
67 Ford Fairlane GT - 390 / 4 speed (sold 7/15) - http://i253.photobucket.com/albums/hh67 ... c5hu8z.jpg
-
lennyp
- Blue Oval Guru
- Posts: 1471
- Joined: Tue Apr 05, 2011 3:30 pm
- Location: Southeastern Massachusetts
Re: Calf's 69 Crew build, and CNM67's 67 shorty build
Looks great. Great job.
-
Calfdemon
- 100% FORDified!
- Posts: 2672
- Joined: Tue May 25, 2010 11:31 pm
- Location: California, Santa Clarita
Re: Calf's 69 Crew build, and CNM67's 67 shorty build
Thanks for the compliments. It feels good to actually see some real progress and watch my "to do" list shrink significantly. It has got me motivated and I can actually see the light at the end of the tunnel now (as long as all goes well).
I had originally planned on a complete rewire of the truck and have a new EZ 21 Wiring Kit that I bought a while back for that purpose. But after planning it out and trying to figure out how to rewire all of the Ford circuits in a GM coded kit, I have decided against it. The wiring in the 69 Crew was a hack job when I got it. But when I parted out and junked my 72, I kept the wiring harness which was nearly perfect. I have been looking it over and it is in great shape. So I am just going to rewire the truck with the 72 harness and then add a second fuse box with some relays to power all of the new items I have installed. It is going to make life a whole lot easier and with the way I am going to wire it, not much juice will be running through the old harness anyway. I am going to run the new heat and AC off the new fuse box, and with the headlight bypass harness, the power draw will be a minimum on the old wires.
Anyway, I went ahead and finished up the Heat and AC system install today. Another great thing about the Classic Air Perfect Fit system, aside from the easy install, is that it uses the factory controls, so everything still looks stock other than the added vents. The only weird thing about it that I need to get used to is that the OFF setting is actually defrost, the HEAT setting is actually floor vents, and the DEFROST setting is AC out of the 4 forward facing vents. The temperature controls still work like the original and the 4 position fan speed works as OFF, LOW, MED, HIGH. Anyway, got everything else installed, controls hooked up and adjusted, and all of the ducting run.
Here is the stock control panel and the 2 new center vents:
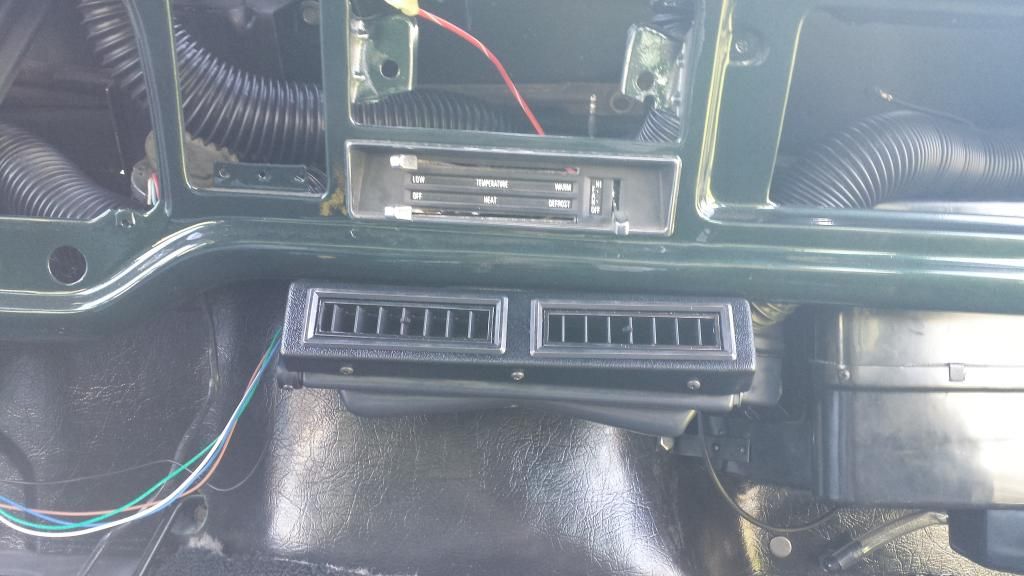
Drivers side vent:
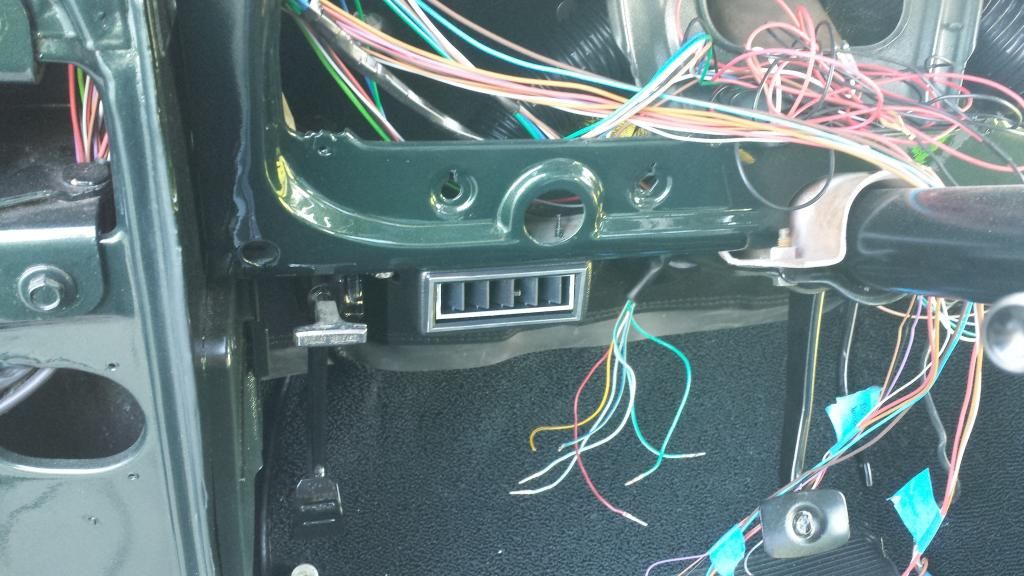
Passenger side vent:
I also installed the 90's in the heater lines and got the temperature valve installed:
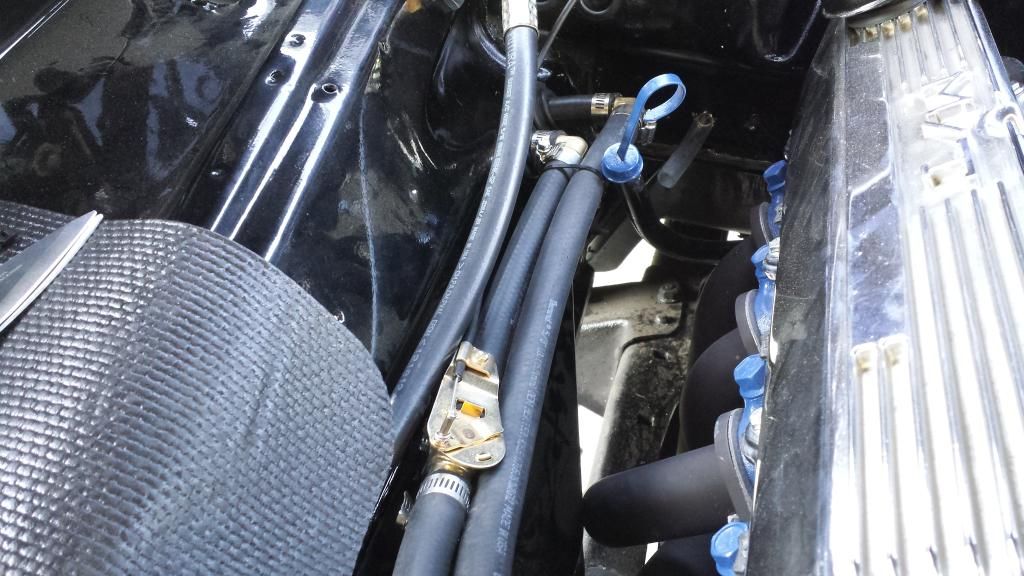
And got the lines run to the water pump and manifold:
I was going to clean up my stock power steering pump, but after looking at it, even with new paint, it looks a little worn and would just look out of place under the hood. Plus I am not sure how much life it might have left in it. So I went ahead and ordered a new PS pump, a new pressure line and new return lines, as well as a dentside era PS cooler rather than the bump era one with the little fins. Those things always seem to cut me when I am working under the hood.. Once those parts get here from NPD, then I can get the PS system installed. I need to get my 3G alternator installed and get the truck wired. After all of that, a few more things to button up under the hood and I should be breaking the cam in with open headers to the delight of my neighbors.
I had originally planned on a complete rewire of the truck and have a new EZ 21 Wiring Kit that I bought a while back for that purpose. But after planning it out and trying to figure out how to rewire all of the Ford circuits in a GM coded kit, I have decided against it. The wiring in the 69 Crew was a hack job when I got it. But when I parted out and junked my 72, I kept the wiring harness which was nearly perfect. I have been looking it over and it is in great shape. So I am just going to rewire the truck with the 72 harness and then add a second fuse box with some relays to power all of the new items I have installed. It is going to make life a whole lot easier and with the way I am going to wire it, not much juice will be running through the old harness anyway. I am going to run the new heat and AC off the new fuse box, and with the headlight bypass harness, the power draw will be a minimum on the old wires.
Anyway, I went ahead and finished up the Heat and AC system install today. Another great thing about the Classic Air Perfect Fit system, aside from the easy install, is that it uses the factory controls, so everything still looks stock other than the added vents. The only weird thing about it that I need to get used to is that the OFF setting is actually defrost, the HEAT setting is actually floor vents, and the DEFROST setting is AC out of the 4 forward facing vents. The temperature controls still work like the original and the 4 position fan speed works as OFF, LOW, MED, HIGH. Anyway, got everything else installed, controls hooked up and adjusted, and all of the ducting run.
Here is the stock control panel and the 2 new center vents:

Drivers side vent:

Passenger side vent:

I also installed the 90's in the heater lines and got the temperature valve installed:

And got the lines run to the water pump and manifold:

I was going to clean up my stock power steering pump, but after looking at it, even with new paint, it looks a little worn and would just look out of place under the hood. Plus I am not sure how much life it might have left in it. So I went ahead and ordered a new PS pump, a new pressure line and new return lines, as well as a dentside era PS cooler rather than the bump era one with the little fins. Those things always seem to cut me when I am working under the hood..
-Rich
Current toys -
69 Ford F350 Crew Cab - 460 / C6 - http://i253.photobucket.com/albums/hh67 ... lqgskp.jpg
31 Ford Vicky - 1955 270 Red Ram Hemi / 4 speed - http://i253.photobucket.com/albums/hh67 ... bsibvn.jpg
Former toys -
67 Pontiac Firebird 400 convertible (sold 9/13) - http://i253.photobucket.com/albums/hh67 ... bird-1.jpg
67 Ford Fairlane GT - 390 / 4 speed (sold 7/15) - http://i253.photobucket.com/albums/hh67 ... c5hu8z.jpg
Current toys -
69 Ford F350 Crew Cab - 460 / C6 - http://i253.photobucket.com/albums/hh67 ... lqgskp.jpg
31 Ford Vicky - 1955 270 Red Ram Hemi / 4 speed - http://i253.photobucket.com/albums/hh67 ... bsibvn.jpg
Former toys -
67 Pontiac Firebird 400 convertible (sold 9/13) - http://i253.photobucket.com/albums/hh67 ... bird-1.jpg
67 Ford Fairlane GT - 390 / 4 speed (sold 7/15) - http://i253.photobucket.com/albums/hh67 ... c5hu8z.jpg
-
Coupe5oh

- New Member

- Posts: 134
- Joined: Sun Nov 13, 2011 3:10 pm
- Location: Rolla, MO
Re: Calf's 69 Crew build, and CNM67's 67 shorty build
Looking good sir.
-1993 Cobra #121, Black/ Grey leather
-1968 Mustang GT Fastback, Gulfstream Aqua
-1967 f100 pile of parts...
-1968 Mustang GT Fastback, Gulfstream Aqua
-1967 f100 pile of parts...
-
guhfluh

- Blue Oval Fan

- Posts: 650
- Joined: Tue Mar 15, 2011 3:31 pm
- Location: Houma, LA
Re: Calf's 69 Crew build, and CNM67's 67 shorty build
It's looking good!
Let me know if you get any water leaks from the kick panel vent cover when it rains, either sitting there or driving. Mine would leak either way, but driving was much worse, as the water gets blown in.
Once I changed to a "v8" style radiator and cut my support out, the lines fit much better on mine. They are just not designed for a 6 cylinder truck, and the controls aren't designed for a 67. A 68-72 v8 truck like yours is what it's designed for, even though they advertise and will tell you different.
How tight is your drain tube sealed to the firewall? I would recommend adding a 90 down turn to the drain end to keep water from backing up the tube and into the cab while driving.
I hope to finish my install and figure out a good kickpanel vent hole cover seal before Labor Day, but I'm still stuck offshore for another week at least.
Any tips for removing and installing the headliner? Did you have to go through the front doors? Is it possible to do with the seats in the truck? I need to remove mine, clean and inspect up there, and install some sound deadening before putting it back in. I still have the factory plastic center piece, but I'm searching for a nice cheap standard cab trim piece locally, so I can add it to the center as you have.
'67 F-250 Crew 2wd 300ci, T-170/RTS/TOD 4-speed overdrive
'96 Dodge Ram ECLB CTD
'99 Dodge Neon ACR 2dr - 10.64@130 (Sold)
'05 Infinity G35 Sedan
'96 Dodge Ram ECLB CTD
'99 Dodge Neon ACR 2dr - 10.64@130 (Sold)
'05 Infinity G35 Sedan
-
Calfdemon
- 100% FORDified!
- Posts: 2672
- Joined: Tue May 25, 2010 11:31 pm
- Location: California, Santa Clarita
Re: Calf's 69 Crew build, and CNM67's 67 shorty build
guhfluh wrote:It's looking good!
Let me know if you get any water leaks from the kick panel vent cover when it rains, either sitting there or driving. Mine would leak either way, but driving was much worse, as the water gets blown in.
Once I changed to a "v8" style radiator and cut my support out, the lines fit much better on mine. They are just not designed for a 6 cylinder truck, and the controls aren't designed for a 67. A 68-72 v8 truck like yours is what it's designed for, even though they advertise and will tell you different.
How tight is your drain tube sealed to the firewall? I would recommend adding a 90 down turn to the drain end to keep water from backing up the tube and into the cab while driving.
I hope to finish my install and figure out a good kickpanel vent hole cover seal before Labor Day, but I'm still stuck offshore for another week at least.
Any tips for removing and installing the headliner? Did you have to go through the front doors? Is it possible to do with the seats in the truck? I need to remove mine, clean and inspect up there, and install some sound deadening before putting it back in. I still have the factory plastic center piece, but I'm searching for a nice cheap standard cab trim piece locally, so I can add it to the center as you have.
Living in SoCal and the lack of rain we get, it will take me forever to see if it actually leaks. But my plan is to seal the kick panel, and around the hose/tube lines where they pass through, with black (or clear) marine silicone. This way, it will have a good waterproof seal that can be cut away if I ever need to take it back apart.
And while my drain tube through the firewall is also very tight, I plan to seal it with the same marine silicone as well. The 90 in the drain tube is a good idea, and I think I am going to take it a step further and run the tube longer so that it drops the water below the frame, rather than have it drip and spray all over the truck.
As for the headliner install.... It definitely takes at least 2 people and even with 2 people, it was a pain in the butt. As for getting the headliners in and out, yeah, the front doors are how you need to do it. Not enough room in the rear doors. The rear seat installed is not an issue, and you could probably do it with the front seat installed as well, but it will be tough with the lack of room. I installed mine without the front seat in which gave us more room to move around in the cab as we fought with the headliner.
As for tips, we did the front half of the headliner first. Get ready for some sore shoulders from holding things up, but the trick is that while one person (or 2) holds the headliner up and in place, the other person installs the trim and screws. First thing you should do is install the center screw which will give the center of the headliner support and then you can hold it up on the sides. This will also help line up the other holes for you. Then you need to look at your trim and install your "under" pieces before your overlying pieces. We did one corner first and then the overlying corner next. Once that was up, it held the front half in place.
Then we installed the rear half in the same fashion. Center screw first to help hold the center and line up the holes. Then the trim, and finally the 2 corners. One thing to note is that if you are going to do the metal center trim like I did, then I would take your center plastic strip out and mock up the metal BEFORE you take your headliner out. This way you can see how it is going to hold your headliner. You also need to mark and drill the holes for your center trim in the clip rail. Easy enough. I did mine with the headliner out and got it right, but with the headliner in, you can see exactly how it is going to lay and get it centered better.
You will also see how the ends of the trim "fork" where they go under the rear corner pieces. My solution to this cosmetic issue (and screw holding issue) was to take an extra rear corner piece and cut it into 2 squares with the screw holes in each. I then used these as caps for the end of the center trim. The center trim slides under these just as they do in the rear corners, and the screw hole helps keep the screw in the end of the trim. Make these before your mock-up so you can get the end holes drilled in the right place too. I believe you will be drilling 5 holes total if I remember correctly. One in the center, one at each end, and then one in the middle of each piece of trim. Same as the rear trim above the rear window.
I can take some close up pics of the rear caps I made on the center piece if you want. Not sure if my explanation is good enough...
-Rich
Current toys -
69 Ford F350 Crew Cab - 460 / C6 - http://i253.photobucket.com/albums/hh67 ... lqgskp.jpg
31 Ford Vicky - 1955 270 Red Ram Hemi / 4 speed - http://i253.photobucket.com/albums/hh67 ... bsibvn.jpg
Former toys -
67 Pontiac Firebird 400 convertible (sold 9/13) - http://i253.photobucket.com/albums/hh67 ... bird-1.jpg
67 Ford Fairlane GT - 390 / 4 speed (sold 7/15) - http://i253.photobucket.com/albums/hh67 ... c5hu8z.jpg
Current toys -
69 Ford F350 Crew Cab - 460 / C6 - http://i253.photobucket.com/albums/hh67 ... lqgskp.jpg
31 Ford Vicky - 1955 270 Red Ram Hemi / 4 speed - http://i253.photobucket.com/albums/hh67 ... bsibvn.jpg
Former toys -
67 Pontiac Firebird 400 convertible (sold 9/13) - http://i253.photobucket.com/albums/hh67 ... bird-1.jpg
67 Ford Fairlane GT - 390 / 4 speed (sold 7/15) - http://i253.photobucket.com/albums/hh67 ... c5hu8z.jpg
-
guhfluh
- Blue Oval Fan
- Posts: 650
- Joined: Tue Mar 15, 2011 3:31 pm
- Location: Houma, LA
Re: Calf's 69 Crew build, and CNM67's 67 shorty build
I believe the explanation is pretty good, and I have a visual in my head of how you did it, combined with the photos you've taken already, but extra pictures of the end trim pieces wouldn't hurt. I was a little confused before your explanation, thinking the end trim pieces you cut and made out of the rear corners already had screw holes punched.
I may try to work with the front seat in at first, but only because things keep getting messed up the more I remove and install it. It can easily be unbolted and slid all the way back to the rear seat if needed and hopefully that will give enough room to get the pieces out of the doors. I just hate to mess up my new seat covers, door seals, threshold trim, doors, etc. that seem to get messed up every time the seat goes in and out.
I may try to work with the front seat in at first, but only because things keep getting messed up the more I remove and install it. It can easily be unbolted and slid all the way back to the rear seat if needed and hopefully that will give enough room to get the pieces out of the doors. I just hate to mess up my new seat covers, door seals, threshold trim, doors, etc. that seem to get messed up every time the seat goes in and out.
'67 F-250 Crew 2wd 300ci, T-170/RTS/TOD 4-speed overdrive
'96 Dodge Ram ECLB CTD
'99 Dodge Neon ACR 2dr - 10.64@130 (Sold)
'05 Infinity G35 Sedan
'96 Dodge Ram ECLB CTD
'99 Dodge Neon ACR 2dr - 10.64@130 (Sold)
'05 Infinity G35 Sedan